How to Create a Template in Word
This guide will show you how to create a template in Word. Creating a template in Microsoft Word can make your document creation faster and more consistent. Whether you’re making business reports, project proposals, or personal letters, a good template can save time and give all your documents a similar look. You can the template for future documents, so you can focus on writing content instead of worrying about formatting.
What are the Two Methods to Create a Template in Word?
There are two methods to create a template in Microsoft Word:
- Method 1: Saving as Template
- Method 2: Using Built-in Template
How to Create a Template in Word by Saving as Template?
Creating your own custom template in Microsoft Word is easy. Follow the below steps to learn how to create a template in Word by saving as template:
Step 1: Create a New Document
- Open a new Microsoft Word document.
- Format the document which you want to use as template by adding text, image, logo, styles, headers & footers, colors etc.
Step 2: Clean the Document (Optional)
- A template must be in such a way that it can be used for multiple times.
- So, remove the unnecessary information from the template such as filled text and any other unnecessary text, format or colors.
Step 3: Save As Word Template
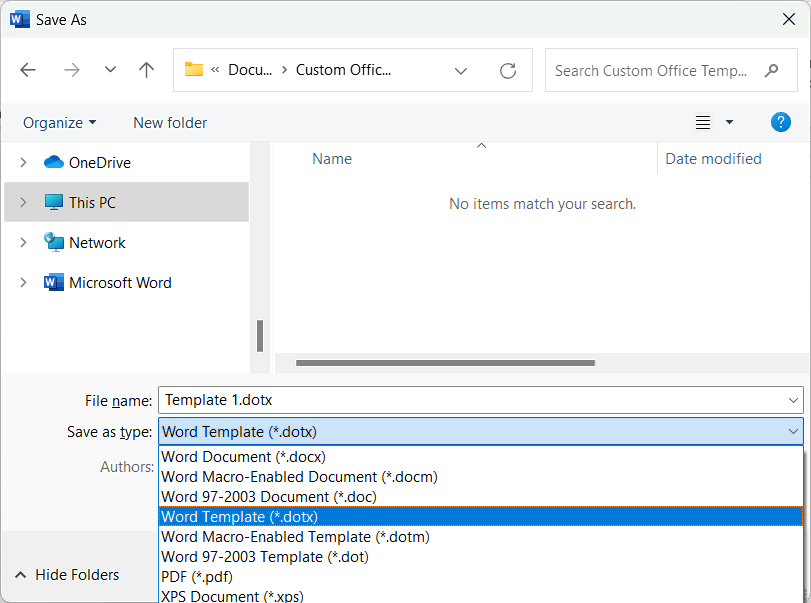
- Go to File menu and select Save As.
- Navigate to the location where you want to save the word template.
- In Save as type, select Word Template (.dotx). If you want to save as a macro template, then select Word Macro-Enabled Template (.dotm).
- In the File name field, you can provide the name of your template.
- Click Save button.
Step 4: Locate Your Templates
- The Word custom templates are typically saved in the Custom Office Templates folder.
- On Windows, it’s often at C:\Users\yourusername\Documents\Custom Office Templates.
- On macOS, find them at Users/yourusername/Library/Application Support/Microsoft/Office/User Templates.
Step 5: Use Your Template
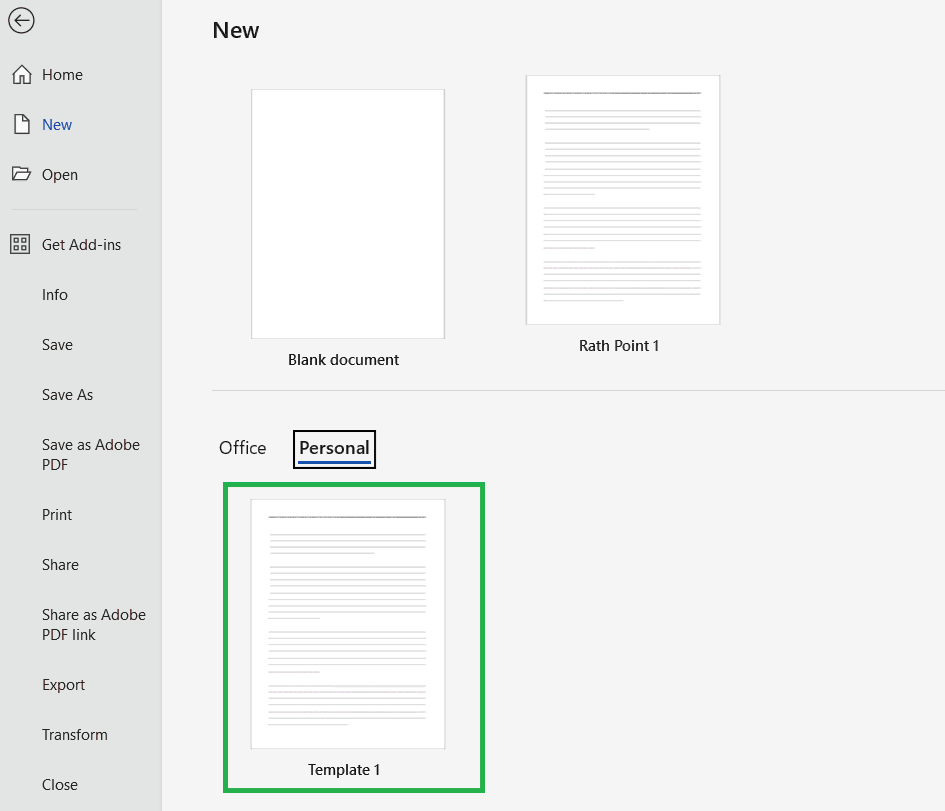
- Open Word and go to File menu and New tab.
- Look under the Personal or Custom tab to find your Word template.
Step 6: Modify and Update Template
- To edit your template, open the .dotx or .dotm file.
- Make your changes and click Save to overwrite the existing template file.
How to Create a Template in Word using Built-in Template?
Making a custom template in Microsoft Word using a built-in template is easy. Follow the below steps to learn how to create a template in Word by using the built-in template:
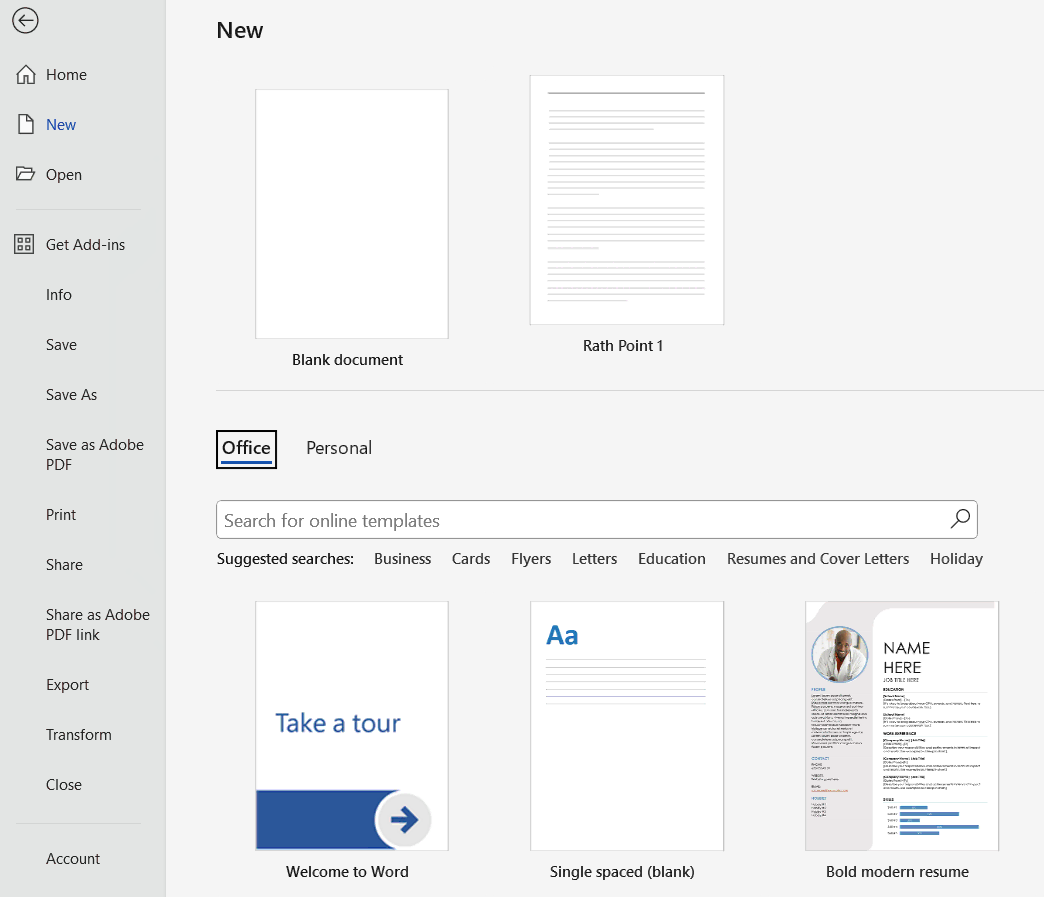
- Open Microsoft Word: Start the Microsoft Word application from your computer.
- Select a Built-in Template: Go to New tab and select a template. You can also search for online templates in Word by entering the text in search bar and then select a desired template you want to use.
- Customize the Template: Add and modify the text, fonts, colors, and layout to personalize the template based on your need.
- Save the Template: Save the custom template with a name and select the save as type as “Word Template (.dotx)”. Save the template in the default folder to make it easier to access and use it later.
How to Create a Template in Word with Fillable Fields?
Making a template in Word with fillable fields is helpful for forms, contracts, or any document that needs standard input. Follow the below steps to learn how to create a template in Word with fillable fields:
Step 1: Create or Open a Document
- Create a new document or open an existing document that you want to use as a template.
- You can also open the custom template or a built-in template in Microsoft Word.
Step 2: Add Developer Tab
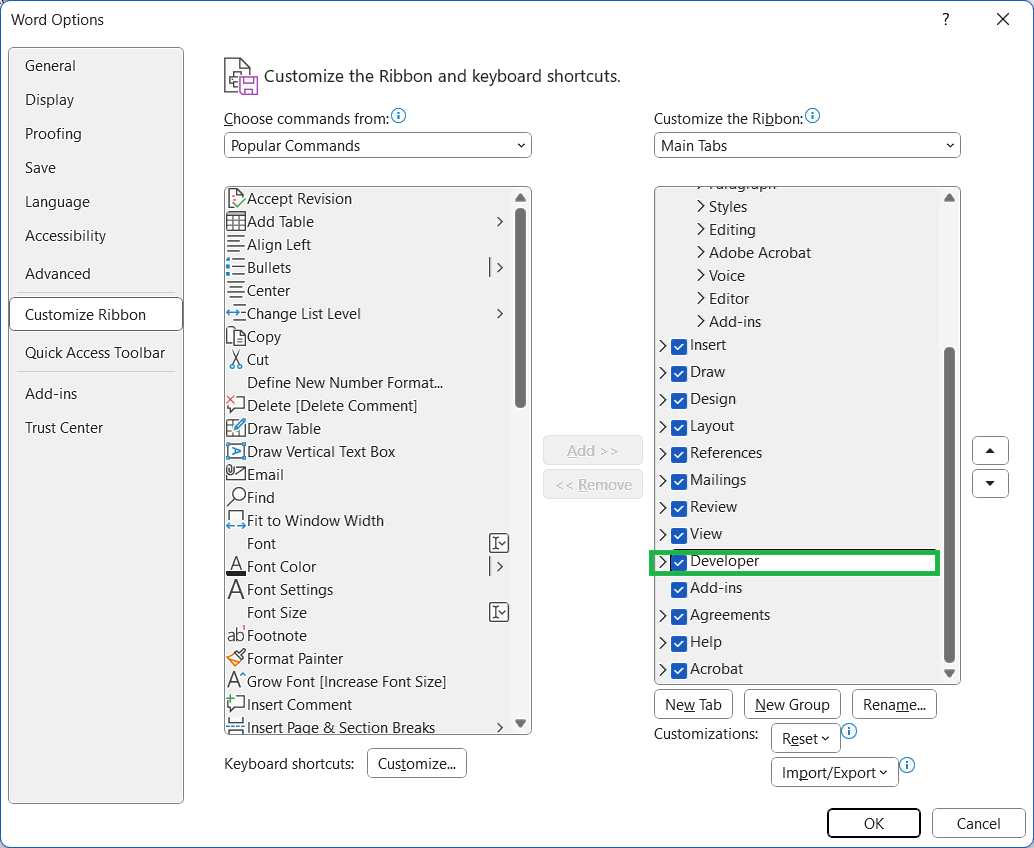
- Go to File tab > Options > Customize Ribbon.
- In the right column, check the box next to Developer and click OK.
Step 2: Add Fillable Fields
- Place your cursor where you want the fillable field.
- Go to the Developer tab > Controls group, you’ll find options for different types of fields.
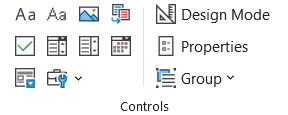
- Rich Text Content Control: Insert a rich text content control (format the text like bold or italic).
- Plain Text Content Control: Insert a plain text content control (enter the plain text only).
- Picture Content Control: Insert a picture content control (insert an image).
- Building Block Gallery Content Control: Insert a building block gallery content control.
- Check Box Content Control: Insert a check box content control (select or clear a checkbox).
- Combo Box Content Control: Insert a combo box content control (select from a specified list of options).
- Drop-Down List Content Control: Insert a drop-down list content control (combo box drop-down list).
- Date Picker Content Control: Insert a date content control (select a date from a calendar).
- Repeating Section Content Control: Insert a content control that contains other controls and repeats the contents of the control as needed.
- Legacy Tools: Insert an ActiveX control or Form control.
Step 3: Update Content Control Properties
- Click on the content control field you have added.
- In the Developer tab, click Properties in the Controls group.
- You can customize the properties based on your need or requirement.
- In Title, specify the content control name.
- In Tag, assign a tag to to identify the control.
- In Show as, you have 3 options to choose: bounding box, start/end tag, and none. By default, the Bounding Box will be selected.
- In Color, you can change the color of the control’s border.
- You can use a Style to format text typed into the empty control, such as heading 1, heading 2, title, subtitle, subtle emphasis, emphasis, intense emphasis, strong, quote, intense quote, subtle reference, intense reference and book title. By default, the Default Paragraph Font will be selected.
- Under Locking section, you can specify whether content control cannot be deleted and/or contents cannot be edited.
- You can select the option to remove content control when contents are edited. This will be disabled if you have selected the contents control cannot be deleted option under locking section.
- The content control properties will be different for each content control in Microsoft Word.
Step 4: Protect Template
- To protect go to the Developer tab > Protect group > click Restrict Editing.
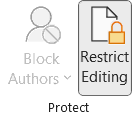
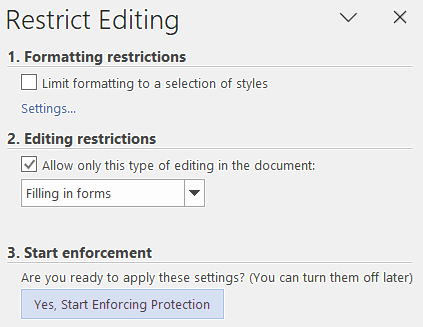
- In the Restrict Editing pane, check the box under Editing restrictions.
- Select Filling in forms from the drop-down list.
- Click Yes, Start Enforcing Protection.
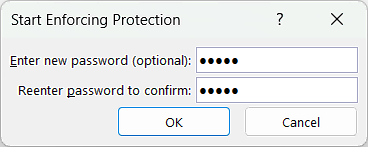
- Set a password if desired and click OK.
Step 4: Save Template
- To save the template with fillable fields, go to File menu and select Save As.
- Navigate to the location where you want to save the word template.
- In Save as type, select Word Template (.dotx).
- In the File name field, provide the name of your template.
- Click Save.
Conclusion
Creating a template in Word can make you more productive and consistent when making documents. By setting up things like fonts, styles, headers, footers, and placeholders, you can make sure all your documents look the same. This saves time and cuts down on mistakes in Microsoft Word template. The Word Templates are also flexible, so you can make changes when needed while keeping the overall look. Whether for work, school, or personal use, knowing how to create a Word template is a useful skill that can help you work faster and make better documents.
Learn More
» How to Create a Word Document?
» How to Create a Pivot Table in Excel?
» How to create Relationship in Power Pivot?
» How to Create a Table in Excel?
» How to create a Relationship between Tables in Excel?
» How to use Advanced Filter in Excel?
» How to use What-If Analysis in Excel?
» How to use Data Validation in Excel?

Word Tutorial Part 1 (Basic)
» Word Home
» Word Basics
» Word Document
» Word Template
» Word Info
» Word Password
Word Tutorial Part 2 (Format)
» Word Clipboard
» Word Font
» Word Color
» Word Alignment
» Word Border
» Word Bullets and Numbering
» Word Indents and Spacing
» Word Line and Page Breaks
Word Tutorial Part 3 (Insert)
» Word Pages
» Word Tables
» Word Illustrations
» Word Links
» Word Comments
» Word Header and Footer
» Word Text Box
» Word WordArt
» Word Quick Parts
» Word Drop Cap
» Word Date and Time
» Word Objects
» Word Equation
» Word Symbol
Word Tutorial Part 4 (Find)
» Word Find and Replace
» Word Go To
» Word Select Objects
» Word Selection Pane
Word Tutorial Part 5 (Design)
» Word Themes
» Word Watermark
» Word Page Color
» Word Page Border
Word Tutorial Part 6 (Layout)
» Word Margin
» Word Orientation
» Word Size
» Word Columns
» Word Breaks
» Word Line Numbers
» Word Hyphenation
» Word Position
» Word Wrap Text
» Word Bring Forward
» Word Send Backward
» Word Group
» Word Rotate
Word Tutorial Part 7 (References)
» Word Table of Contents
» Word Footnotes
» Word Citation and Bibliography
» Word Captions
» Word Index
» Word Table of Authorities
Word Tutorial Part 8 (Mailings)
» Word Envelopes
» Word Labels
» Word Start Mail Merge
» Word Write and Insert Fields
» Word Preview Results
» Word Finish and Merge
Word Tutorial Part 9 (Review)
» Word Editor
» Word Spelling and Grammer
» Word Thesaurus
» Word Count
» Word Read Aloud
» Word Check Accessibility
» Word Translate
» Word Language
» Word Comments
» Word Share
» Word Track Changes
» Word Compare
» Word Ink
Word Tutorial Part 10 (View)
» Word Views
» Word Immersive
» Word Show
» Word Zoom
» Word Window
» Word Macros
» Word Properties
Word Tutorial Part 11 (Other)
» Word Add-ins
» Word Shortcuts

0 Comments