How many Workbook Views in Excel
In this tutorial page, you will learn how many Workbook Views in Excel step by step. The Workbook Views in Excel are tools that allow you to customize how you view and interact with your worksheet. These views are particularly useful when reviewing data, preparing for printing, or managing multiple worksheets.
What are the different Types of Workbook Views in Excel?
The Microsoft Excel offers four main Workbook Views that you can switch between to adjust how you interact with your workbook. These views are:
- Normal View,
- Page Break Preview,
- Page Layout View, and
- Custom Views.
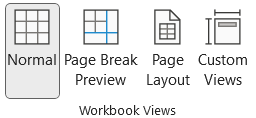
Let’s understand all these Workbook Views in detail one by one.
Normal View
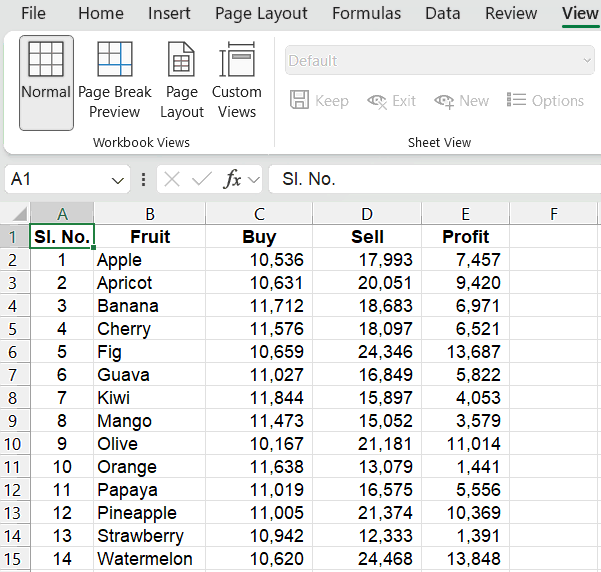
The Normal View is the default view that Excel opens when you start a new workbook. It presents the worksheet as a simple grid of rows and columns. This view is optimized for entering and editing data.
What are the Features of Normal View in Excel?
- It does not display page breaks, margins, or headers and footers.
- Best suited for tasks like data entry, formula creation, and formatting.
How to Change to Normal View in Excel?
Go to the View tab in the Ribbon and select Normal under Workbook Views or use the status bar at the bottom-right corner of Excel.
Page Break Preview
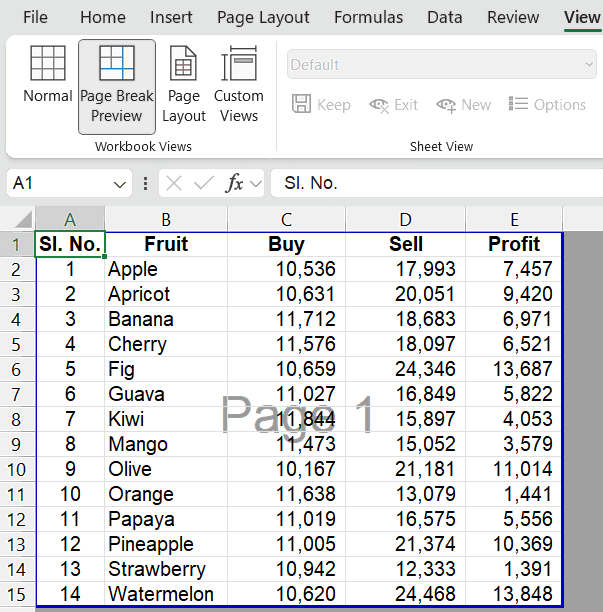
This Page Break view focuses on showing where the pages will break when printing, allowing you to see and adjust how much content fits on each page.
What are the Features of Page Break View in Excel?
- Page breaks are shown as bold blue lines (dashed for automatic breaks and solid for manual ones).
- It allows you to drag and adjust the page breaks manually to control what is printed on each page.
- It controls the printed output when your worksheet spans multiple pages.
- This preview ensures specific rows or columns appear together on the same page.
- The unused space outside the printable area is greyed out for clarity.
How to Change to Page Break View in Excel?
- Go to the View tab and select Page Break Preview under the Workbook Views, or
- Click the Page Break Preview icon on the status bar at the bottom-right corner of Excel.
Page Layout View
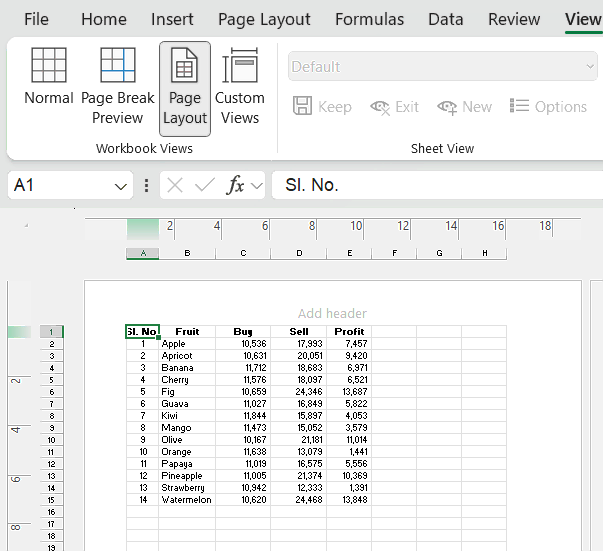
The Page Layout view shows how the worksheet will appear when printed. It provides a realistic preview of the printed document, including margins, headers, footers, and the physical spacing on the page.
What are the Features of Page Layout View in Excel?
- The Page Layout view displays rulers along the top and left sides of the worksheet to help with alignment.
- In this view you can directly add or edit headers and footers within this view.
- This view shows the content within the page’s printable area.
- The Page Layout view is helpful when you need to fine-tune the layout of your worksheet for printing and ensures proper alignment or space for professional look.
How to Change to Page Layout View in Excel?
- Go to the View tab and select Page Layout under the Workbook Views, or
- Click the Page Layout icon on the status bar at the bottom-right corner of Excel.
Custom Views
The Custom Views allow you to create and save personalized views of your worksheet. Each view can store specific settings, such as:
- Hidden rows or columns,
- Applied filters or sorting, and
- Zoom level or window arrangement.
What are the Features of Custom Views in Excel?
- The Custom View saves time when working with large datasets or complex workbooks that require different configurations for specific tasks.
- You can switch between saved views with a single click, avoiding the need to reapply settings manually.
- The Custom View is useful when multiple users are working on the same workbook, each needing a customized view of the data.
- This view is also saving time when working on repetitive tasks requiring specific configurations.
How to Create a Custom View in Excel?
- Set up the worksheet as you want it (e.g., hide rows, apply filters etc.).
- Then go to the View tab and click Custom Views under the Workbook Views.
- In the Custom View window, click Add button.
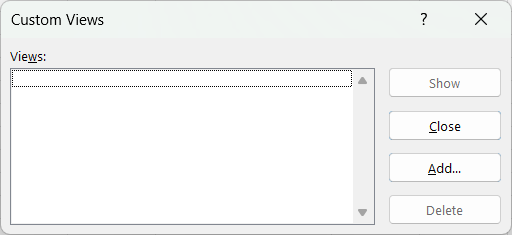
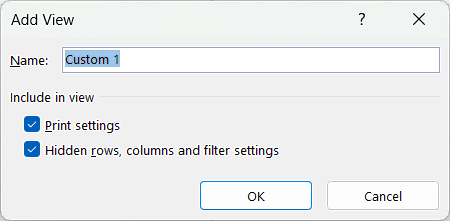
- In the Add View window, provide a Name for the view.
- Under the include in view, you have option to tick:
- Print settings
- Hidden rows, columns and filter settings
- Then click OK.
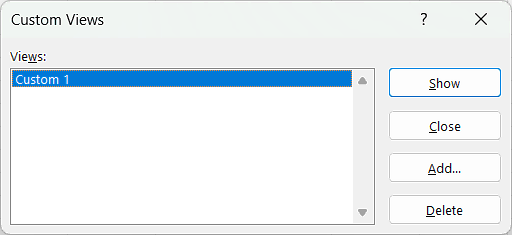
- Again, go to the View tab and select Custom View under the Workbook Views.
- Select the Custom View (e.g. Custom 1) and click the Show button.
Shortcut keys
Below are the keyboard shortcut keys to change Workbook Views in Excel:
Conclusion
The Workbook Views offer a range of tools to tailor your workspace to your specific tasks and preferences. Whether you’re analyzing data, preparing for print, or sharing with colleagues, views like Normal View, Page Layout View, Page Break Preview, and Custom Views help you manage and visualize your workbook more effectively. These features enhance productivity by giving you control over how your data is displayed and interacted with. By mastering Workbook Views, you can streamline tasks such as editing, reviewing, and presenting your work, ultimately improving your overall Excel workflow.
Learn More
» How to use Smart Lookup in Excel?
» How to Spell Check in Excel?
» How to use Selection Pane in Excel?
» How to Select all Objects in Excel?
» How to use Go To in Excel?
» How to use Find and Replace in Excel?
» How to Count Uppercase Letters in Excel?
» How to Count Lowercase Letters in Excel?
» How to create Relationship in Power Pivot?
» How to Create a Table in Excel?
» How to Create a Pivot Table in Excel?
» How to create a Relationship between Tables in Excel?
» How to use Advanced Filter in Excel?
» How to use What-If Analysis in Excel?

Excel Tutorial Part 1 (Basic)
» Excel Home
» Excel Basics
» Excel Workbook
» Excel Template
» Excel Cell
» Excel Password
Excel Tutorial Part 2 (Format)
» Excel Clipboard
» Excel Format Font
» Excel Format Alignment
» Excel Format Number
» Excel Border
» Excel Conditional Formatting
Excel Tutorial Part 3 (Data)
» Excel Sort Data
» Excel Filter Data
» Excel Text to Columns
» Excel Data Validation
» Excel Flash Fill
» Excel Remove Duplicates
» Excel Relationships
» Excel Consolidate
» Excel What-If Analysis
» Excel Group
» Excel Charts
» Excel Table
» Excel PivotTable
Excel Tutorial Part 4 (Find)
» Excel Find and Replace
» Excel Go To
» Excel Select Objects
» Excel Selection Pane
Excel Tutorial Part 5 (Review)
» Excel Spell Check
» Excel Smart Lookup
» Excel Translate
» Excel Comments & Notes
» Excel Protect
» Excel Hide Ink
Excel Tutorial Part 6 (View)
» Excel Workbook Views
» Excel Formula Bar
» Excel Zoom
» Excel Window
» Excel Macros
Excel Tutorial Part 7 (Fx)
» Excel Formulas (Category)
» Excel Formulas (Alphabetical)
» Excel Errors
» Excel Name Manager
» Excel Formula Auditing
» Excel Watch Window
» Excel Calculation Options
Excel Tutorial Part 8 (Other)
» Excel Add-ins
» Excel Shortcuts

0 Comments