How to Password Protect a Word Document
This guide will show you how to password protect a Word document. Keeping your important documents safe is very important, especially when they contain personal or sensitive information. Microsoft Word makes it easy to protect your files by letting you add a password. This means only people who know the password can open or change the document. Whether it’s a work file, a financial report, or something personal, adding a password helps keep your information private and secure.
Table of Contents:
» What Does it Mean to Password Protect a Word Document
» How to Add a Password to Open a Word Document
» How to Stop People from Editing a Word Document
» How to Remove a Password from a Word Document
» How to Mark the Document as Final (Soft Lock)
» What are the Best Practices for Keeping Word Documents Safe
» Shortcut Keys
» Conclusion
✅ What Does it Mean to Password Protect a Word Document?
When you protect a Word document with a password, you can choose:
A password to open the document (no one can read it without the password)
A password to edit the document (people can read it, but can’t change anything)
Or just mark it as “final” (people get a message saying it shouldn’t be edited)
🔐 How to Add a Password to Open a Word Document?
This is the strongest way to protect your file. No one can open it unless they know the password. There are two methods to add password in Word document:
👉 Method 1:
- Open the Word document for which you want to add password.
- Click the File tab in the top-left corner.
- Click Info on the left menu.
- Click the Protect Document button.
- Choose Encrypt with Password from the list.
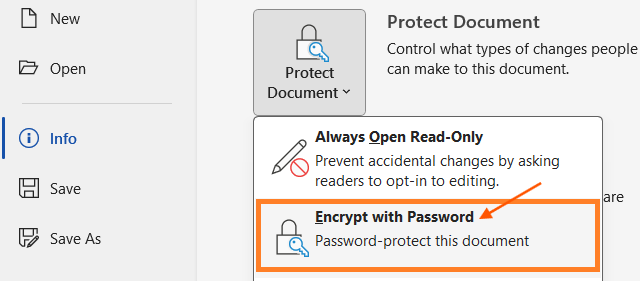
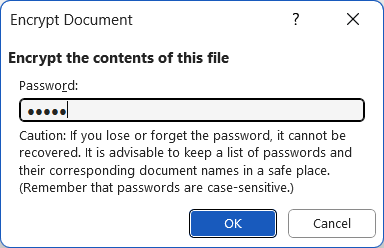
- The Encrypt Document dialog box will pop up. Type the password you want to use and click OK.
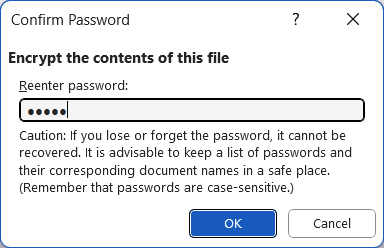
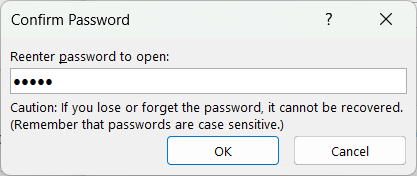
- In the Confirm Password dialog box, type the same password again to confirm and click OK.
- Then Save the document.
👉 Method 2:
- Go to File menu at the top left, navigate to Save As and click on Browse.
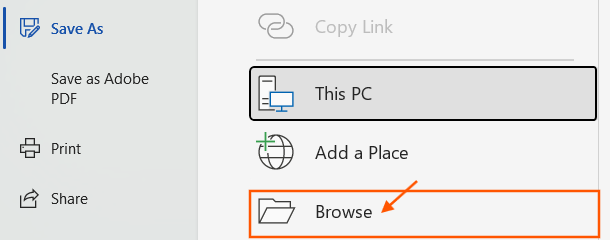
- In the Save As dialog box, browse the location where you want to save the file, update file name and select the Save as type.
- Locate the Tools menu at the bottom and click on General Options from the dropdown list.

- In the General Options dialog box, update the password to open the Word document.
- You can also update the password to modify the Word document, which is optional.

- Confirm the password by re-entering the same password to open the Word document and click OK. Click OK again to close the General Options dialog box.
- Click Save button to save the Word document with password.
✍️ How to Stop People from Editing a Word Document?
This method lets people open and read your file, but they can’t make changes unless they know the password. Follow the below steps to stop people from editing Word document:
- Open your Word document for which you want to restrict editing.
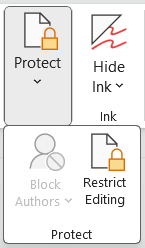
- Go to Review tab and click Restrict Editing under Protect.
- Or go to File > Info > Protect Document > Restrict Editing.
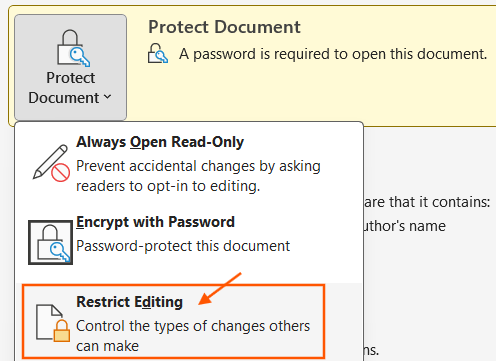
- The Restrict Editing panel will appear on the right.
- Check the box that says: Allow only this type of editing in the document.
- Choose No changes (Read only) from the drop-down list.
- Click Yes, Start Enforcing Protection.

- Enter new password to start enforcing protection.
- Re-enter password to confirm and click OK.
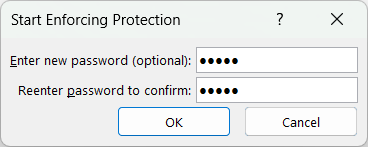
- Save the word document to restrict editing without password.
🔓 How to Remove a Password from a Word Document?
If you no longer need the password, you can remove it.
To Remove a Password to Open:
- Open the Word document using the current password.
- Go to File > Info > Protect Document > Encrypt with Password.
- Delete the password in the box and click OK.
- Save the Word file.
To Remove Editing Restrictions:
- Open the document in Microsoft Word.
- Go to Review tab and click Restrict Editing under Protect.
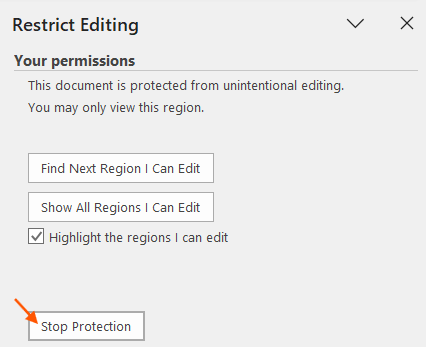
- At the bottom of the panel, click Stop Protection.
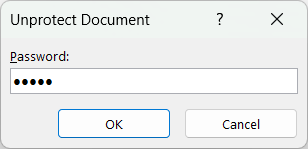
- In Unprotect Document dialog box, enter the password.
- Save the Word document.
🛅 How to Mark the Document as Final (Soft Lock)?
If you don’t want to use a password but just want to let others know not to edit the file, you can mark it as final. Follow the below steps to make the Word document as final:
- Go to File tab > Info > Protect Document.
- Choose Mark as Final.

- You will get the dialog box showing: “This document will be marked as final and then saved”.
- Click OK and save Word document.
- People can still edit it if they really want to, but it acts like a warning.

💡 What are the Best Practices for Keeping Word Documents Safe?
Follow the below key practices for keeping your Word document safe:
🔑 Use Strong Passwords
Add the passwords that are challenging for others to guess by incorporating a mix of letters, numbers, and special characters.
🧩 Update Passwords
It’s advisable to regularly update your passwords as a security measure to minimize the risk of unauthorized individuals gaining access to your accounts.
🔐 Limited Access
It’s advisable to provide passwords solely to trusted individuals who require access to the data. Avoid sharing passwords through insecure channels such as email.
🧾 Password Backup
Ensure the passwords are stored securely using a reputable password manager or another reliable system. Forgetting the password to a Word file may result in the loss of valuable data.
⚠️ Caution
Although password protection adds security to a Word document, it’s not foolproof. You should combine it with other security measures such as file encryption and secure storage practices to maximize the protection.
💻 Shortcut Keys
🎯 Conclusion
Protecting your Word documents with a password is a smart way to keep your content private and secure. Whether you are sharing files with others or simply storing them on your device, a password helps prevent unauthorized access or unwanted edits. With just a few clicks, you can add a strong layer of security that keeps your work safe from prying eyes. It’s an easy step that can make a big difference in protecting your important information.
Learn More
» How to Create a Word Document?
» How to Create a Pivot Table in Excel?
» How to create Relationship in Power Pivot?
» How to Create a Table in Excel?
» How to create a Relationship between Tables in Excel?
» How to use Advanced Filter in Excel?
» How to use What-If Analysis in Excel?
» How to use Data Validation in Excel?
Word Tutorial Part 1 (Basic)
» Word Home
» Word Basics
» Word Document
» Word Template
» Word Properties
» Word Password
Word Tutorial Part 2 (Format)
» Word Clipboard
» Word Font
» Word Color
» Word Alignment
» Word Border
» Word Bullets and Numbering
» Word Indents and Spacing
» Word Line and Page Breaks
Word Tutorial Part 3 (Insert)
» Word Pages
» Word Tables
» Word Illustrations
» Word Links
» Word Comments
» Word Header and Footer
» Word Text Box
» Word WordArt
» Word Quick Parts
» Word Drop Cap
» Word Date and Time
» Word Objects
» Word Equation
» Word Symbol
Word Tutorial Part 4 (Find)
» Word Find and Replace
» Word Go To
» Word Select Objects
» Word Selection Pane
Word Tutorial Part 5 (Design)
» Word Themes
» Word Watermark
» Word Page Color
» Word Page Border
Word Tutorial Part 6 (Layout)
» Word Margin
» Word Orientation
» Word Size
» Word Columns
» Word Breaks
» Word Line Numbers
» Word Hyphenation
» Word Position
» Word Wrap Text
» Word Bring Forward
» Word Send Backward
» Word Group
» Word Rotate
Word Tutorial Part 7 (References)
» Word Table of Contents
» Word Footnotes
» Word Citation and Bibliography
» Word Captions
» Word Index
» Word Table of Authorities
Word Tutorial Part 8 (Mailings)
» Word Envelopes
» Word Labels
» Word Start Mail Merge
» Word Write and Insert Fields
» Word Preview Results
» Word Finish and Merge
Word Tutorial Part 9 (Review)
» Word Editor
» Word Spelling and Grammer
» Word Thesaurus
» Word Count
» Word Read Aloud
» Word Check Accessibility
» Word Translate
» Word Language
» Word Comments
» Word Share
» Word Track Changes
» Word Compare
» Word Ink
Word Tutorial Part 10 (View)
» Word Views
» Word Immersive
» Word Show
» Word Zoom
» Word Window
» Word Macros
» Word Properties
Word Tutorial Part 11 (Other)
» Word Add-ins
» Word Shortcuts

0 Comments