How to use Excel Clipboard
The Microsoft Excel Clipboard lets you to copy and paste up to 24 different items. The Excel Clipboard is like a temporary holding area where you can store data temporarily when you want to move it from one place to another in your Excel file, or even between different Excel files. In Excel Clipboard task pane doesn’t just remember the last item you copied or cut. It actually stores multiple images and text that you’ve copied or cut recently.
Learning how to use the Excel Clipboard well can make it much easier and faster to work with big sets of data or complicated spreadsheets.
What is Excel Clipboard?
The Excel Clipboard is a place on your computer where you can temporarily store the data and later paste it. When you use the Excel Clipboard task pane, you can see more than just the last thing you copied or cut. It keeps track of lots of text and images you copied or cut recently.
You can cut, copy, and paste by clicking on buttons in the Excel Clipboard area. You can also use the keyboard shortcut keys (Cut: Ctrl + X, Copy: Ctrl + C, and Paste: Ctrl + V) to perform the similar tasks.
How to Open Excel Clipboard?
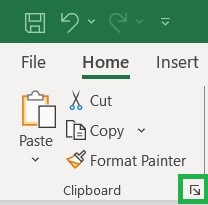
To open the Excel Clipboard task pane, go to Home tab, and then click the Clipboard dialog box launcher (highlighted in green in the below image):
How to Paste or Delete from Excel Clipboard?
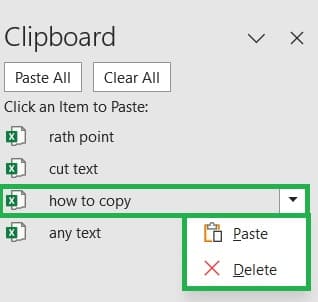
Go to the cell where you want to paste and then click the item to be pasted. You can Paste or Delete by clicking the desired option from the right hand side drop down as shown in the below image. You can also Paste All or Clear All the items at a time.
What are the Excel Clipboard Options?
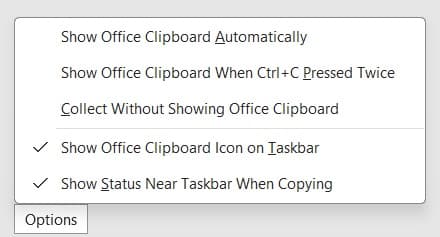
You can find the below options under Clipboard:
- Show Office Clipboard Automatically: to automatically display Excel Clipboard when copying the items.
- Show Office Clipboard When CTRL+C Pressed Twice: to automatically display the Excel Clipboard when you press CTRL+C two times.
- Collect Without Showing Office Clipboard: to automatically copy items to the Excel Clipboard without displaying the task pane.
- Show Office Clipboard Icon on Taskbar: to display the Excel Clipboard icon in the status area of the system taskbar when the Clipboard is active (turned on by default).
- Show Status Near Taskbar When Copying: to display the collected item message when copying items to the Excel Clipboard (turned on by default).
What are the Paste Options in Excel Clipboard?
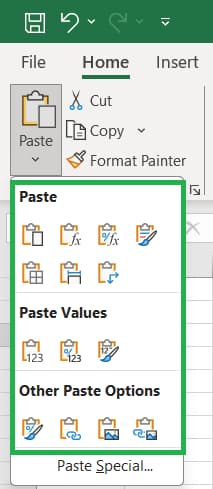
After copying any item, you will get the below Paste Options:
- Paste (P): to paste all cell contents and formatting.
- Formulas (F): to paste only the formulas.
- Formulas & Number Formatting (O): to paste only formulas and number formatting.
- Keep Source Formatting (K): to paste all cell contents and formatting.
- No Borders (B): to paste all cell contents and formatting except cell borders.
- Keep Source Column Widths (W): to paste only column widths.
- Transpose (T): to paste and change the orientation of copied cells, so the data in columns is pasted into rows and vice versa.
- Values (V): to paste only the values as displayed in the cells.
- Values & Number Formatting (A): to paste only the values and number formatting.
- Values & Source Formatting (E): to paste only the values and number color and font size formatting.
- Formatting (R): to paste all cell formatting, including number and source formatting.
- Paste Link (N): to paste the link to the original data.
- Picture (U): to paste a copy of the image.
- Linked Picture (I): to paste a copy of the image with a link to the original cells.
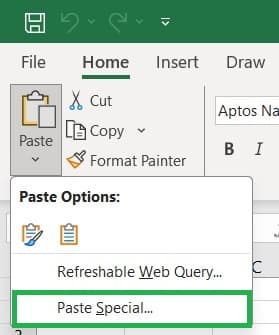
How to navigate to Paste Special in Excel Clipboard?
- Go to Clipboard section under the Home tab.
- Click the drop down arrow under Paste to find the Paste Special icon.
What are the Paste Special Options in Excel Clipboard?
In Microsoft Excel, you can find the below paste special option under Clipboard:
- All: to paste all cell contents and formatting, including linked data.
- Formulas: to paste only the formulas.
- Values: to paste only the values as displayed in the cells.
- Formats: to paste cell contents and formatting.
- Comments: to paste only comments attached to the cell.
- Validation: to paste only data validation rules.
- All using Source theme: to paste all cell contents and formatting using the theme in the source data.
- All except borders: to paste cell contents and formatting except borders.
- Column widths: to paste the width of one column(s) to another column(s).
- Formulas and number formats: to paste only formulas and number formatting.
- Values and number formats: to paste only values and number formatting options.
- All, merge conditional formats: to combine conditional formatting from the copied cells with conditional formatting.
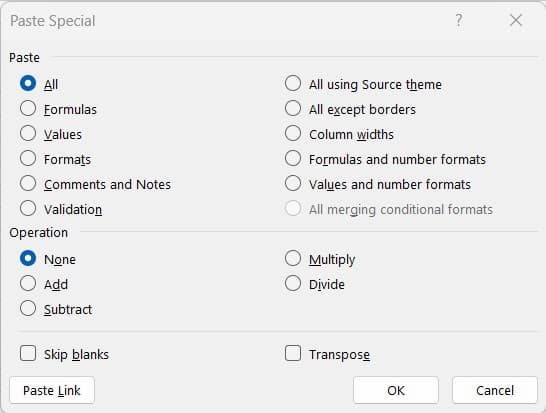
- None: to paste the contents of the copy area without any mathematical calculation.
- Add: to add the values in the copy area to the values in the paste area.
- Subtract: to subtract the values in the copy area from the values in the paste area.
- Multiply: to multiply the values in the paste area by the values in the copy area.
- Divide: to divide the values in the paste area by the values in the copy area.
- Skip Blanks: to skip values or attributes in your paste area when blank cells occur in the copy area.
- Transpose: to change orientation of copied cells when pasting.
- Paste Link: to paste the link to the source data.
How to Change Clipboard Settings in Excel?
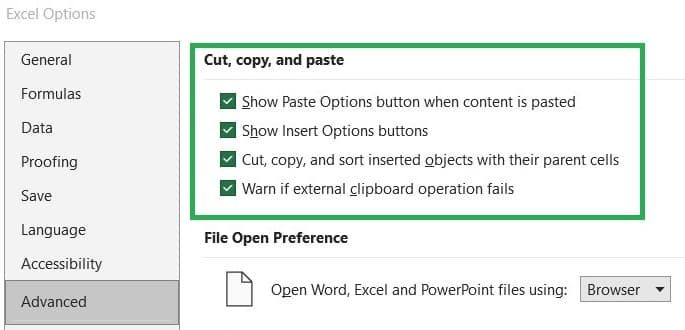
Follow the below steps to change the cut, copy, and paste setting of Excel Clipboard:
- Open Micrsoft Excel application.
- Go to File menu > Options.
- Go to the Advanced tab, scroll down to the Cut, copy, and paste section.
- By default all the below options are ticked, you can tick and untick based on your requirements:
- Show Paste Options button when content is pasted
- Show Insert Option buttons
- Cut, copy, and sort inserted objects with their parent cells
- Warn if external clipboard operation fails
- Click OK to make the changes.
How to Change Clipboard Settings in Windows?
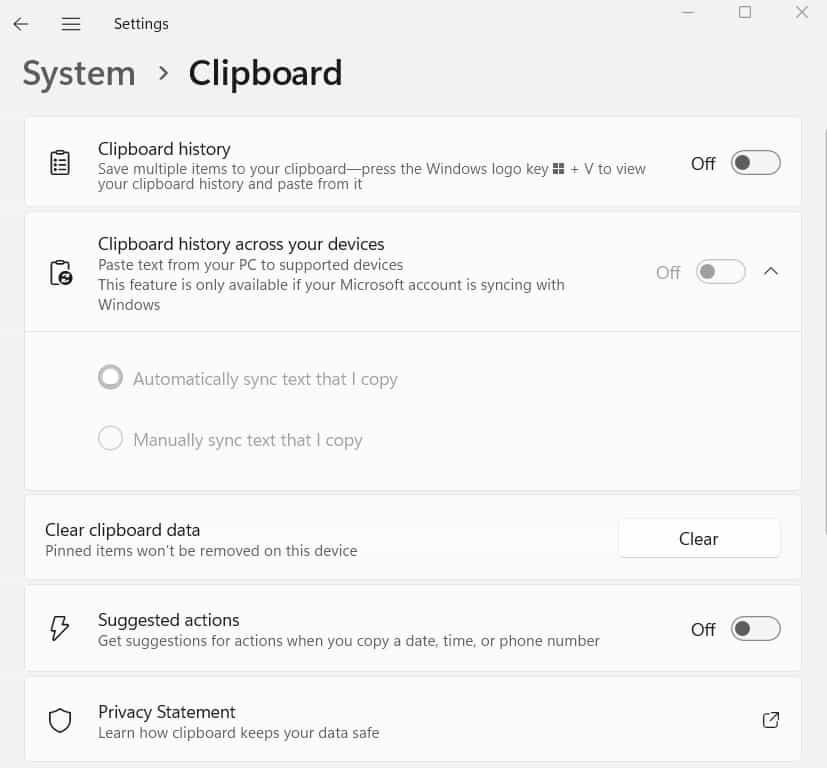
Follow the below steps to change the Clipboard settings in Windows:
- Go to Start > Settings > System > Clipboard.
- On the Clipboard History to save multiple items to your clipboard. Press Windows logo key + V to view your clipboard history and paste from it.
- On Clipboard history across your devices to paste text from your PC to supported devices. This feature is only available if your Microsoft account is syncing with Windows. You have 2 options: automatically sync text that I copy, and manually syny text that I copy.
- You can clear clipboard data, but the pinned items won’t be removed on the device.
- On the Suggested actions to get suggestions for actions when you copy a date, time, or a phone number.
- Click on the Privacy Statement to learn how clipboard keeps your data safe.
What are the Key Features of Excel Clipboard?
The key features of Excel Clipboard are:
- Cut, Copy, and Paste: You can select cells, ranges, or even entire worksheets and then cut or copy them onto the Clipboard. After that, you can paste them somewhere else in the same workbook or even in a different workbook.
- Multiple Items Storage: Unlike regular clipboards, Excel Clipboard can hold lots of items at once. This means you can cut or copy many different selections of data one after the other. Then, you can choose which one you want to paste, or even paste them all in order.
- Clipboard Pane: Excel has a special area called the Clipboard Pane where you can see all the items you’ve copied or cut. This makes it easy to pick the exact data you want to paste. You can find the Excel Clipboard Pane in the “Home” tab of the ribbon.
- Paste Special Options: Excel gives you different choices for how you paste items from the Clipboard. These include pasting just the values, formulas, formatting, and more. Using these options helps you make sure the pasted data looks and acts the way you need it to.
Conclusion
The Excel clipboard is an important tool for moving and changing data in Microsoft Excel. It lets you copy, cut, and paste things like numbers, formulas, and styles between different parts of your spreadsheet. This makes it easier to work with your data and saves time. Excel helps you stay organized, analyze information, and make presentations faster and more accurately because of its clipboard features.

Excel Tutorial Part 1 (Basic)
» Excel Home
» Excel Basics
» Excel Workbook
» Excel Template
» Excel Cell
» Excel Password
Excel Tutorial Part 2 (Format)
» Excel Clipboard
» Excel Format Font
» Excel Format Alignment
» Excel Format Number
» Excel Border
» Excel Conditional Formatting
Excel Tutorial Part 3 (Data)
» Excel Sort Data
» Excel Filter Data
» Excel Text to Columns
» Excel Data Validation
» Excel Flash Fill
» Excel Remove Duplicates
» Excel Relationships
» Excel Consolidate
» Excel What-If Analysis
» Excel Group
» Excel Charts
» Excel Table
» Excel PivotTable
Excel Tutorial Part 4 (Find)
» Excel Find and Replace
» Excel Go To
» Excel Select Objects
» Excel Selection Pane
Excel Tutorial Part 5 (Review)
» Excel Spell Check
» Excel Smart Lookup
» Excel Translate
» Excel Comments & Notes
» Excel Protect
» Excel Hide Ink
Excel Tutorial Part 6 (View)
» Excel Workbook Views
» Excel Formula Bar
» Excel Zoom
» Excel Window
» Excel Macros
Excel Tutorial Part 7 (Fx)
» Excel Formulas (Category)
» Excel Formulas (Alphabetical)
» Excel Errors
» Excel Name Manager
» Excel Formula Auditing
» Excel Watch Window
» Excel Calculation Options
Excel Tutorial Part 8 (Other)
» Excel Add-ins
» Excel Shortcuts
