Excel Format Font
The Excel format font option lets you change how text looks to make it easier to read and nicer to look at in your spreadsheets. You can pick from lots of different fonts, like classic ones or more modern ones, and adjust their size to fit your needs. You can also make text bold, italic, underlined, or strikethrough to highlight important information or make things clearer. Whether you’re working on finances, projects, or analyzing data, Excel helps you make your spreadsheets look professional and organized.
Excel Format Font Name
Changing the font in Excel can easily make your spreadsheet look better in no time. Below are the steps to format font name in Excel:
Changing the font in Excel can easily make your spreadsheet look better in no time. Below are the steps to format font name in Excel:
- Select the cells that you want to format the font name.
- Go to Home tab and click the arrow button near the font name under the Font section.
- Select the font name to use.

Excel Format Font Size
Follow the below steps to format the Excel font size:
- Select cells that you want to format the font size.
- Go to Home tab and click the arrow button near the font size.
- Select the font size to increase or decrease.

Excel Format Font Style
The user can apply any one or combination of more than one font styles in the text. Below are the 3 different types of font styles in Excel:
- Bold (B): to make the text thicker and darker for emphasis.
- Italic (I): to bend the text to the right for a stylish look.
- Underline (U): to add a line beneath the text for distinction.

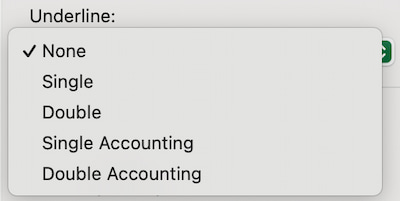
There are multiple underline options in Excel. To get those options right click on the cell and click on “Format Cells”. Then under “Font” go to “Underline” section to get all underline options: none, single, double, single accounting and double accounting.

Excel Format Font Colour
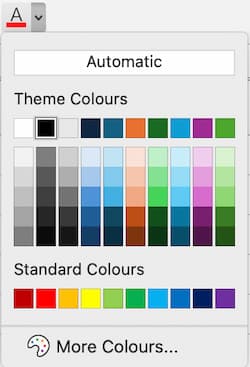
Go to Home tab and find the “Font Colour” button in the “Font” group. It usually looks like a letter “A” with a coloured bar underneath it.

Click on the down arrow button near the font colour icon to get all the colour options: automatic, theme colours, standard colours and more colours.

Excel Format Font Effects
Follow the below steps to change the font effects in Excel:
- Right click on the cell and click on “Format Cells” for which you want to change the font effects.
- Under Font go to Effects section and select strikethrough, superscript, or subscript to see the “Preview”.
- Click OK to apply the font effects.

Conclusion
Choosing the right font in Excel can make your spreadsheet look better and easier to read. Picking the right style and size can make it clearer and more professional. Whether you’re using Excel for yourself or for work, trying out different font formats can really make your documents stand out and be easier to understand.

Excel Tutorial Part 1 (Basic)
» Excel Home
» Excel Basics
» Excel Workbook
» Excel Template
» Excel Cell
» Excel Password
Excel Tutorial Part 2 (Format)
» Excel Clipboard
» Excel Format Font
» Excel Format Alignment
» Excel Format Number
» Excel Border
» Excel Conditional Formatting
Excel Tutorial Part 3 (Data)
» Excel Sort Data
» Excel Filter Data
» Excel Text to Columns
» Excel Data Validation
» Excel Flash Fill
» Excel Remove Duplicates
» Excel Relationships
» Excel Consolidate
» Excel What-If Analysis
» Excel Group
» Excel Charts
» Excel Table
» Excel PivotTable
Excel Tutorial Part 4 (Find)
» Excel Find and Replace
» Excel Go To
» Excel Select Objects
» Excel Selection Pane
Excel Tutorial Part 5 (Review)
» Excel Spell Check
» Excel Smart Lookup
» Excel Translate
» Excel Comments & Notes
» Excel Protect
» Excel Hide Ink
Excel Tutorial Part 6 (View)
» Excel Workbook Views
» Excel Formula Bar
» Excel Zoom
» Excel Window
» Excel Macros
Excel Tutorial Part 7 (Fx)
» Excel Formulas (Category)
» Excel Formulas (Alphabetical)
» Excel Errors
» Excel Name Manager
» Excel Formula Auditing
» Excel Watch Window
» Excel Calculation Options
Excel Tutorial Part 8 (Other)
» Excel Add-ins
» Excel Shortcuts

0 Comments