How to use Excel Password
The Excel password is crucial for protecting your sensitive data. The Microsoft Excel password protection feature helps the users to restrict access to their files, preventing unauthorized users from viewing, modifying, or deleting important information. In this guide, we’ll talk about why Excel password protection matters, how to add, remove or change it, and some smart tips to keep your info secure.
Why to Use Excel Password?
- Confidentiality: Implementing Excel password protection serves as a pivotal measure in safeguarding the confidentiality of the sensitive data housed within your spreadsheet. This security feature is instrumental in preserving the integrity of diverse information types, spanning financial records, personal details, and various other data categories.
- Control Access: Establishing a Excel password provides you with the authority to manage access to and alteration of your documents. This is especially crucial within collaborative settings where numerous individuals are granted entry to a shared spreadsheet.
- Compliance: Numerous industries and organizations operate under stringent regulations concerning data privacy and security. Integrating Excel password protection serves as a pivotal measure to uphold adherence to these regulatory frameworks.
How to Save an Excel File with Password?
Adding a password to your Excel file makes it more secure by protecting your private information, which helps keep it safe from unauthorized access. So, the Excel password protection is important if you want to secure the workbook. Below are the steps to save an Excel file with a password:
- Open the Excel file: Launch Microsoft Excel and open the desired file by double-clicking on it.
- Prepare the document: Ensure the document is finalized and ready for saving with any necessary updates or changes made.
- Access the ‘File’ menu: Navigate to the top-left corner of the Excel window and click on the “File” tab to access the File menu.
- Choose ‘Save As’ option: Select the “Save As” option from the File menu to initiate the saving process.
- Specify the saving location: Browse to the preferred folder where you intend to save the Excel file, allowing flexibility to choose an alternate location if required.
- Select the file format: Determine the file format for saving, opting for an Excel Workbook (*.xlsx) or any other format as needed.
- Access additional options: Within the Save As dialog box, locate the “Tools” dropdown menu located at the bottom and click on it to reveal further options.
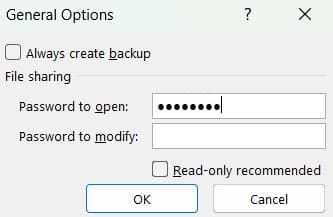
- Configure General Options: From the dropdown menu, opt for “General Options” to access the corresponding dialog box.

- Set a password to open: Within the General Options dialog box, input a password in the designated field. Ensure the chosen password is sufficiently secure and not easily guessable.

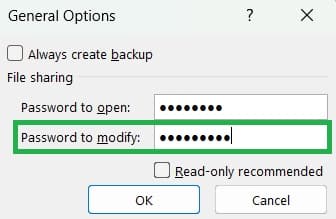
- Optionally set a modification password: If desired, establish a password for modifying the file by entering it in the second field provided.

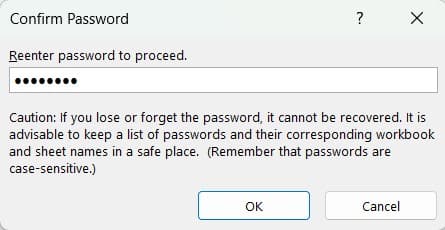
- Reenter Password to Proceed: After entering the passwords, click on the “OK” button within the General Options dialog box to confirm and apply the settings

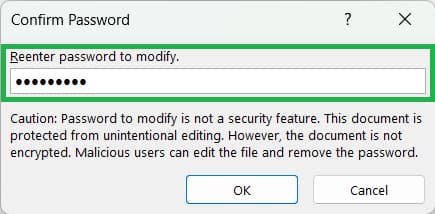
- Reenter Password to Modify: If you have updated the Excel password to modify then reenter the same to confirm and click “OK’ button to apply the settings.

- Save the file: Return to the Save As dialog box and click on the “Save” button to save the Excel file.
Upon completion, the Excel file is successfully saved with password protection. It’s imperative to securely store or remember the Excel passwords, as they are essential for accessing or modifying the file in the future.
What are the Best Practices for Excel Password?
- Use Strong Passwords: In Excel, add the passwords that are challenging for others to guess by incorporating a mix of letters, numbers, and special characters.
- Update Passwords: It’s advisable to regularly update your Excel passwords as a security measure to minimize the risk of unauthorized individuals gaining access to your accounts.
- Limited Access: It’s advisable to provide Excel passwords solely to trusted individuals who require access to the data. Avoid sharing passwords through insecure channels such as email.
- Password Backup: Ensure the Excel passwords are stored securely using a reputable password manager or another reliable system. Forgetting the password to an Excel file may result in the loss of valuable data.
- Caution: Although password protection adds security to an excel file, it’s not foolproof. You should combine it with other security measures such as file encryption and secure storage practices to maximize the protection.
How to Remove Password from an Excel file?
Removing password from an Excel file might be needed if you don’t need to passward protect the Excel file. Below are the steps to remove password from an Excel file:
- Open the Excel file: Open the Excel file from which you want to remove the password.
- Choose Save As option: Go to File menu, select “Save As” option and click “Browse” to get the “Save As” dialog box. Or press F12 shortcut key from the keyboard to get the “Save As” dialog box.
- Configure General Options: Within the Save As dialog box, locate the “Tools” dropdown menu located at the bottom and click on “General Options”.
- Remove Password: Within the General Options dialog box, remove the passwords under “Password to open” and “Password to modify” also if any. Click the “OK” button.
- Save the Excel file: Return to the “Save As” dialog box and click on the “Save” button to save the Excel file without password.
How to Change Password in an Excel file?
- Open the Excel file: Open the Excel file from which you want to chnage the password.
- Choose Save As option: Go to File menu, select “Save As” option and click “Browse” to get the “Save As” dialog box. Or press F12 shortcut key from the keyboard to get the “Save As” dialog box.
- Configure General Options: Within the Save As dialog box, locate the “Tools” dropdown menu located at the bottom and click on “General Options”.
- Change Password: Within the General Options dialog box, change the passwords under “Password to open” and “Password to modify” also if any. Reenter the passwords to confirm. Click the “OK” button.
- Save the Excel file: Return to the “Save As” dialog box and click on the “Save” button to save the Excel file with updated password.

Excel Tutorial Part 1 (Basic)
» Excel Home
» Excel Basics
» Excel Workbook
» Excel Template
» Excel Cell
» Excel Password
Excel Tutorial Part 2 (Format)
» Excel Clipboard
» Excel Format Font
» Excel Format Color
» Excel Format Alignment
» Excel Format Number
» Excel Border
» Excel Conditional Formatting
Excel Tutorial Part 3 (Data)
» Excel Sort Data
» Excel Filter Data
» Excel Text to Columns
» Excel Data Validation
» Excel Flash Fill
» Excel Remove Duplicates
» Excel Relationships
» Excel Consolidate
» Excel What-If Analysis
» Excel Group
» Excel Charts
» Excel Table
» Excel PivotTable
Excel Tutorial Part 4 (Find)
» Excel Find and Replace
» Excel Go To
» Excel Select Objects
» Excel Selection Pane
Excel Tutorial Part 5 (Review)
» Excel Spell Check
» Excel Smart Lookup
» Excel Translate
» Excel Comments & Notes
» Excel Protect
» Excel Hide Ink
Excel Tutorial Part 6 (View)
» Excel Workbook Views
» Excel Formula Bar
» Excel Zoom
» Excel Window
» Excel Macros
Excel Tutorial Part 7 (Fx)
» Excel Formulas (Category)
» Excel Formulas (Alphabetical)
» Excel Errors
» Excel Name Manager
» Excel Formula Auditing
» Excel Watch Window
» Excel Calculation Options
Excel Tutorial Part 8 (Other)
» Excel Add-ins
» Excel Shortcuts
