How to use Excel Template
Excel templates are pre-built workbooks which are already formatted and well organized to use. The new Excel templates can be created or the exiting templates in Excel can be modified by the user based on their need and use.
The article in this webpage describes the meaning, how to make and use the Excel templates.
What is Excel Template?
The Excel template is a pre-designed spreadsheet or workbook which can be used to create new file with same format, formula, image etc.
Once the template in Excel is designed, you do not have to recreate the same design again as its already done. Also it represents the unique design for the company or organization with logo and colors to be used for day to day transactions.
The templates in Microsoft Excel are a great way to save time and can be applied to different purposes. The templates in Excel help in creating unique and attractive designs to improve the quality of the look and impress the end users.
The templates in Excel are frequently used for planning, forecasting, budgeting, bills, invoices, calenders, inventories, etc. Thats why the templates in Excel are so powerful and can be tailored to meet multi purposes. You can select a pre-defined template in Excel and modify the same or create a new template on your own.
In an Excel template, you can use the below to design the workbook:
- Modify the formats and styles including font type, style, size and alignment.
- Insert tables, charts, lines, symbols, shapes, pictures or logo.
- Update the themes, effects, background, watermarks and colors.
- Add formulas, hyperlinks or website links.
- Define print area, margin, orientation and size.
- Change workbook views, zoom%, split, freeze panes and show or hide gridlines.
- Use data valudation, conditional formatting, group, ungroup, hide rows or columns, goal seak, scenario manager and forecast sheet.
- Protect sheet or workbook, allow edit ranges, add comments or notes.
How to Create Using Existing Excel Template?
Instead of beginning with a blank page, you can easily make a new Excel template using an existing template. The pre-designed templates in Excel can help you with complex formulas, fancy styles, and other features easily. Here’s how to create a new template in Excel by using one of these templates:
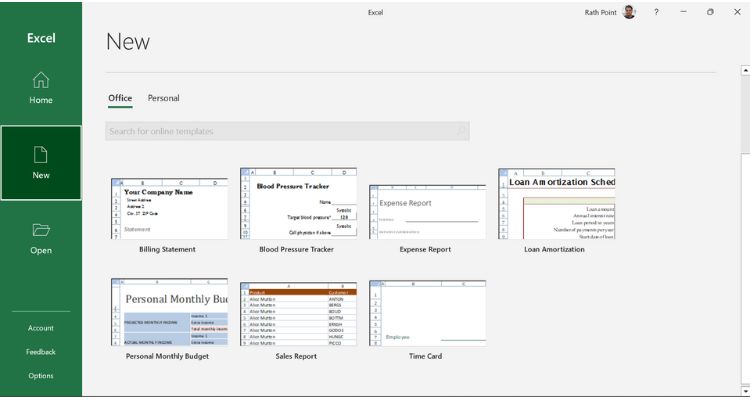
- Open Excel and go to New (or File ⇒ New) and you will find the pre-defined Excel templates. You can also search for online templates. There are many free Excel templates available online and you can download the same to use it. There are 7 types of templates available by default and those are billing statement, blood pressure tracker, expense report, loan amortization, personal monthly budget, sales report, and time card.

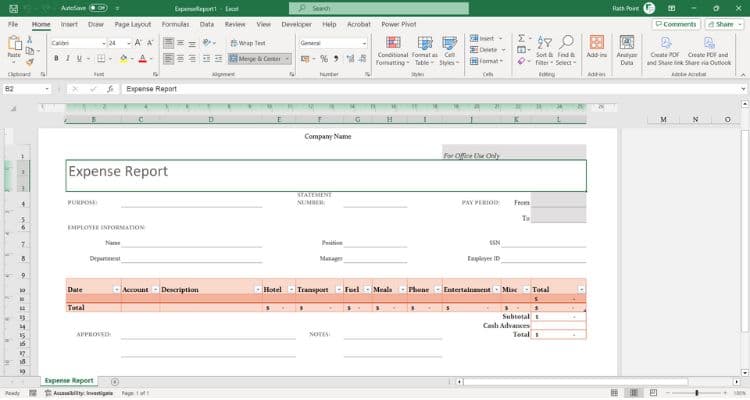
- Click on the Excel template you like and want to use. For example, I have clicked on the “Expense Report” template for Excel:

- Then modify the Excel template based on your requirement, such as changing clolors, font, adding logo, text, and other details.
How to Create a Custom Excel Template?
Creating your own Excel template is simple and easy. Your custom template in Excel will be one-of-a-kind and tailored to your requirements. Follow the below steps to create a custom Excel template:
- First, create an Excel workbook as you usually do. The most challenging part is getting it to look exactly how you want. It’s important to invest time and effort in both the design and content because any formatting, styles, text, or graphics you add will appear in all new workbooks created from this template.
- Next, you have to save the workbook as an template in Excel:
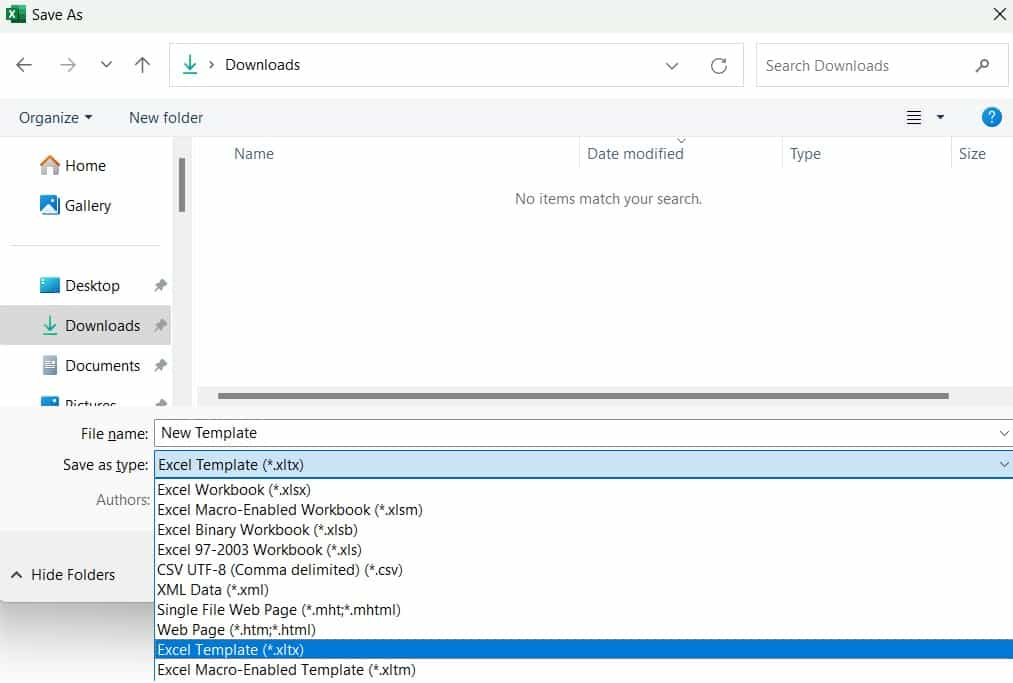
- click File ⇒ Save As to get the Save As window,
- in File name, define a name for your template,
- in Save as type, select “Excel Template (*.xltx)” and if the workbook contains macro then select “Excel Macro-Enabled Template (*.xltm)”.
- selct the path and click on Save.


Excel Tutorial Part 1 (Basic)
» Excel Home
» Excel Basics
» Excel Workbook
» Excel Template
» Excel Cell
» Excel Password
Excel Tutorial Part 2 (Format)
» Excel Clipboard
» Excel Format Font
» Excel Format Alignment
» Excel Format Number
» Excel Border
» Excel Conditional Formatting
Excel Tutorial Part 3 (Data)
» Excel Sort Data
» Excel Filter Data
» Excel Text to Columns
» Excel Data Validation
» Excel Flash Fill
» Excel Remove Duplicates
» Excel Relationships
» Excel Consolidate
» Excel What-If Analysis
» Excel Group
» Excel Charts
» Excel Table
» Excel PivotTable
Excel Tutorial Part 4 (Find)
» Excel Find and Replace
» Excel Go To
» Excel Select Objects
» Excel Selection Pane
Excel Tutorial Part 5 (Review)
» Excel Spell Check
» Excel Smart Lookup
» Excel Translate
» Excel Comments & Notes
» Excel Protect
» Excel Hide Ink
Excel Tutorial Part 6 (View)
» Excel Workbook Views
» Excel Formula Bar
» Excel Zoom
» Excel Window
» Excel Macros
Excel Tutorial Part 7 (Fx)
» Excel Formulas (Category)
» Excel Formulas (Alphabetical)
» Excel Errors
» Excel Name Manager
» Excel Formula Auditing
» Excel Watch Window
» Excel Calculation Options
Excel Tutorial Part 8 (Other)
» Excel Add-ins
» Excel Shortcuts
