How to Format Alignment in Excel
To format alignment in Excel is super easy! You can format alignment in Excel to personalize your spreadsheet to fit your needs. It helps you change how your text and numbers are placed inside cells. You can easily adjust how your content is aligned horizontally or vertically, make text indents, and even rotate it for a better look. The Excel’s alignment feature allows you to neatly position your data in the center, tilt it for a unique style, and much more.
Why to Format Alignment in Excel?
Here are some reasons why it’s helpful to learn how to format alignment in Excel:
- Enhanced Readability: When you format text text in Excel, it’s like arranging your data neatly in columns and rows. This makes it easier for others to read and understand what you’re showing.
- Elevated Professionalism: Formatting text in Excel makes your spreadsheet look more polished, like when you neatly organize data in a presentation. It shows you’re serious about presenting your information in a professional way.
- Improved Clarity: In Excel, formatting text helps separate different parts of your spreadsheet, like putting labels above columns or aligning numbers in rows. It helps users quickly find what they’re looking for and understand your data better.
- Sustained Consistency: Imagine your Excel sheet is like a grid, and formatting text is like making sure everything lines up perfectly in each cell. Consistently aligning text throughout your spreadsheet makes it easier to follow and looks more organized.
- Organizing Tables and Charts: The Excel alignment format helps to make tables and charts easier to read by lining up text in columns and rows. For example, you can align numbers to the right in a column to make them easier to compare.
- Formatting Financial Reports: Text alignment is important for formatting financial reports like income statements and balance sheets, making data clear and organized.
- Aesthetic Appeal: Formatting text in Excel improves the overall look of your spreadsheet, making it visually appealing and easier to work with. It’s like tidying up your workspace to make it more inviting and enjoyable to use.
How to Align Text in Excel?
You can align text in Excel easily to make your spreadsheet look better in no time. Let’s learn how to align text in Excel in 2 different ways.
How to Align Text Horizontally in Excel?
Horizontal Alignment using Ribbon:
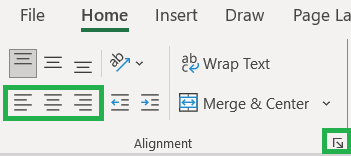
To format alignment in Excel horizontally, you will have 3 options in the alignment group under Home tab:
- Align Left: to align the text along the left edge of the cell.
- Center: to align the text in the middle of the cell.
- Align Right: to align the text along the right edge of the cell.
Horizontal Alignment using Format Cells:
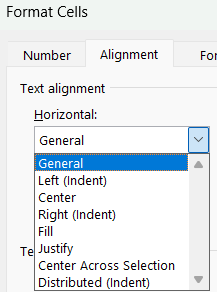
Click on the Alignment laucher at the bottom righ of the above screen to get all the alignment options. You can also use the keyboard shortcut key Ctrl + 1 (or right click on Cell and select “Format Cell”) to get the Format Cell dialog box. To format alignment in Excel horizontally, go to Alignment tab and you will find below horizontal alignment options under Text alignment:
- General: default alignment.
- Left (Indent): to align the text in the left of the cell.
- Center: to align the text to the center potition of the cell horizontally.
- Right (Indent): to align the text in the right of the cell.
- Fill: to align the text to fill the cell.
- Justify: each line of your text from the left margin to the right margin.
- Center Across Selection: keeps the text in the middle of the cell.
- Distributed (Indent): the first and last text of each line is aligned to the left and right margin.
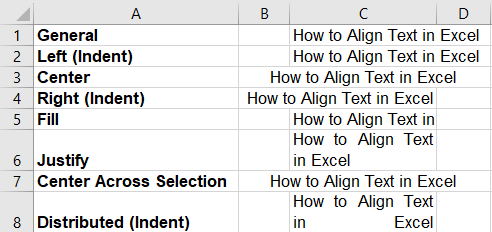
Let’s understand all horizontal text alignment options with examples.
In the below image the A column refers to the types of horizontal alignments and the C column is the result of these horizontal alignments.
Excel lets you use keyboard shortcuts for lots of its features. You can align text horizontally in Excel using just the keyboard, without taking your fingers off. Below are some helpful keyboard shortcut keys for horizontal alignments in Excel:
Horizontal Alignment using Shortcut Keys:
How to Align Text Vertically in Excel?
Vertical Alignment using Ribbon:
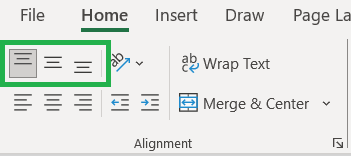
To format alignment in Excel vertically, you will have 3 options in the alignment group under Home tab:
- Top Align: to align the text to the top of the cell.
- Middle Align: to align the text to the center i.e. between the top and bottom of the cell.
- Bottom Align: it is the default alignment, which aligns the text to the bottom of the cell.
Vertical Alignment using Format Cells:
Click on the Alignment laucher or use the keyboard shortcut Ctrl + 1 (or right click on Cell and select “Format Cell”) to get the Format Cell dialog box. To format alignment in Excel vertically, go to Alignment tab and you will find below vertical alignment options under Text alignment:
- Top: to align the text to the top of the cell.
- Center: to align the text to the center potition of the cell horizontally.
- Bottom: to align the text to the bottom of the cell (default alignment).
- Justify: each line of your text from the left margin to the right margin.
- Distributed: the first and last text of each line is aligned to the left and right margin.
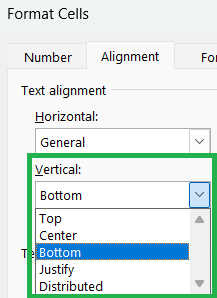
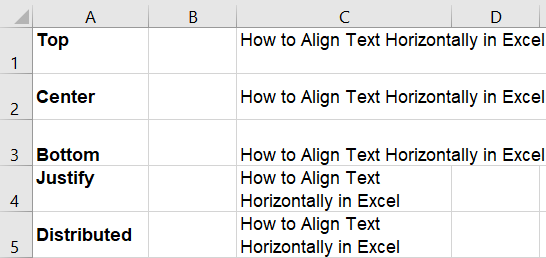
Let’s understand all vertical text alignment options with examples.
In the below image the A column refers to the types of vertical alignments and the C column is the result of these vertical alignments.
Vertical Alignment using Shortcut Keys:
Below are the keyboard shortcut keys for vertical alignments in Excel:
Conclusion
Choosing the right font in Excel can make your spreadsheet look better and easier to read. Picking the right style and size can make it clearer and more professional. Whether you’re using Excel for yourself or for work, trying out different font formats can really make your documents stand out and be easier to understand.
Learn More
» How to use Wrap Text in Excel?
» How to use Shrink to Fit in Excel?
» How to Merge and Unmerge Cells in Excel?
» How to Increase or Decrease Indent in Excel?
» How to Rotate Text in Excel (Text Orientation)?

Excel Tutorial Part 1 (Basic)
» Excel Home
» Excel Basics
» Excel Workbook
» Excel Template
» Excel Cell
» Excel Password
Excel Tutorial Part 2 (Format)
» Excel Clipboard
» Excel Format Font
» Excel Format Alignment
» Excel Format Number
» Excel Border
» Excel Conditional Formatting
Excel Tutorial Part 3 (Data)
» Excel Sort Data
» Excel Filter Data
» Excel Text to Columns
» Excel Data Validation
» Excel Flash Fill
» Excel Remove Duplicates
» Excel Relationships
» Excel Consolidate
» Excel What-If Analysis
» Excel Group
» Excel Charts
» Excel Table
» Excel PivotTable
Excel Tutorial Part 4 (Find)
» Excel Find and Replace
» Excel Go To
» Excel Select Objects
» Excel Selection Pane
Excel Tutorial Part 5 (Review)
» Excel Spell Check
» Excel Smart Lookup
» Excel Translate
» Excel Comments & Notes
» Excel Protect
» Excel Hide Ink
Excel Tutorial Part 6 (View)
» Excel Workbook Views
» Excel Formula Bar
» Excel Zoom
» Excel Window
» Excel Macros
Excel Tutorial Part 7 (Fx)
» Excel Formulas (Category)
» Excel Formulas (Alphabetical)
» Excel Errors
» Excel Name Manager
» Excel Formula Auditing
» Excel Watch Window
» Excel Calculation Options
Excel Tutorial Part 8 (Other)
» Excel Add-ins
» Excel Shortcuts

0 Comments