How to Format Numbers in Excel
Its important to learn how to format numbers in Excel as it gives your data a makeover to make it more appealing and understandable. Whether you’re dealing with money, percentages, dates, or plain numbers, Excel lets you tweak how they show up in your spreadsheet. Let’s learn the benifit of formatting numbers and how to do it.
Why to Format Numbers in Excel?
Here are some reasons why it’s helpful to learn how to format numbers in Excel:
- Understanding: You can format numbers in Excel to enhance clarity and comprehension. For instance, utilize comma separators for substantial figures (e.g., 1,000,000) to enhance understanding of the data in Microsoft Excel.
- Consistency and Standardization: Maintain consistency in formatting throughout your spreadsheet to ensure uniform presentation of data. Consistent formatting facilitates easy comparison of values and enhances users’ understanding of the information.
- Calculation: Use appropriate number formatting to prevent errors in calculations. For example, formatting cells as percentages ensures accurate operation of formulas and functions involving percentages.
- Customization: Excel offers multiple formatting options for numbers. You can tailor the appearance of your numbers to meet your specific requirements and preferences.
How to Format Numbers in Excel?
By following the below steps, you can easily format numbers in Excel to suit your specific requirements and improve the readability of your data:
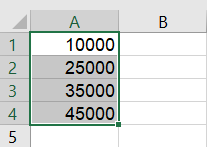
- Select Cells: Before formatting, select the cells or range of cells containing the numbers you want to format. For example, select the cells from A1 to A4 containing numbers.

- Open Format Cells Dialog Box: There are multiple ways to open the Format Cells dialog box:
- Right-click on the selected cells and choose “Format Cells.”
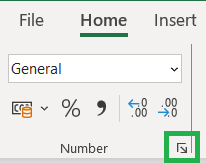
- Go to the “Home” tab on the Excel ribbon, click on the “Number” dropdown menu in the “Number” group, and select “More Number Formats”. Or click on the luncher icon on “Number” group.
- Press Ctrl + 1 as a shortcut to open the Format Cells dialog box.

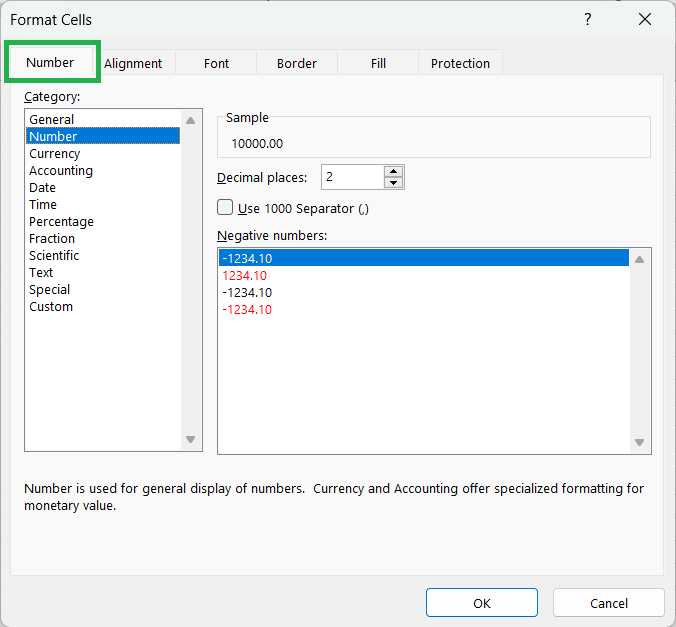
- Navigate to Number Tab: In the Format Cells dialog box, navigate to the “Number” tab. This tab contains various categories of number formats.
- Select a Category: Excel provides several categories of number formats to choose from, including:
- General: The general format cells have no specific number format.
- Number: The number is used for general display of numbers. Currency and accounting offer specialized formatting for monetary value.
- Currency: The currency formats are used for general monetary value. Use accounting formats to align decimal points in a column.
- Accounting: The accounting formats line up the currency symbols and decimal points in a column.
- Date: The date formats display date and time serial numbers as date values. The date formats that begin with an asterisk (*) respond to change in regional date and time settings that are specific for the operating system. The formats without an asterisk are not affected by the operating system setting.
- Time: The time formats display date and time serial numbers as date values. The time formats that begin with an asterisk (*) respond to change in regional date and time settings that are specific for the operating system. The formats without an asterisk are not affected by the operating system setting.
- Percentage: The percentage formats multiply the cell value by 100 and displays the result with a percentage symbol.
- Fraction: The fraction formats display numbers as fractions.
- Scientific: The scientific formats display the data in scientific notation.
- Text: The text format cells are treated as text even when a number is in the cell. The cell is displayed exactly as entered.
- Special: The special formats are useful for tracking list and database values.
- Custom: The custom formats allow you to create your own custom number format. You can type the number format code, using one of the existing codes as a starting point. For example:
- 0: Digit placeholder (always displayed).
- #: Digit placeholder (displayed if necessary).
- %: Percentage symbol.
- ,: Thousands separator.
- $: Currency symbol.
- .: Decimal point.
- /: Fraction separator.

- Choose a Specific Format: Once you’ve selected a category, choose a specific format from the list provided. Excel displays a preview of how the selected format will affect your numbers.
- Preview the Changes: As you select different formats or customize them, Excel provides a preview of how the numbers in the selected cells will appear with the chosen format.
- Apply the Format: Once you’re satisfied with the selected format, click “OK” to apply it to the selected cells.
How to Format Numbers in Excel using Shortcuts?
Below are the keyboard shortcut keys to format numbers in Excel:
Conclusion
In Excel, formatting numbers in Excel is super important. It helps people understand the numbers in a better way, makes your work look nicer, and keeps everything organized and consistent. When your numbers are easy to read and consistent, it’s way easier to analyze them, do calculations, and customize your spreadsheets. And when everything looks good and makes sense, it helps people communicate and make decisions better.
Learn More
» How to Format Font in Excel?
» How to Format Alignment in Excel?

Excel Tutorial Part 1 (Basic)
» Excel Home
» Excel Basics
» Excel Workbook
» Excel Template
» Excel Cell
» Excel Password
Excel Tutorial Part 2 (Format)
» Excel Clipboard
» Excel Format Font
» Excel Format Alignment
» Excel Format Number
» Excel Border
» Excel Conditional Formatting
Excel Tutorial Part 3 (Data)
» Excel Sort Data
» Excel Filter Data
» Excel Text to Columns
» Excel Data Validation
» Excel Flash Fill
» Excel Remove Duplicates
» Excel Relationships
» Excel Consolidate
» Excel What-If Analysis
» Excel Group
» Excel Charts
» Excel Table
» Excel PivotTable
Excel Tutorial Part 4 (Find)
» Excel Find and Replace
» Excel Go To
» Excel Select Objects
» Excel Selection Pane
Excel Tutorial Part 5 (Review)
» Excel Spell Check
» Excel Smart Lookup
» Excel Translate
» Excel Comments & Notes
» Excel Protect
» Excel Hide Ink
Excel Tutorial Part 6 (View)
» Excel Workbook Views
» Excel Formula Bar
» Excel Zoom
» Excel Window
» Excel Macros
Excel Tutorial Part 7 (Fx)
» Excel Formulas (Category)
» Excel Formulas (Alphabetical)
» Excel Errors
» Excel Name Manager
» Excel Formula Auditing
» Excel Watch Window
» Excel Calculation Options
Excel Tutorial Part 8 (Other)
» Excel Add-ins
» Excel Shortcuts

0 Comments