How to Add Borders in Excel
This guide will show you how to add borders in Excel cells, so you can make your documents look more professional and easier to understand. It’s useful when you’re arranging data, making tables, or preparing reports because borders help separate different parts, emphasize important details, and make your spreadsheet look neat. Excel provides different border options such as styles, thicknesses, and colors so you can choose what works best for you. Now, let’s learn how to add borders in Excel in different methods.
How to Add Borders in Excel using Ribbon?
By following the below steps, you can easily add borders in Excel:
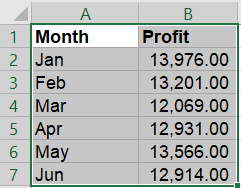
- Select Cells: Select the cell or range of cells where you want to add the border.

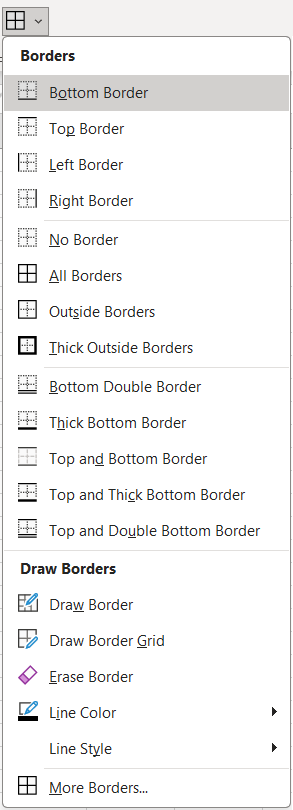
- Navigate to Border Icon: Go to Home tab and click on Border icon under Font group.
- Select Border to Apply: You can click on any one border type to apply to the selected cells. There are some predefined border types and those are bottom border, top border, left border, right border, all borders, outside borders, thick outside borders, bottom double border, thick bottom border, top and bottom border, top and thick bottom boder, and top and double bottom border.

To remove border in Excel, click the Border icon in the Font group under Home tab and select No Border.
How to Add Borders in Excel using Format Cells?
Follow the below steps to add custom borders in Excel cell:
- Select Cells: Select the cell or range of cells where you want to add the custom border.
- Open Format Cells Dialog Box: There are multiple ways to open the Format Cells dialog box:
- Right-click on the selected cells and choose “Format Cells.”
- Go to the “Home” tab on the Excel ribbon, click on the “Border” dropdown menu in the “Font” group, and select “More Borders”. Or click on the luncher icon on “Font” group.
- Press Ctrl + 1 as a shortcut to open the Format Cells dialog box.
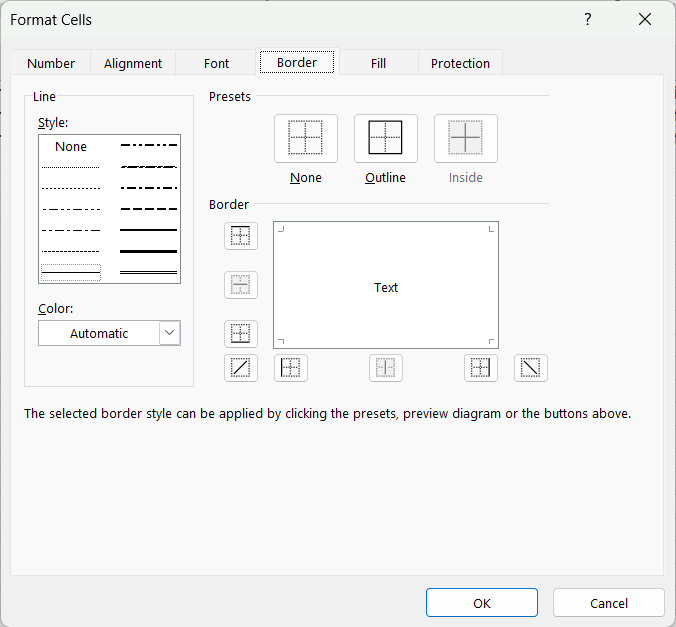
- Navigate to Border Tab: In the Format Cells dialog box, navigate to the “Border” tab. This tab contains various border formats.

- Custom Border Format: Excel provides different border formats and those are:
- Line Style: Click on the line style to apple and click on none to remove.
- Line Color: By default it will be automatic and you can change the color based on your requirement.
- Preset and Borders: You can choose from the presets (outline and inside) or click on the border icon to apple and click again on the on the border icon to remove. Click on the None under Presets to remove borders in Excel.
- Apply Border: Once you’re satisfied with the border format, click “OK” to apply it to the selected cells.
How to Add Borders in Excel using Shortcuts?
Below are the keyboard shortcut keys to add borders in Excel:
Conclusion
In Excel, knowing how to add or remove borders around cells is an important skill that can make your spreadsheets look more professional and easy to understand. By learning about the different ways you can change borders and using them wisely, you can make important data stand out, make your spreadsheets easier to read, and make them look nicer overall. Whether you’re dividing sections, highlighting important numbers, or just making your work look better, being able to change borders helps you present information clearly and neatly. With practice, you’ll see that customizing borders not only makes your work easier but also makes your data more impactful and easier to understand.
Learn More
» How to Format Numbers in Excel?
» How to Format Font in Excel?
» How to Format Alignment in Excel?

Excel Tutorial Part 1 (Basic)
» Excel Home
» Excel Basics
» Excel Workbook
» Excel Template
» Excel Cell
» Excel Password
Excel Tutorial Part 2 (Format)
» Excel Clipboard
» Excel Format Font
» Excel Format Alignment
» Excel Format Number
» Excel Border
» Excel Conditional Formatting
Excel Tutorial Part 3 (Data)
» Excel Sort Data
» Excel Filter Data
» Excel Text to Columns
» Excel Data Validation
» Excel Flash Fill
» Excel Remove Duplicates
» Excel Relationships
» Excel Consolidate
» Excel What-If Analysis
» Excel Group
» Excel Charts
» Excel Table
» Excel PivotTable
Excel Tutorial Part 4 (Find)
» Excel Find and Replace
» Excel Go To
» Excel Select Objects
» Excel Selection Pane
Excel Tutorial Part 5 (Review)
» Excel Spell Check
» Excel Smart Lookup
» Excel Translate
» Excel Comments & Notes
» Excel Protect
» Excel Hide Ink
Excel Tutorial Part 6 (View)
» Excel Workbook Views
» Excel Formula Bar
» Excel Zoom
» Excel Window
» Excel Macros
Excel Tutorial Part 7 (Fx)
» Excel Formulas (Category)
» Excel Formulas (Alphabetical)
» Excel Errors
» Excel Name Manager
» Excel Formula Auditing
» Excel Watch Window
» Excel Calculation Options
Excel Tutorial Part 8 (Other)
» Excel Add-ins
» Excel Shortcuts

0 Comments