How to Create a Table in Excel
This guide will show you how to create a table in Excel. The Table in Excel makes it easier to organize, analyze, and present the data. When you turn a range of data into a table, you get benefits like simple sorting and filtering, automatic formatting, and dynamic referencing. Whether you’re doing business analysis, research, or managing personal finances, Excel tables are a great tool for turning raw data into useful information.
What is Table in Excel?
An Excel table is a powerful tool for organizing the data. It has many useful features, such as:
- Sorting and filtering data,
- Adding new information easily,
- Changing format or styles,
- Summarizing data,
- Quickly calculating data, and
- Exporting data.
Steps: How to Create a Table in Excel?
Let’s understand how to create a table in Excel in step by step.
Step 1: Select Data
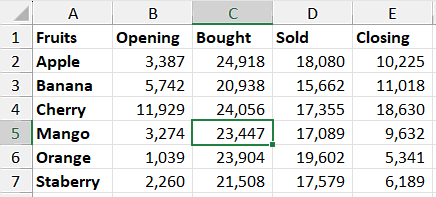
- Select the entire data or click a cell within your data.
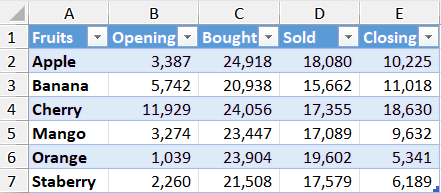
- In the below example, you can select the entire data range from A1 to E7 or just click a cell within it (C5).
Step 2: Access Insert Table or Format as Table
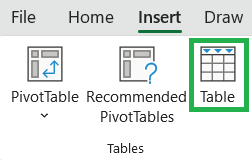
- Go to Insert tab in the ribbon and click on Table button under Tables section.
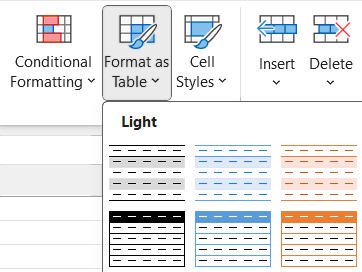
- OR, go to Home tab in the ribbon and click on Format as Table button under Styles. Then choose from the predefined styles (light, medium and dark) or create new table style.
Step 3: Update Cell Range
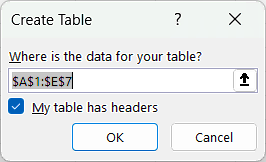
- In the Create Table dialog box, it will automatically select the data range. If not, then you can manually select the range under “Where is the data for your table?” section.
- If your data doest no have headers then you can untick the “My table has headers” button.
- Thenk click OK to create a table in Excel.
Step 4: Click OK to Create Table
- Once you have defined the table range, click OK to create a table in Excel.
How to Create a Table in Excel using Shortcuts?
Below is the keyboard shortcut key to create a table in Excel:
Conclusion
Creating a table in Excel is easy and very useful. It helps you to organize, analyze, and display your data in a better way. When you turn a range of data into a table, you get tools like automatic filtering, sorting, and dynamic formatting. These tools help to manage your data in a simple and efficient manner.
Learn More
» How to Group in Excel?
» How to use What-If Analysis in Excel?
» How to Consolidate Data in Excel from Multiple Worksheets?
» How to Remove Duplicates in Excel?
» How to use Data Validation in Excel?
» How to use Advanced Filter in Excel?
» How to create a Relationship between Tables in Excel?
» How to create Relationship in Power Pivot?
» How to use Conditional Formatting in Excel?

Excel Tutorial Part 1 (Basic)
» Excel Home
» Excel Basics
» Excel Workbook
» Excel Template
» Excel Cell
» Excel Password
Excel Tutorial Part 2 (Format)
» Excel Clipboard
» Excel Format Font
» Excel Format Alignment
» Excel Format Number
» Excel Border
» Excel Conditional Formatting
Excel Tutorial Part 3 (Data)
» Excel Sort Data
» Excel Filter Data
» Excel Text to Columns
» Excel Data Validation
» Excel Flash Fill
» Excel Remove Duplicates
» Excel Relationships
» Excel Consolidate
» Excel What-If Analysis
» Excel Group
» Excel Charts
» Excel Table
» Excel PivotTable
Excel Tutorial Part 4 (Find)
» Excel Find and Replace
» Excel Go To
» Excel Select Objects
» Excel Selection Pane
Excel Tutorial Part 5 (Review)
» Excel Spell Check
» Excel Smart Lookup
» Excel Translate
» Excel Comments & Notes
» Excel Protect
» Excel Hide Ink
Excel Tutorial Part 6 (View)
» Excel Workbook Views
» Excel Formula Bar
» Excel Zoom
» Excel Window
» Excel Macros
Excel Tutorial Part 7 (Fx)
» Excel Formulas (Category)
» Excel Formulas (Alphabetical)
» Excel Errors
» Excel Name Manager
» Excel Formula Auditing
» Excel Watch Window
» Excel Calculation Options
Excel Tutorial Part 8 (Other)
» Excel Add-ins
» Excel Shortcuts

0 Comments