How to Create a Word Document
This guide will show you how to create a Word document. Creating a Word document is an important skill nowadays, useful for many personal, school, and professional tasks.
The Microsoft Word is a top word processing software for writing, letting you make everything from simple letters to detailed reports. It helps you organize text, add pictures and other media, and use different formatting options to make your documents look professional.
Whether you’re making a resume, writing an essay, or creating a business proposal, knowing how to use Microsoft Word can greatly improve your efficiency and communication.
Steps: How to Create a Word Document?
Let’s understand how to create a Word document step by step.
Step 1: Open Microsoft Word
- Go to Start menu 〉 All Apps 〉 scroll down and select Word. You can also type “Microsoft Word” in the search box to find Word.
- Or, click the Word icon from the Desktop or Taskbar if it is already added.
Alternatively,
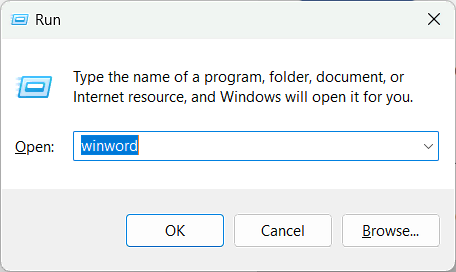
- Type Windows+R from keyboard to open Run dialog box, then type winword under Open and click OK to open Microsoft Word.
Step 2: Create a Blank Document
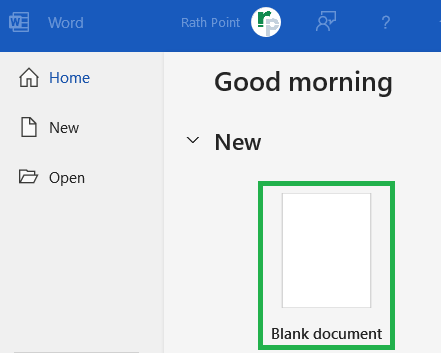
- When Microsoft Word opens for the first time, you might see a startup screen. You have to click on Blank document to create a new document in Word.
- If the Microsoft Word is already open, go to File menu in the top-left corner and click on Blank document under New or Home to create a Word document.
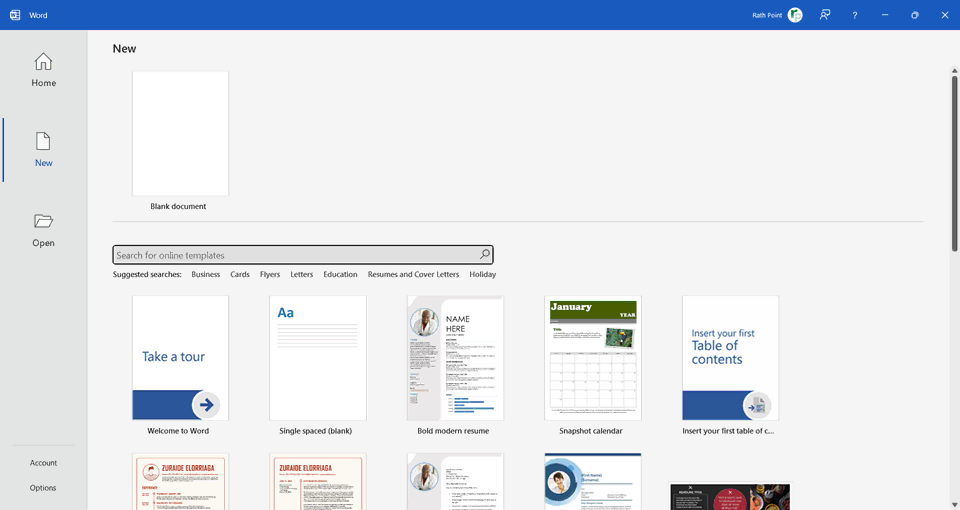
- To create a Word document using a Template, go to File menu 〉 New 〉 click on an existing Template or search for online templates.
- If you have already saved a template, then you can open the same to create a Word document.
Step 3: Add Text and Objects
- Start typing your text to add in the Word document.
- You can change how the text looks by using the options in the ribbon. You can adjust the font, size, color, and make it bold, italic, or underlined etc.
- You can insert the objects such as shapes, pictures, icons, charts etc. into the Word document.
Step 4: Save Word Document
- Go to File menu at the top left.
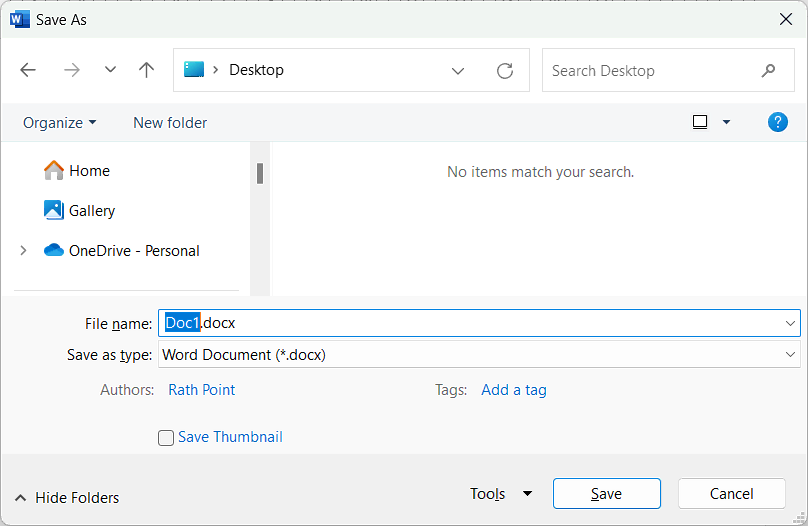
- Select Save or Save As to get the Save As dialog box.
- Select the location where you want to save your document.
- Enter a name for your file under File Name.
- Choose the .docx format (.doc for Word 97-2003 document) under Save as type.
- Click Save button.
How to Create a Word Document look Professional?
- Plan Your Document: Start by noting down the main points you want to cover. Divide your document into sections with clear headings to make it easier to follow.
- Use Templates: Choose from Word’s ready-made templates to save time and keep things consistent. You can also create your own template if you often use the same format.
- Apply Styles: Use heading styles (like Heading 1, Heading 2) to format titles and subheadings. This helps with creating a table of contents. Also, use styles for different text types to keep your document uniform.
- Format Your Text: Use bold, italic or underline for important points, titles and special terms. Add bullet points for lists and numbers for steps to make things clearer. Adjust spacing and margins to avoid a cluttered or empty look.
- Add Visuals: Its important to include tables, images, charts, and graphics to support your text to create a document look professional.
- Spell and Grammar Check: You must use Word’s spell and grammar check to find mistakes and correct it from the Word document.
- Headers and Footers: Add headers and footers for consistent information, such as page numbers, document titles, or author names, across all pages in a document.
- Save and Backup: Save your work frequently to prevent data loss. Store copies of the Word document in the cloud or on an external drive as backup.
How to Create a Word Document using Shortcuts?
Below are the keyboard shortcut keys to create a Word Document:
Conclusion
Creating a Word document is an important skill that brings many advantages in both personal and professional situations. Whether you’re writing essays, making business proposals, or organizing information, Microsoft Word is a flexible tool that helps you to express your ideas well. By learning its features, you can boost your productivity and creativity, work better with others, and create polished documents for different purposes.
Learn More
» How to Create a Pivot Table in Excel?
» How to create Relationship in Power Pivot?
» How to Create a Table in Excel?
» How to create a Relationship between Tables in Excel?
» How to use Advanced Filter in Excel?
» How to use What-If Analysis in Excel?
» How to use Data Validation in Excel?

Word Tutorial Part 1 (Basic)
» Word Home
» Word Basics
» Word Document
» Word Template
» Word Info
» Word Password
Word Tutorial Part 2 (Format)
» Word Clipboard
» Word Font
» Word Color
» Word Alignment
» Word Border
» Word Bullets and Numbering
» Word Indents and Spacing
» Word Line and Page Breaks
Word Tutorial Part 3 (Insert)
» Word Pages
» Word Tables
» Word Illustrations
» Word Links
» Word Comments
» Word Header and Footer
» Word Text Box
» Word WordArt
» Word Quick Parts
» Word Drop Cap
» Word Date and Time
» Word Objects
» Word Equation
» Word Symbol
Word Tutorial Part 4 (Find)
» Word Find and Replace
» Word Go To
» Word Select Objects
» Word Selection Pane
Word Tutorial Part 5 (Design)
» Word Themes
» Word Watermark
» Word Page Color
» Word Page Border
Word Tutorial Part 6 (Layout)
» Word Margin
» Word Orientation
» Word Size
» Word Columns
» Word Breaks
» Word Line Numbers
» Word Hyphenation
» Word Position
» Word Wrap Text
» Word Bring Forward
» Word Send Backward
» Word Group
» Word Rotate
Word Tutorial Part 7 (References)
» Word Table of Contents
» Word Footnotes
» Word Citation and Bibliography
» Word Captions
» Word Index
» Word Table of Authorities
Word Tutorial Part 8 (Mailings)
» Word Envelopes
» Word Labels
» Word Start Mail Merge
» Word Write and Insert Fields
» Word Preview Results
» Word Finish and Merge
Word Tutorial Part 9 (Review)
» Word Editor
» Word Spelling and Grammer
» Word Thesaurus
» Word Count
» Word Read Aloud
» Word Check Accessibility
» Word Translate
» Word Language
» Word Comments
» Word Share
» Word Track Changes
» Word Compare
» Word Ink
Word Tutorial Part 10 (View)
» Word Views
» Word Immersive
» Word Show
» Word Zoom
» Word Window
» Word Macros
» Word Properties
Word Tutorial Part 11 (Other)
» Word Add-ins
» Word Shortcuts

0 Comments