How to Group in Excel
This guide will show you how to group in Excel and ungroup it. After learning how to group in Excel, you arrange rows or columns into sections that can be expanded or collapsed. This makes it easier to concentrate on specific data parts while still keeping the big picture in mind. It’s especially helpful for summary reports, managing hierarchical data, and making complex spreadsheets easier to read. On the other and, the ungrouping in Excel removes these sections and returns the data to its original form by giving a complete view of the data.
Rows and Columns: How to Group in Excel?
Once you understand how to group columns in Excel, then you can follow the same steps to group rows in Excel. Follow the below steps to group in Excel:
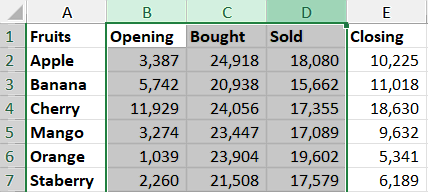
Step 1: Select the Column
- Click on the header of the starting column (for example column B).
- Then hold down your mouse button and drag across to include all columns you want to group (for example column C to D).
Note: To group the rows in Excel, first you must select the rows and follow the next steps.
Step 2: Access Group Button
- Go to Data tab in the ribbon and click on Group button under Outline.
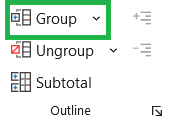
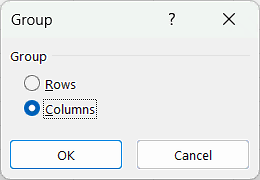
- The shortcut key to group in Excel is Shift + Alt + Right Arrow in Windows and Command + Shift + K on MacBook. Then you will get the Group window, you can select either Rows (to group rows) or Columns (to group columns) and then click OK.
- If you have already selected the columns/rows and then you may not get the Group window and the shortcut key will work instantly.
Step 3: Collapse or Expand the Group
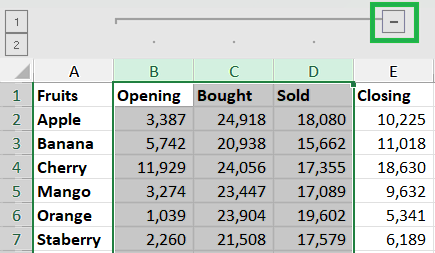
- After you group columns in Excel, you’ll see a small minus (-) button above them. Click minus (-) button to hide the grouped columns.
- A plus (+) button will then appear, which you can click to show the columns again.
Step 4: Adding Sub-Groups (Optional)
- In Excel, you can create nested groups by repeating the process of selecting and grouping rows or columns within an already grouped section.
- This creates multiple levels of groups, which is helpful for organizing and analysing complex data.
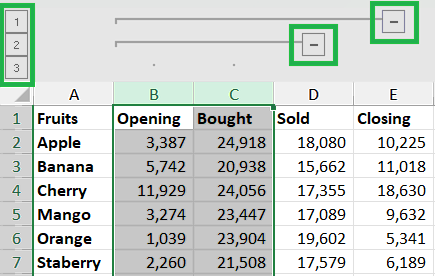
- for example, select column B and C, then click the Group button to see the 2 groups as shown below.
- In the left side above the row number, you can identify how many groupings are done. In this example you can find 1, 2, and 3, means 2 times grouping is done. You can click these 1, 2, and 3 buttons to expand and collapse the group in Excel.
Rows and Columns: How to Ungroup in Excel?
After you have grouped the rows or columns, you can ungroup the same. Once you understand how to ungroup columns in Excel, then you can follow the same steps to ungroup rows in Excel. Follow the below steps to ungroup in Excel:
Step 1: Select the Column
- First, select the rows or columns already grouped to ungroup in Excel.
- It not necessary that you should select all the columns or rows already grouped to ungroup in Excel. You can select few of the columns or rows also to ungroup and the remaining will be grouped.
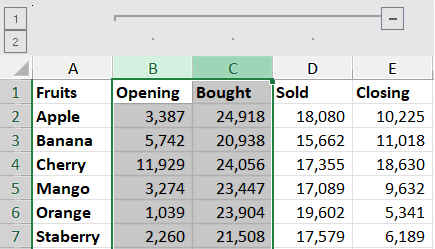
In the below example, 3 columns (B, C and D) are grouped, and we have selected 2 columns (B and C) to ungroup in Excel.
Step 2: Access Ungroup Button
- Go to Data tab in the ribbon and click on Ungroup button under Outline.
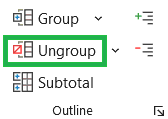
- Instead of Ungroup button in ribbon, you can also use the shortcut to ungroup in Excel.
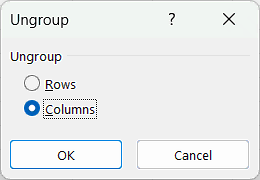
- The shortcut key to ungroup in Excel is Shift + Alt + Left Arrow in Windows and Command + Shift + J on MacBook. Then you will get the Ungroup window, you can select either Rows (to ungroup rows) or Columns (to ungroup columns) and then click OK.
- If you have already selected the columns/rows and then you may not get the Ungroup window and the shortcut key will work instantly.
How to Group in Excel using Shortcuts?
Below is the keyboard shortcut key to select the rows and columns and then group/ungroup in Excel:
Conclusion
The Excel group feature lets you combine several rows or columns into a single group. You can then expand or collapse this group with one click. The Excel ungroup feature splits the group back into the original rows or columns.
Learn More
» How to use What-If Analysis in Excel?
» How to Consolidate Data in Excel from Multiple Worksheets?
» How to create a Relationship between Tables in Excel?
» How to create Relationship in Power Pivot?
» How to use Conditional Formatting in Excel?
» How to use Data Validation in Excel?
» How to Remove Duplicates in Excel?
» How to use Advanced Filter in Excel?

Excel Tutorial Part 1 (Basic)
» Excel Home
» Excel Basics
» Excel Workbook
» Excel Template
» Excel Cell
» Excel Password
Excel Tutorial Part 2 (Format)
» Excel Clipboard
» Excel Format Font
» Excel Format Alignment
» Excel Format Number
» Excel Border
» Excel Conditional Formatting
Excel Tutorial Part 3 (Data)
» Excel Sort Data
» Excel Filter Data
» Excel Text to Columns
» Excel Data Validation
» Excel Flash Fill
» Excel Remove Duplicates
» Excel Relationships
» Excel Consolidate
» Excel What-If Analysis
» Excel Group
» Excel Charts
» Excel Table
» Excel PivotTable
Excel Tutorial Part 4 (Find)
» Excel Find and Replace
» Excel Go To
» Excel Select Objects
» Excel Selection Pane
Excel Tutorial Part 5 (Review)
» Excel Spell Check
» Excel Smart Lookup
» Excel Translate
» Excel Comments & Notes
» Excel Protect
» Excel Hide Ink
Excel Tutorial Part 6 (View)
» Excel Workbook Views
» Excel Formula Bar
» Excel Zoom
» Excel Window
» Excel Macros
Excel Tutorial Part 7 (Fx)
» Excel Formulas (Category)
» Excel Formulas (Alphabetical)
» Excel Errors
» Excel Name Manager
» Excel Formula Auditing
» Excel Watch Window
» Excel Calculation Options
Excel Tutorial Part 8 (Other)
» Excel Add-ins
» Excel Shortcuts

0 Comments