How to Make an Excel File Read Only after Opening
This guide will show you how to make an Excel file read only after opening. Making an Excel file read-only after opening helps to protect your data by stopping you from making unwanted changes. When a file is read-only, you can look at the data but cannot edit it. So, let us learn how to set your Excel file to read-only after opening to keep your data safe and unmodified.
Steps: How to Make an Excel File Read Only after Opening?
Follow the below steps to make an Excel file ready only after opening it:
Step 1: Open Excel File
- Open Excel and go to the top left of the File menu.
- Select Open and click on Browse.
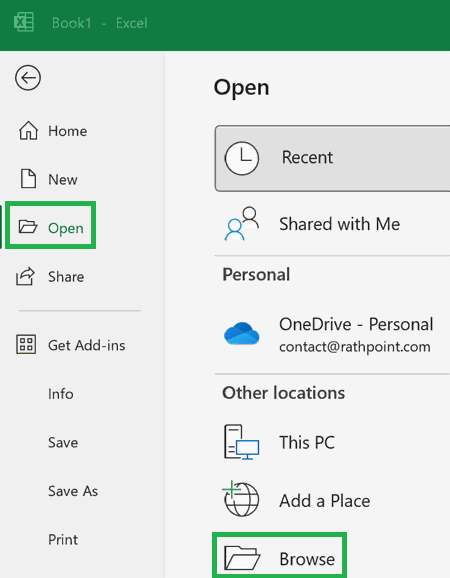
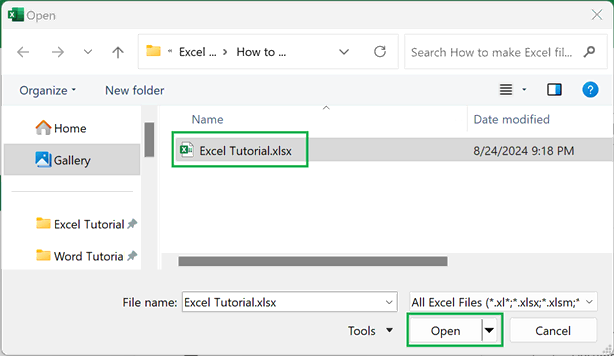
- Go to the location of the Excel file, select it, and click Open.
- Alternatively, open File Explorer and go to the location of the Excel file and open it.
Step 2: Customize Quick Access Toolbar
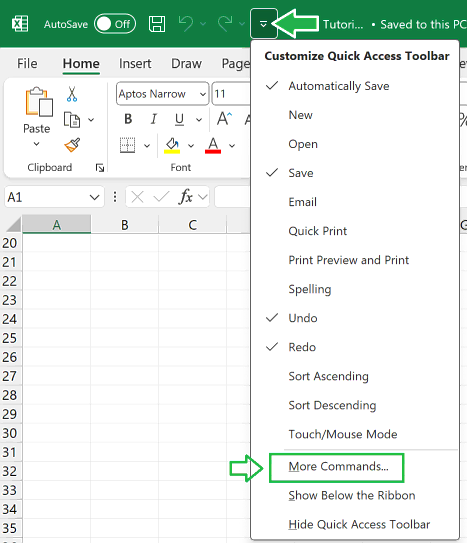
- Navigate to Quick Access Toolbar. It will be either below or above the ribbon.
- Go to the end of this toolbar and click on More Commands from the drop-down list.
- Alternatively, go to File menu and select Options under More.
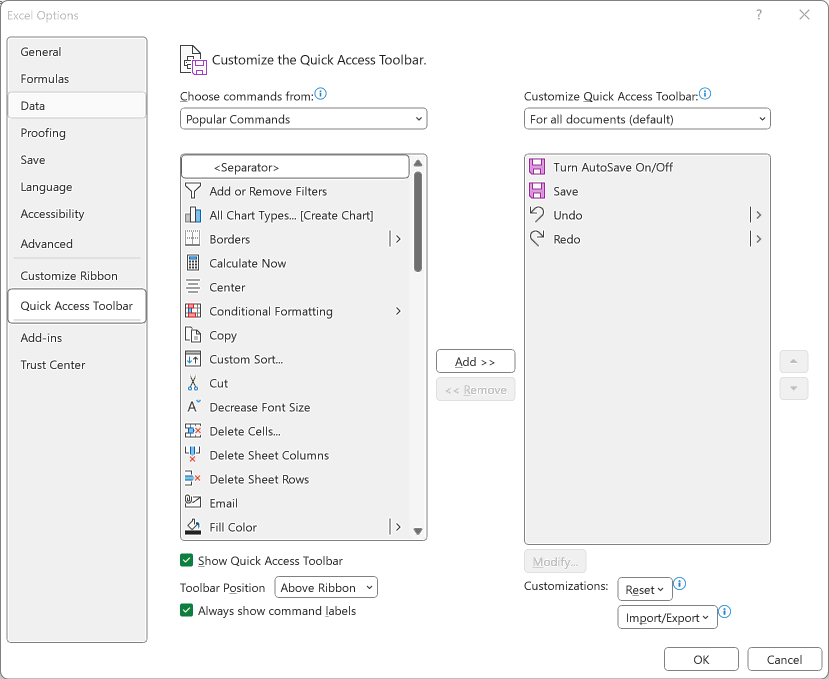
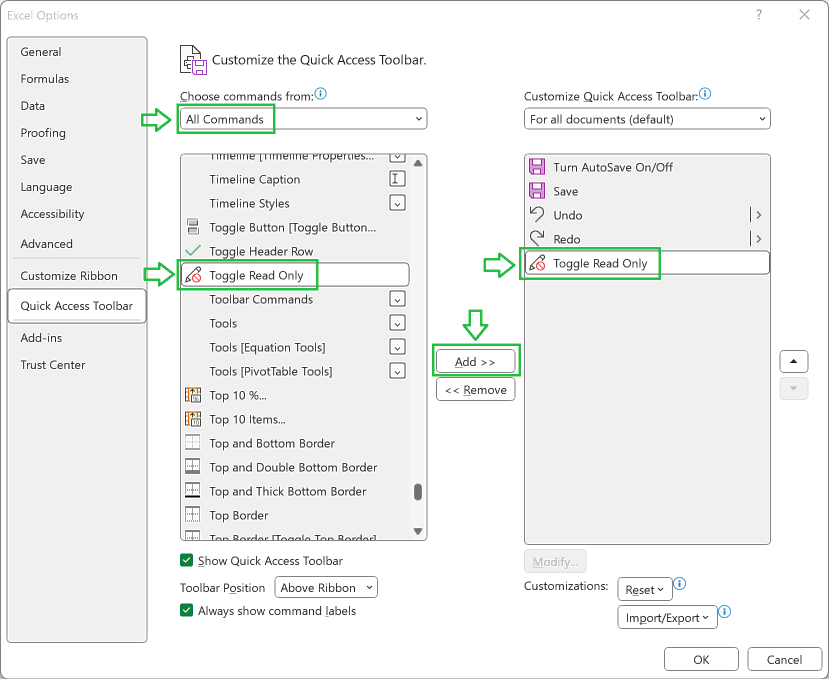
- Click on Quick Access Toolbar from the Excel Options.
Step 3: Add Toggle Read Only
- Under Choose command from, select All Commands from the drop-down list.
- Scroll down for Toggle Read Only command. Type “to” from the keyboard to quickly find it.
- Click Add >> button to add the Toggle Read Only under Quick Access Toolbar.
- Click OK to complete and close the Excel Options window.
Step 4: Click Toggle Read Only Button
- Click the Toggle Read Only button under Quick Access Toolbar.
- Then, the Excel file will become read only instantly.
- Click the Toggle Read Only button again to remove Read-Only from the file name.

Next time if you open any Excel file, just follow Step 4 to make it read only as you have already added the Toggle Read Only button in the Quick Access Toolbar.
Step 5: Remove Read Only (Optional)
- Click the Toggle Read Only button again to remove Read-Only from the file name and make it normal.
- If you have not made any changes then it will become normal immediately.
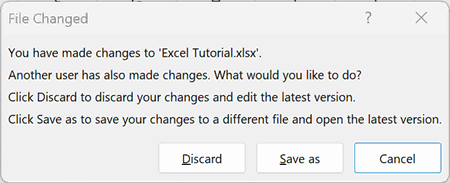
- If you have made any changes after making the file read only then you will get the File Changed dialog box with three options: discard, save as and cancel.
- Click Discard to discard your changes and edit the latest version.
- Click Save as to save your changes to a different file and open the latest version.
- Click Cancel to close the File Changed dialog box and keep as read only.
Conclusion
Click the Toggle Read Only button under Quick Access Toolbar to make the Excel file read only after opening it. If the Toggle Read Only button is not available under the Quick Access Toolbar, you can add it under More Commands. This is the quick and easy method to make ready only after opening an Excel file.
Learn More
» How to Select all Objects in Excel?
» How to use Go To in Excel?
» How to use Find and Replace in Excel?
» How to Count Uppercase Letters in Excel?
» How to Count Lowercase Letters in Excel?
» How to create Relationship in Power Pivot?
» How to Create a Table in Excel?
» How to Create a Pivot Table in Excel?
» How to create a Relationship between Tables in Excel?
» How to use Advanced Filter in Excel?
» How to use What-If Analysis in Excel?

Excel Tutorial Part 1 (Basic)
» Excel Home
» Excel Basics
» Excel Workbook
» Excel Template
» Excel Cell
» Excel Password
Excel Tutorial Part 2 (Format)
» Excel Clipboard
» Excel Format Font
» Excel Format Alignment
» Excel Format Number
» Excel Border
» Excel Conditional Formatting
Excel Tutorial Part 3 (Data)
» Excel Sort Data
» Excel Filter Data
» Excel Text to Columns
» Excel Data Validation
» Excel Flash Fill
» Excel Remove Duplicates
» Excel Relationships
» Excel Consolidate
» Excel What-If Analysis
» Excel Group
» Excel Charts
» Excel Table
» Excel PivotTable
Excel Tutorial Part 4 (Find)
» Excel Find and Replace
» Excel Go To
» Excel Select Objects
» Excel Selection Pane
Excel Tutorial Part 5 (Review)
» Excel Spell Check
» Excel Smart Lookup
» Excel Translate
» Excel Comments & Notes
» Excel Protect
» Excel Hide Ink
Excel Tutorial Part 6 (View)
» Excel Workbook Views
» Excel Formula Bar
» Excel Zoom
» Excel Window
» Excel Macros
Excel Tutorial Part 7 (Fx)
» Excel Formulas (Category)
» Excel Formulas (Alphabetical)
» Excel Errors
» Excel Name Manager
» Excel Formula Auditing
» Excel Watch Window
» Excel Calculation Options
Excel Tutorial Part 8 (Other)
» Excel Add-ins
» Excel Shortcuts

0 Comments