Protect an Excel File
Protect an Excel file to prevent unauthorized access or accidental edits. The Microsoft Excel offers multiple protection features that can be tailored to your needs. Here’s a detailed guide on how to protect an Excel file, the entire workbook, or specific sheets.
How to Protect an Excel File (Workbook)?
Follow the below steps to protect the Excel file or the workbook:
- Open the Excel file you want to protect.
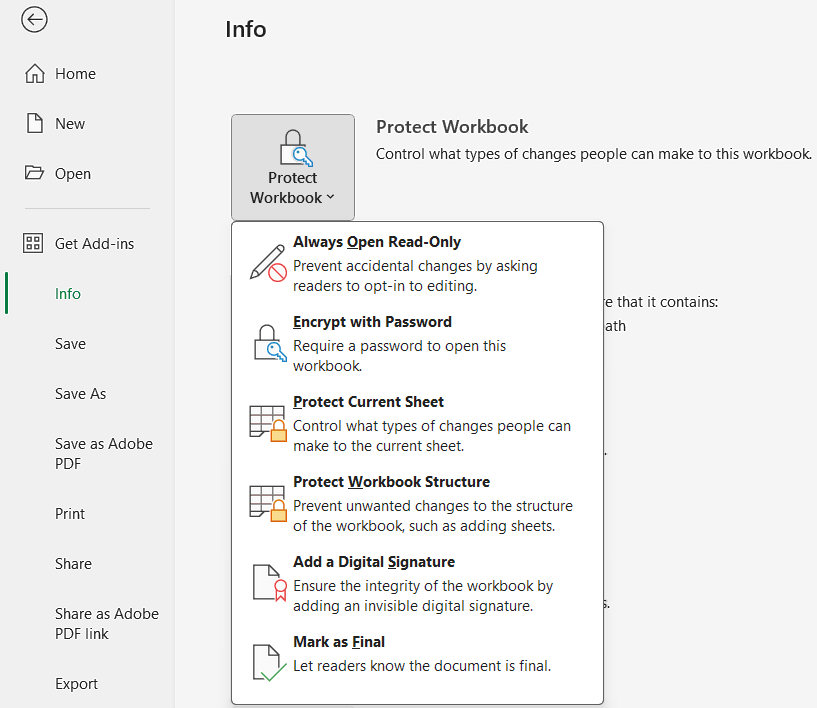
- Go to File > Info.
- Select Protect Workbook and choose Encrypt with Password.
- Enter a password in the pop-up dialog box and click OK.
- Confirm the password by re-entering it and click OK again.
The other features are:
- Always Open Read-Only: to prevent accidental changes by asking readers to opt-in editing.
- Protect Current Sheet: to control what type of changes people can make to the current sheet.
- Protect Workbook Structure: to prevent unwanted changes to the structure of the workbook, such as adding worksheets.
- Add a Digital Signature: to ensure the integrity of the workbook by adding an invisible digital signature.
- Mark as Final: to let readers know the document is final.
How to Protect an Excel Workbook (Method – 2)?
Follow the below steps to protect workbook in Excel:
- Open the Excel workbook you want to protect.
- Go to Review tab > Protect group.
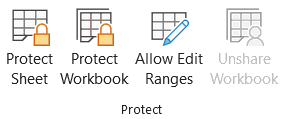
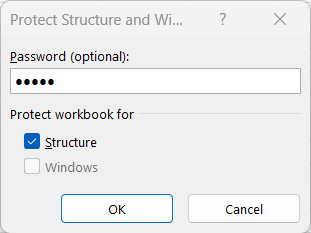
- Select Protect Workbook and enter a password in the pop-up dialog box.
- By default, the Structure will be ticked under Protect workbook for – to prevent unwanted changes to the structure of the workbook. You can untick the same if not required.
- Click OK.
- Re-enter password to proceed and click OK.
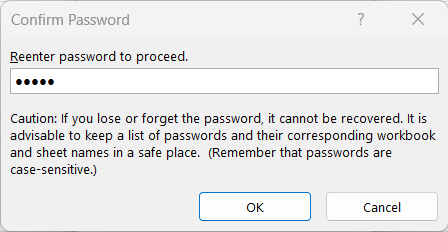
Caution: If you lose of forget the password, it cannot be recovered. It is advisable to keep a list of passwords and their corresponding workbook and sheet names in safe place. (Remember that passwords are case-sensitive.)
How to Protect Sheet in Excel?
Follow the below steps to protect worksheet in Excel:
- Open the Excel workbook you want to protect.
- Go to Review tab > Protect group and select Protect Sheet.
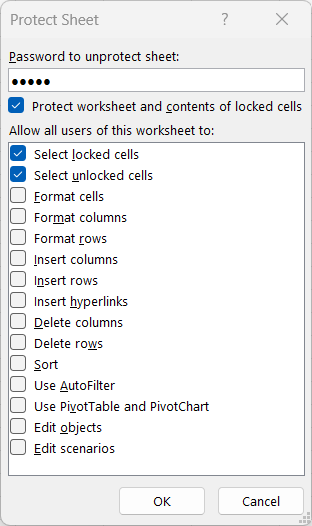
- Enter a password in the Protect Sheet dialog box.
- By default, the Protect worksheet and contents of locked cells will be ticked. Under Allow all users of this worksheet to, the Select locked cells and select unlocked cells will be ticked, and you have below additional options to select:
- Format cells,
- Format columns,
- Format rows,
- Insert columns,
- Insert rows,
- Insert hyperlinks,
- Delete columns,
- Delete rows,
- Sort,
- Use AutoFilter,
- Use PivotTable and PivotChart,
- Edit objects, and
- Edit scenarios.
- Click OK once you have updated the Protect Sheet dialog box.
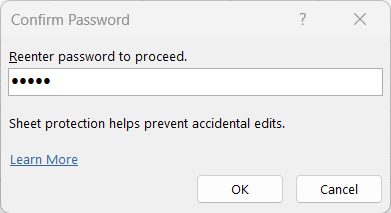
- Re-enter password to proceed and click OK.
Shortcut keys
Below is the keyboard shortcut key to protect an Excel file (workbook/worksheet):
Conclusion
In Excel, protecting sheets and workbooks is like locking specific areas to control access and edits. Sheet protection allows you to restrict changes to certain cells or ranges while enabling permitted actions, such as selecting or editing unlocked cells. Workbook protection secures the workbook’s structure, preventing actions like adding, deleting, or rearranging sheets. You can also set a password to restrict who can open or modify the workbook. These features are essential for preserving data integrity and accuracy, especially in shared or sensitive Excel files.
Learn More
» How to use Smart Lookup in Excel?
» How to Spell Check in Excel?
» How to use Selection Pane in Excel?
» How to Select all Objects in Excel?
» How to use Go To in Excel?
» How to use Find and Replace in Excel?
» How to Count Uppercase Letters in Excel?
» How to Count Lowercase Letters in Excel?
» How to create Relationship in Power Pivot?
» How to Create a Table in Excel?
» How to Create a Pivot Table in Excel?
» How to create a Relationship between Tables in Excel?
» How to use Advanced Filter in Excel?
» How to use What-If Analysis in Excel?
Excel Tutorial Part 1 (Basic)
» Excel Home
» Excel Basics
» Excel Workbook
» Excel Template
» Excel Cell
» Excel Password
Excel Tutorial Part 2 (Format)
» Excel Clipboard
» Excel Format Font
» Excel Format Alignment
» Excel Format Number
» Excel Border
» Excel Conditional Formatting
Excel Tutorial Part 3 (Data)
» Excel Sort Data
» Excel Filter Data
» Excel Text to Columns
» Excel Data Validation
» Excel Flash Fill
» Excel Remove Duplicates
» Excel Relationships
» Excel Consolidate
» Excel What-If Analysis
» Excel Group
» Excel Charts
» Excel Table
» Excel PivotTable
Excel Tutorial Part 4 (Find)
» Excel Find and Replace
» Excel Go To
» Excel Select Objects
» Excel Selection Pane
Excel Tutorial Part 5 (Review)
» Excel Spell Check
» Excel Smart Lookup
» Excel Translate
» Excel Comments & Notes
» Excel Protect
» Excel Hide Ink
Excel Tutorial Part 6 (View)
» Excel Workbook Views
» Excel Formula Bar
» Excel Zoom
» Excel Window
» Excel Macros
Excel Tutorial Part 7 (Fx)
» Excel Formulas (Category)
» Excel Formulas (Alphabetical)
» Excel Errors
» Excel Name Manager
» Excel Formula Auditing
» Excel Watch Window
» Excel Calculation Options
Excel Tutorial Part 8 (Other)
» Excel Add-ins
» Excel Shortcuts

0 Comments