How to use Data Validation in Excel
This guide will show you how to use data validation in Excel step by step. The data validation in Excel is a useful feature that helps keep your data accurate and consistent. By setting up rules, you can control what type of data can be entered in a cell, reducing mistakes and improving the reliability of your data.
What is Data Validation in Excel?
The data validation in Excel lets you control what kind of data can go into a cell. This helps to keep your data accurate and consistent by limiting the types of information that can be entered, reducing errors, and making sure everyone follows the same rules when entering data.
What are the Benefits of Data Validation in Excel?
- Accurate Data: The data validation in Excel makes sure only the right kind of data is entered in the cell, preventing mistakes like wrong dates, numbers that are too high, too low, or invalid text.
- Data Consistency: It keeps the data entries uniform, which is important for analyzing and creating reports in Microsoft Excel.
- Data Quality: By setting rules for what data can be entered, the data validation helps keep your datasets accurate and reliable.
- Enhance Data Input: It helps users enter the correct data by providing drop-down lists, error alerts, and helpful input messages.
- Reduces Errors: By limiting the type of data that can be entered in the cell, it reduces the chance of incorrect data entry.
- Saves Time: By automating the validation process, the Excel data validation feature saves time that would otherwise be spent on manual checks.
How to use Data Validation in Excel?
Follow the below steps to add data validation in Excel:
Step 1. Select Cells
Step 2. Open Data Validation dialog box
- Go to the Data tab on the Ribbon.
- Click the “Data Validation” button in the “Data Tools” section.
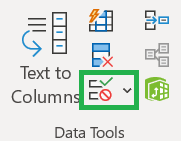
Step 3. Choose Data Validation Criteria
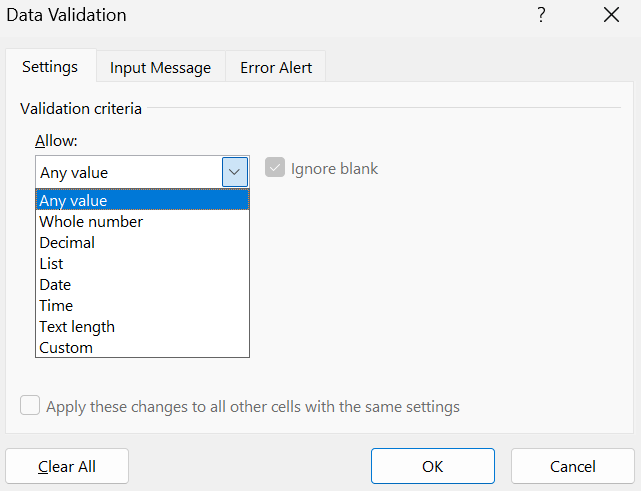
- Go to the Settings tab in the Data Validation window.
- Choose the data validation criteria from the “Allow” drop-down menu. There are 8 types of data validation criteria and those are:
- Any Value: You can set a cell to accept any value such as text, number, date, time etc.
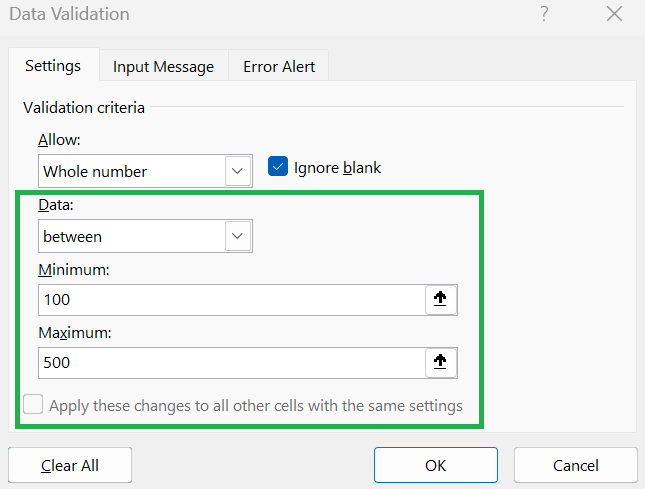
- Whole Number: You can set a cell to only accept whole numbers within a specific range.
- Decimal: You can set a cell to only accept decimal numbers within a specific range.
- List: You can create a drop-down menu in a cell for users to select from specific options.
- Date: You can set a cell to only accept dates within a specific range.
- Time: You can set a cell to only accept times within a specific range.
- Text Length: You can limit how long the text can be in a cell.
- Custom: You can use a formula to create specific rules for what data is allowed in a cell.
- Specify the conditions for the selected validation criteria (for example, between minimum and maximum values, a list of items, greater than, less than or equal to specific criteria etc.).
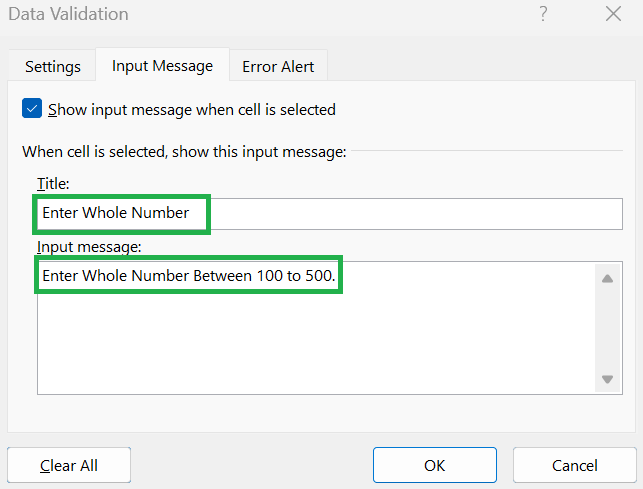
Step 4. Add Input Message (Optional)
Step 5. Show Error Alert (Optional)
- Go to the “Error Alert” tab to decide what should happen when someone enters incorrect data.
- Check the box that says “Show error alert after invalid data is entered”.
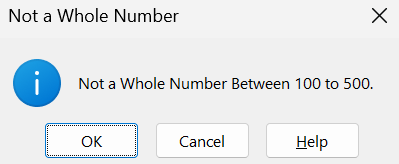
- Select a style for the alert (Stop, Warning, or Information) and then type in a title and an error message.
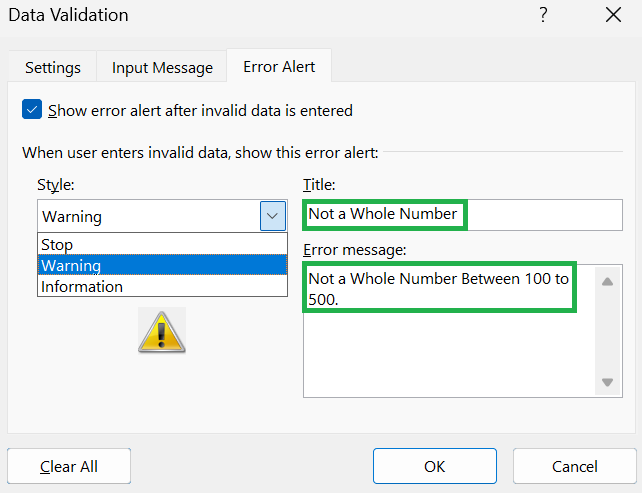
Step 5. Date Entry
- Once you are done, click “OK”.
- Enter the data or select from drop down if the list is created.
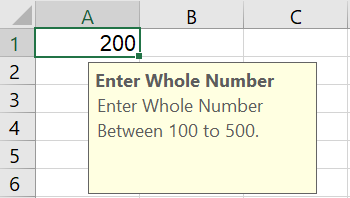
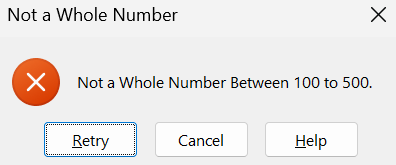
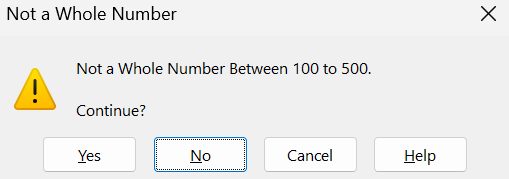
- If you have specified the input message, then it will show while entering the data. If you have specified the error alert and the data is not meeting the validation criteria then you will get either stop, warning or information dialog box which is defined in the data validation.
Stop Message Example:
Warning Message Example:
Information Message Example:
How to use Data Validation in Excel by Shortcut?
Below is the keyboard shortcut key to use data validation in Excel:
Conclusion
The data validation in Excel is a key feature that helps to keep your data accurate and consistent. It works by setting rules for what users can enter in cells. This makes your data cleaner and reduces mistakes, making it easier to manage and analyze.
Learn More
» How to use Text to Columns in Excel?
» How to Filter Data in Excel?
» How to use Advanced Filter in Excel?
» How to Sort Data in Excel?
» How to use Conditional Formatting in Excel?
» How to Add Borders in Excel?

Excel Tutorial Part 1 (Basic)
» Excel Home
» Excel Basics
» Excel Workbook
» Excel Template
» Excel Cell
» Excel Password
Excel Tutorial Part 2 (Format)
» Excel Clipboard
» Excel Format Font
» Excel Format Alignment
» Excel Format Number
» Excel Border
» Excel Conditional Formatting
Excel Tutorial Part 3 (Data)
» Excel Sort Data
» Excel Filter Data
» Excel Text to Columns
» Excel Data Validation
» Excel Flash Fill
» Excel Remove Duplicates
» Excel Relationships
» Excel Consolidate
» Excel What-If Analysis
» Excel Group
» Excel Charts
» Excel Table
» Excel PivotTable
Excel Tutorial Part 4 (Find)
» Excel Find and Replace
» Excel Go To
» Excel Select Objects
» Excel Selection Pane
Excel Tutorial Part 5 (Review)
» Excel Spell Check
» Excel Smart Lookup
» Excel Translate
» Excel Comments & Notes
» Excel Protect
» Excel Hide Ink
Excel Tutorial Part 6 (View)
» Excel Workbook Views
» Excel Formula Bar
» Excel Zoom
» Excel Window
» Excel Macros
Excel Tutorial Part 7 (Fx)
» Excel Formulas (Category)
» Excel Formulas (Alphabetical)
» Excel Errors
» Excel Name Manager
» Excel Formula Auditing
» Excel Watch Window
» Excel Calculation Options
Excel Tutorial Part 8 (Other)
» Excel Add-ins
» Excel Shortcuts

0 Comments