How to use Flash Fill in Excel
This guide will show you how to use flash fill in Excel step by step. The flash fill in Excel is a handy tool that automatically completes data for you by finding patterns in your entries. It saves time by quickly finishing repetitive tasks with very little effort from you.
What is Flash Fill in Excel?
The flash fill in Excel was introduced in 2013. It is a tool that automatically fills in data based on patterns it notices from what you type. It makes easy to format and organize data without using complicated formulas or doing lots of manual work. The flash fill can do things like split text, join text, or change the format of data in columns by learning from the examples you provide.
What are uses of Flash Fill in Excel?
- Splitting Data: Break down the data into separate columns similar to Text to Columns feature in Excel. For example, split phone numbers to get area codes in one column and the rest in another.
- Combining Data: Combine data from multiple columns into one, similar to Concatenate function in Excel. For example, create email addresses by merging first names and last names.
- Formatting Data: Change the appearance of data entries, such as formatting dates in Excel. For example, convert dates from “mm/dd/yyyy” to “Month dd, yyyy”.
- Extracting Data: to Pull specific data from text entries, similar to using LEFT, RIGHT, MID, or FIND functions in Excel. For example, extract the domain name from email addresses.
What are the Advantages of Flash Fill in Excel?
The main advantages of Flash Fill in Excel are filling data automatically, saving time and reducing manual effort. Let’s understand all the advantages of Flash Fill in Excel in detail:
- Saves Time: The Flash Fill in Excel is used to automate the repetitive tasks by cutting down the time spent on manual data entry for each task.
- Easy to Use: The Flash Fill in Microsoft Excel is very easy to use and understand.
- Quick Data Entry: The Flash Fill enters the data quickly by recognizing patterns in your data and filling in the rest.
- Simple Interface: The Flash Fill is simple – just start typing a pattern, and Excel will suggest the remaining entries, making it accessible for everyone, regardless of their Excel skills.
- Consistent Data: The Flash Fill feature in Excel ensures uniformity across your data sets by applying the same pattern to related cells, minimizing errors that can happen with manual entry and keeping your data in a specific format.
- Versatile Data Handling: The Flash Fill can handle various data tasks like formatting, splitting, combining, and extracting data, streamlining processes like separating names or extracting email addresses from a list.
- No Formula Knowledge Needed: The Flash Fill doesn’t require you to know formulas, making it ideal for users who prefer simpler solutions.
- Automatic Updates: TheExcel’s Flash Fill adapts to changes in your data. If you adjust the pattern or source data, it will update the filled-in values accordingly, saving you from redoing everything manually.
- Minimized Errors: By automating data tasks, the Flash Fill reduces the chance of errors that can occur with manual entry or complex formulas, leading to more precise data analysis and reporting.
What are the Disadvantages of Flash Fill in Excel?
The flash fill in Excel can save a lot of time and effort, but it also has some disadvantages that you should know about:
Pattern Recognition Challenges: The Flash Fill in Excel identifies patterns to automate tasks, but it can make mistakes if the pattern isn’t clear or if the data has irregularities. For example, if the data formatting varies, the Flash Fill might give incorrect results.
Weak Error Handling: The Flash Fill lacks strong error handling. If it misunderstands a pattern or fails to recognize it, it won’t give any error message. This can lead to unnoticed errors, especially in large datasets.
Limited Versatility: The Flash Fill is best for simple patterns. It can’t handle complex transformations or tasks needing conditional logic or advanced functions. For those, users have to turn to more advanced Excel functions or VBA scripting.
Static Operations: The Flash Fill’s changes are static. Once it fills data, it won’t update automatically if the original data changes. Unlike Excel formulas, which update dynamically.
Narrow Application: The Flash Fill is great for basic tasks like splitting or merging text, but for more complex data tasks, it’s not enough. Users often need other Excel features or manual editing for desired results.
Performance Challenges: With large datasets, Flash Fill can slow down or freeze. It’s optimized for small to medium-sized datasets, and its performance suffers with larger data volumes.
User Reliance: The Flash Fill’s success depends on users correctly identifying and inputting patterns. If the examples provided are unclear or wrong, Flash Fill won’t work properly.
Limited Data Compatibility: The Flash Fill mainly handles text data and might struggle with numerical data, dates, or specialized formats. Complex date transformations or math operations often need advanced Excel functions or programming.
Lack of Tracking: The changes by Flash Fill aren’t easy to track. Unlike formulas, which show their logic, Flash Fill just replaces data. This makes it hard to trace changes, maintain data integrity, and debug.
How to use Flash Fill in Excel (Step by Step)?
Follow the below steps to use Flash Fill in Excel:
Step 1. Enter Sample Data
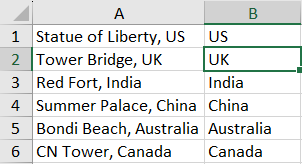
- Enter the sample of the desired data in the destination column. In the below example, there are muliple address in column A and we need only the coluntry in column B. So, enter the desired country in cell B1 as “US”.
- If the data is more complex then you can enter few more samples in subsequents cells. But make sure the data is uniform and correct. Then go to the next cell (in this example: B2).

Step 2. Use Flash Fill
- Go to the Data tab on the Ribbon.
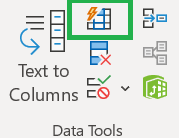
- Click the “Flash Fill” button in the “Data Tools” section.

Step 3. Check and Confirm
- When you use Excel’s Flash Fill feature, it automatically predicts and fills in adjacent cells with what it thinks is the right information.
- Take a look at the filled cells to make sure they are correct.

Step 3. Repeat for Other Columns (Optional)
- If necessary, you can repeat Step 1 and 2 for other columns too.
- For example, you want to extract place names from the address in column A. You can update the sample data in Column C with the desired data and use Flash Fill accordingly.
How to use Flash Fill in Excel by Shortcut?
Below is the keyboard shortcut key to use Flash Fill in Excel:
Conclusion
In Excel, think of Flash Fill feature as your super-fast data assistant. It automatically organizes and grabs the info you need from messy data, making your job easier and quicker.
Learn More
» How to use Data Validation in Excel?
» How to use Text to Columns in Excel?
» How to Filter Data in Excel?
» How to use Advanced Filter in Excel?
» How to Sort Data in Excel?
» How to use Conditional Formatting in Excel?

Excel Tutorial Part 1 (Basic)
» Excel Home
» Excel Basics
» Excel Workbook
» Excel Template
» Excel Cell
» Excel Password
Excel Tutorial Part 2 (Format)
» Excel Clipboard
» Excel Format Font
» Excel Format Alignment
» Excel Format Number
» Excel Border
» Excel Conditional Formatting
Excel Tutorial Part 3 (Data)
» Excel Sort Data
» Excel Filter Data
» Excel Text to Columns
» Excel Data Validation
» Excel Flash Fill
» Excel Remove Duplicates
» Excel Relationships
» Excel Consolidate
» Excel What-If Analysis
» Excel Group
» Excel Charts
» Excel Table
» Excel PivotTable
Excel Tutorial Part 4 (Find)
» Excel Find and Replace
» Excel Go To
» Excel Select Objects
» Excel Selection Pane
Excel Tutorial Part 5 (Review)
» Excel Spell Check
» Excel Smart Lookup
» Excel Translate
» Excel Comments & Notes
» Excel Protect
» Excel Hide Ink
Excel Tutorial Part 6 (View)
» Excel Workbook Views
» Excel Formula Bar
» Excel Zoom
» Excel Window
» Excel Macros
Excel Tutorial Part 7 (Fx)
» Excel Formulas (Category)
» Excel Formulas (Alphabetical)
» Excel Errors
» Excel Name Manager
» Excel Formula Auditing
» Excel Watch Window
» Excel Calculation Options
Excel Tutorial Part 8 (Other)
» Excel Add-ins
» Excel Shortcuts

0 Comments