How to use Name Manager in Excel
In this article, you will learn how to use Name Manager in Excel step by step. Using a clear and organized way to name ranges in Excel can make work easier and reduce mistakes. Built-in tools help users handle named ranges efficiently, making formulas easier to read and ensuring consistency across spreadsheets.
Table of Contents:
» What is Name Manager in Excel
» Where to find Name Manager in Excel
» How to Create Named Ranges in Excel
» How to Delete all Name Manager in Excel
» How to Edit Named Ranges in Excel
» What are the Advantages of using Name Manager in Excel
» What are the Disadvantages of using Name Manager in Excel
» How to use Name Manager in Excel Shortcut
» Conclusion
What is Name Manager in Excel?
- The Name Manager in Excel is a powerful tool that allows users to create, edit, and manage named ranges, constants, and formulas.
- It enhances formula readability and simplifies data navigation, especially in large spreadsheets.
- It lets users modify or delete named ranges without disrupting the worksheet’s structure.
- Using named ranges in formulas improves clarity and minimizes errors in complex calculations.
Where to find Name Manager in Excel?
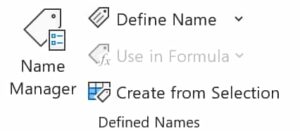
- Go to the Formulas tab in the Ribbon.
- You can find the Name Manager in the Defined Names group.
How to Create Named Ranges in Excel?
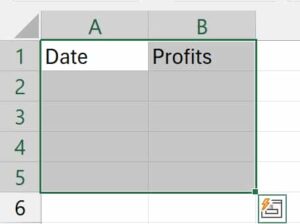
- Open your Excel worksheet and select the range of cells that you want to name.
- For example, select the cells from A1 to B5.
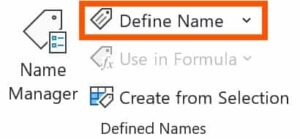
- Navigate to the Formulas tab in the ribbon and click on Define Name under the Defined Names group to create a new named range.
- In the New Name dialog box, enter a meaningful and descriptive name for the selected range.
- In this example, we have defined the Name as Transactions.
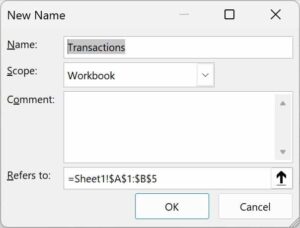
- Ensure that the Scope is set correctly, either for the entire workbook or a specific worksheet.
- Click the OK button to save the newly defined named range.
- Once created, you can use the named range in formulas instead of referencing cell addresses.
How to Delete all Name Manager in Excel?
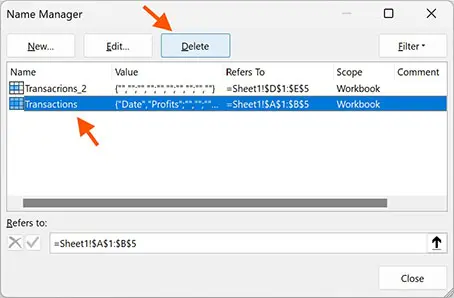
- In Excel, go to the Formulas tab and select Name Manager.
- To delete a name manager, click on the name and click Delete button.
- To delete all name manager, click the first Name and hold Shift key and click the last Name, then press Delete button.
- To delete only few Names, press Ctrl and click on the Names one by one, then click Delete button.
- Click Close once you have deleted.
How to Edit Named Ranges in Excel?
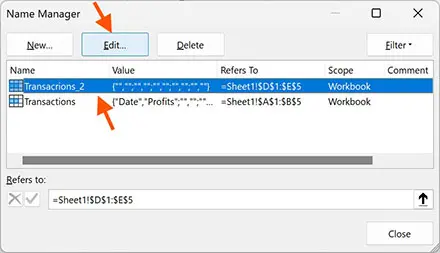
- To edit a named range in Excel, go to the Formulas > Name Manager in the Defined Names group.
- In the Name Manager dialog box, click on the named range to select it.
- Then click Edit button to get the Edit Name dialog box.
- Hove over to the Name and edit it (in this example, we have changed it to Transactions_2nd).
- Click OK once you have changed the Name.
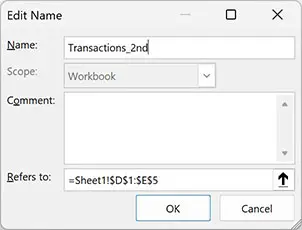
Similarly, you can edit the cell ranges in the Refers to and add/edit comment in the Comment section.
What are the Advantages of using Name Manager in Excel?
Makes Formulas Clearer: Giving meaningful names to cells or ranges in Excel makes formulas easier to read and understand.
Reduces Errors: The named ranges in Excel help prevent mistakes in complex calculations by replacing confusing cell references.
Simplifies Formula Writing: Using names instead of cell addresses makes formulas more intuitive and easier to manage.
Keeps Spreadsheets Organized: The named ranges in Excel improves structure and make navigation within the spreadsheet more efficient.
Saves Time: The Name Manager in Excel saves time by allowing quick access to important data without searching through multiple cells.
What are the Disadvantages of using Name Manager in Excel?
Risk of Errors: If a named range is deleted or changed incorrectly, formulas may stop working.
Not Easily Visible: Unlike regular cell references, named ranges are not always visible, and making troubleshooting difficult.
Compatibility Issues: Some older Excel versions or other spreadsheet programs might not support named ranges properly.
Hard to Manage in Large Files: Keeping track of many named ranges in big spreadsheets can be tricky.
Regular Updates: As data changes, named ranges may need to be updated, which can take extra time.
How to use Name Manager in Excel Shortcut?
Below are the keyboard shortcut keys to use Name Manager in Excel:
Conclusion
The named ranges in Excel make working with data easier by giving meaningful names to cell ranges. This helps to improve clarity, reduces mistakes, and makes formulas simpler to use. Whether for calculations, data validation, or quick navigation, named ranges keep spreadsheets more organized and user-friendly.
Learn More
» How to use Smart Lookup in Excel?
» How to Spell Check in Excel?
» How to use Selection Pane in Excel?
» How to Select all Objects in Excel?
» How to use Go To in Excel?
» How to use Find and Replace in Excel?
» How to Count Uppercase Letters in Excel?
» How to Count Lowercase Letters in Excel?
» How to create Relationship in Power Pivot?
» How to Create a Table in Excel?
» How to Create a Pivot Table in Excel?
» How to create a Relationship between Tables in Excel?
» How to use Advanced Filter in Excel?
» How to use What-If Analysis in Excel?

Excel Tutorial Part 1 (Basic)
» Excel Home
» Excel Basics
» Excel Workbook
» Excel Template
» Excel Cell
» Excel Password
Excel Tutorial Part 2 (Format)
» Excel Clipboard
» Excel Format Font
» Excel Format Alignment
» Excel Format Number
» Excel Border
» Excel Conditional Formatting
Excel Tutorial Part 3 (Data)
» Excel Sort Data
» Excel Filter Data
» Excel Text to Columns
» Excel Data Validation
» Excel Flash Fill
» Excel Remove Duplicates
» Excel Relationships
» Excel Consolidate
» Excel What-If Analysis
» Excel Group
» Excel Charts
» Excel Table
» Excel PivotTable
Excel Tutorial Part 4 (Find)
» Excel Find and Replace
» Excel Go To
» Excel Select Objects
» Excel Selection Pane
Excel Tutorial Part 5 (Review)
» Excel Spell Check
» Excel Smart Lookup
» Excel Translate
» Excel Comments & Notes
» Excel Protect
» Excel Hide Ink
Excel Tutorial Part 6 (View)
» Excel Workbook Views
» Excel Formula Bar
» Excel Zoom
» Excel Window
» Excel Macros
Excel Tutorial Part 7 (Fx)
» Excel Formulas (Category)
» Excel Formulas (Alphabetical)
» Excel Errors
» Excel Name Manager
» Excel Formula Auditing
» Excel Watch Window
» Excel Calculation Options
Excel Tutorial Part 8 (Other)
» Excel Add-ins
» Excel Shortcuts

0 Comments