How to use Text to Columns in Excel
This guide will show you how to use text to columns in Excel. The text to columns is a handy feature in Microsoft Excel that helps you to split data in one column into several columns using a specific separator (like a comma) or by setting a fixed width.
The text to columns in Excel is very useful for organizing and managing your data. For example, you can separate first and last names, break down data from CSV files, or extract particular details from text.
By turning messy data into a neat and structured format, the text to columns makes it easier to read and analyze your data. Whether you’re working with small lists or large datasets, learning to use this feature can make your work in Excel much easier and more efficient.
How to Convert Text to Columns in Excel?
Follow the below steps to convert text to columns in Excel:
Step 1. Select Data
- Select the cell with the data you want to split.
- To split data in multiple cells, click and drag your mouse to highlight the range of cells.
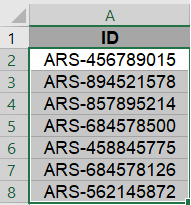
- Example: Select the cells from A2 to A8.
Step 2. Open Text to Columns dialog box
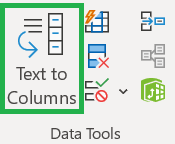
- Go to the Data tab on the Ribbon.
- Click the “Text to Columns” button in the “Data Tools” section.
Step 3. Choose Data Type
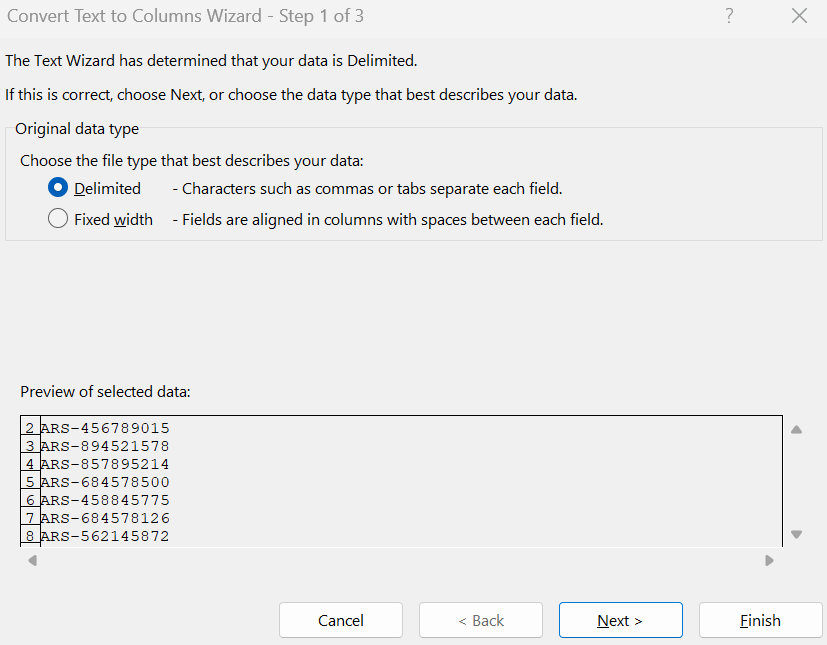
- There are two options to choose the file type that best describes you:
- Delimited: if your data is separated by specific characters like commas, tabs, spaces, or others.
- Fixed width: if your data is arranged in columns with spaces between each section.
- Select Delimited or Fixed Width and then click “Next”.
Step 4. Specify Delimiters or Column Breaks
Delimited
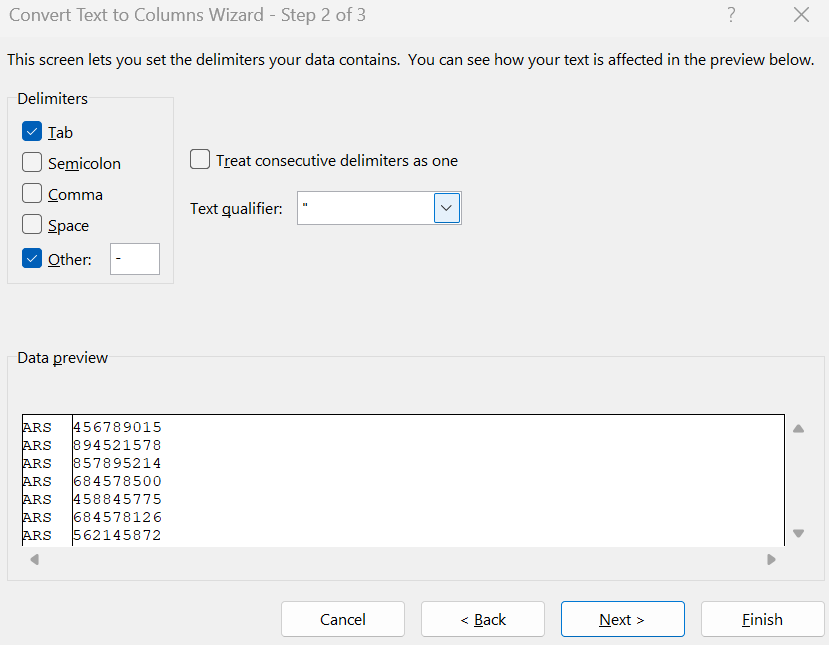
- In the Delimiters section, pick the character that separates your data (tab, semicolon, comma, space and other). In the below example, “Other’ is selected and “-” is entered to separate the text.
- You also can choose more than one delimiter if required.
- A preview of how your data will be split is shown in the Data preview section.
Fixed Width
- If you have selected the “Fixed width” in the previous step then you’ll see a preview with vertical lines showing where the columns will split and you can do the following:
- To CREATE a break line, click at the desired position.
- To DELETE a break line, double click on the line.
- to MOVE a break line, click and drag it.
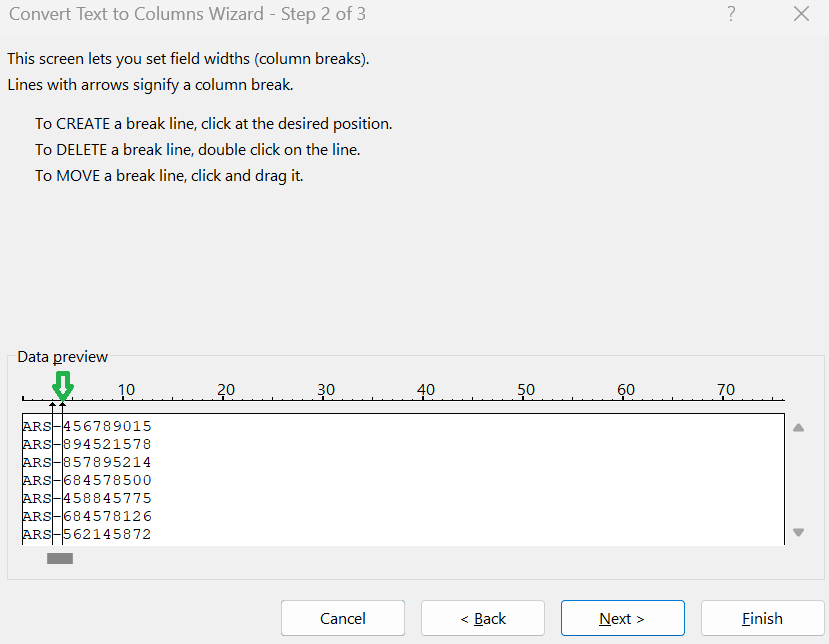
Once you are satisfied with preview, click “Next”.
Step 5. Column Data Format
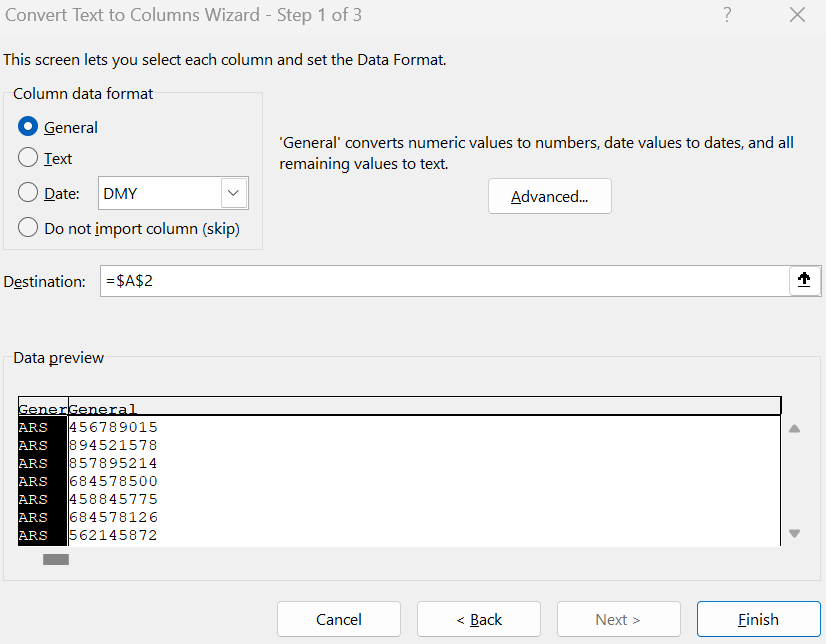
- This screen lets you select each column and set the data format. Under column data format, “General” is the default. The “General” converts numeric values to numbers, date values to dates, and all remaining values to text.
- You can also set the format to “Text” or “Date.”
- To ignore a column, select it in the Data Preview and choose “Do not import column (skip).”
Advanced Text Import Settings
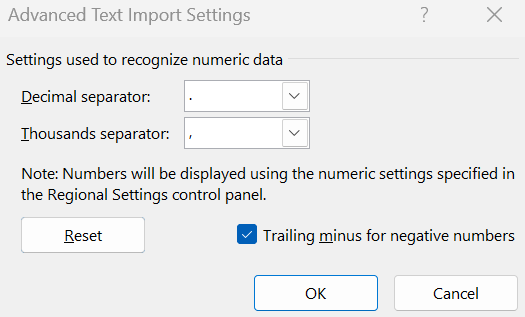
- You can click on “Advanced…” to get the “Advanced Text Import Settings”, which is used to recognize numeric data.
- You have option to choose decimal separator and thousands separator.
- The numbers will be displayed using the numeric settings specified in the Regional Settings control panel.
- Also you have option for trailing minus for negative numbers.
Destination
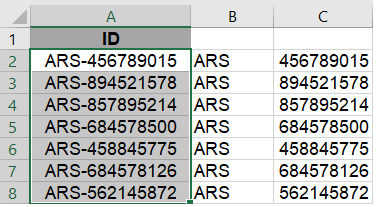
- Under “Destination, you can choose the desired cell in which you want the output to be reflected.
- In theis example, cell B2 is the destination cell in which the converted text will appear, without disturbing the original data in A column.

Step 5. Finish and Adjust Column Width
- Once you are done, click “Finish” so that your data will be split into several columns based on the delimiter you choose or by fixed width.
- To see all the data, you might need to adjust the column widths. Just click and drag the border between the column headers to resize them if required.
How to use Text to Columns in Excel by Shortcut?
Below is the keyboard shortcut key to use “Text to Columns” in Excel:
Conclusion
In Excel, Text to Columns feature is a super useful tool for organizing your data neatly. Instead of dealing with one huge column of data, the Text to Columns lets you split it into smaller columns. You can do this by choosing separators like commas or spaces, or by setting specific widths for each column.
Learn More
» How to Filter Data in Excel?
» How to use Advanced Filter in Excel?
» How to Sort Data in Excel?
» How to use Conditional Formatting in Excel?
» How to Add Borders in Excel?

Excel Tutorial Part 1 (Basic)
» Excel Home
» Excel Basics
» Excel Workbook
» Excel Template
» Excel Cell
» Excel Password
Excel Tutorial Part 2 (Format)
» Excel Clipboard
» Excel Format Font
» Excel Format Alignment
» Excel Format Number
» Excel Border
» Excel Conditional Formatting
Excel Tutorial Part 3 (Data)
» Excel Sort Data
» Excel Filter Data
» Excel Text to Columns
» Excel Data Validation
» Excel Flash Fill
» Excel Remove Duplicates
» Excel Relationships
» Excel Consolidate
» Excel What-If Analysis
» Excel Group
» Excel Charts
» Excel Table
» Excel PivotTable
Excel Tutorial Part 4 (Find)
» Excel Find and Replace
» Excel Go To
» Excel Select Objects
» Excel Selection Pane
Excel Tutorial Part 5 (Review)
» Excel Spell Check
» Excel Smart Lookup
» Excel Translate
» Excel Comments & Notes
» Excel Protect
» Excel Hide Ink
» Excel Clipboard
Excel Tutorial Part 6 (View)
» Excel Workbook Views
» Excel Formula Bar
» Excel Zoom
» Excel Window
» Excel Macros
Excel Tutorial Part 7 (Fx)
» Excel Formulas (Category)
» Excel Formulas (Alphabetical)
» Excel Errors
» Excel Name Manager
» Excel Formula Auditing
» Excel Watch Window
» Excel Calculation Options
Excel Tutorial Part 8 (Other)
» Excel Add-ins
» Excel Shortcuts

0 Comments