How to use What-If Analysis in Excel
This guide will show you how to use what-if analysis in Excel. By learning how to use What-If Analysis tools in Excel, you can try different sets of values in your formulas to see all the possible results. Nearly all data analysts use What-If Analysis in Excel to make quicker and more precise decisions using data.
The What-If Analysis in Excel is used to try out various values for the formulas in your sheet using:
- Scenario Manager,
- Goal Seek and
- Data Table.
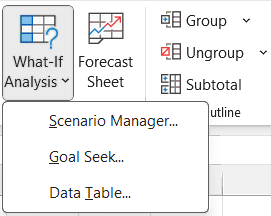
Let’s understand Goal Seek and Data Table before Scenario Manager for better understanding.
How to use What-If Analysis in Excel for Goal Seek?
The Goal Seek in Excel helps you to find the right input needed to get the specific value in a formula. If you know the result but not the input, then the Goal Seek can find it for you. It does this by changing the input value step by step until the formula’s output matches your desired result.
The Goal Seek in Excel contains 3 elements and those are:
- Set cell – the cell reference which contains the formula within it.
- To value – the cell reference of the desired value which you want to get.
- By changing cell – the input cell that will change based on your goal.
Example:
Let’s understand the Goal Seek with an easy example.
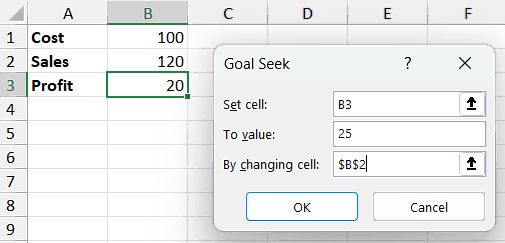
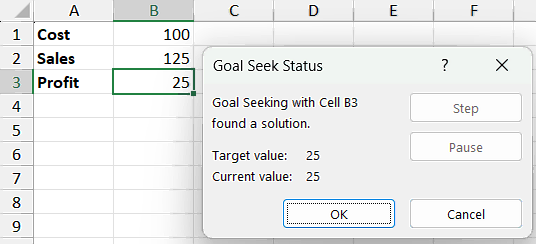
- The Proft in cell B3 contain formula (=B2-B1), i.e., Sales $120 minus Cost $100.
- The desired profit is $25 (now $20).
- By changing the Sales in cell B2 from $120 to the updated value based on profit of $25.
How to use What-If Analysis in Excel for Data Table?
The Data Table in Excel is used to display different outcomes based on different inputs. They are commonly used in financial models to examine various scenarios, particularly when the future is unpredictable. The Data Table in Excel helps you to see the results of multiple inputs at the same time.
Example:
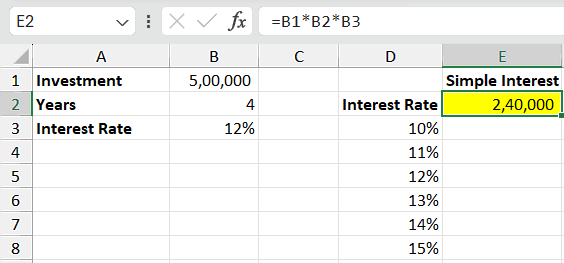
- In this one variable Data Table example, the simple interest in cell E2 is calculated by multiplying investment, years and interest rate (=B1*B2*B3).
- There are different interest rates in column D, and we will calculate the simple interest in column E using the Data Table feature in Excel.
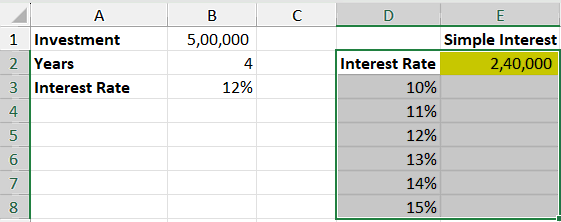
- Select the cell range from D2 to E8.
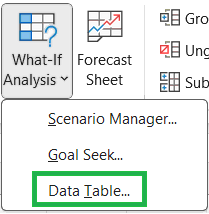
- Go to Data tab in the ribbon and click on Data Table button under What-If Analysis.
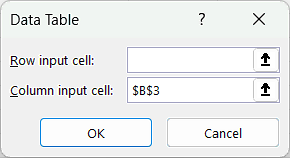
- In the Data Table window, you have to go to “Column input cell” section and select the cell reference of interest rate ($B$3).
- Leave the “Row input cell” section blank and Click OK.
- The simple interest will be calculated in cell E3 to E8 based on the interest rates in D column.
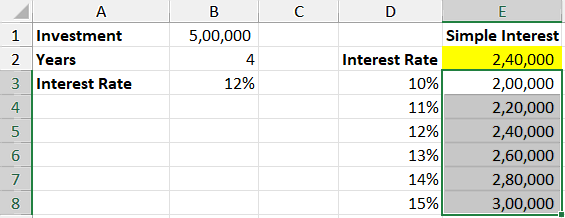
The above is just a simple example of Data Table in Excel, but you can do much more using the Data Table feature in Excel, such as two variable data table, row-oriented data table, data table to compare multiple results etc.
How to use What-If Analysis in Excel for Scenario Manager?
A scenario in Excel is a set of saved values that you can automatically swap into your worksheet cells. The scenario manager is an Excel tool used for what-if analysis, allowing you to test different scenarios. Here are the main features:
- You can save different sets of values and switch between them to see different outcomes.
- A scenario can include several variables but can only hold up to 32 values.
- You can generate a scenario summary report to view all scenarios on one sheet. For instance, you might create various budget scenarios to compare different income and expense levels side-by-side.
- Scenario Manager is a tool that lets you save the values and give them a name to it.
Example:
Let’s understand the Scenario Manager with an easy example.
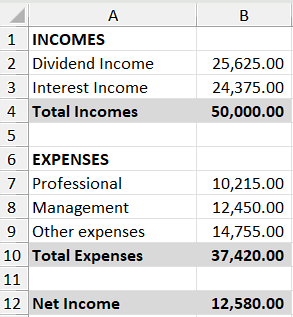
- In this example, total incomes in cell B4, total expenses in cell B10 and the net income in cell B12.
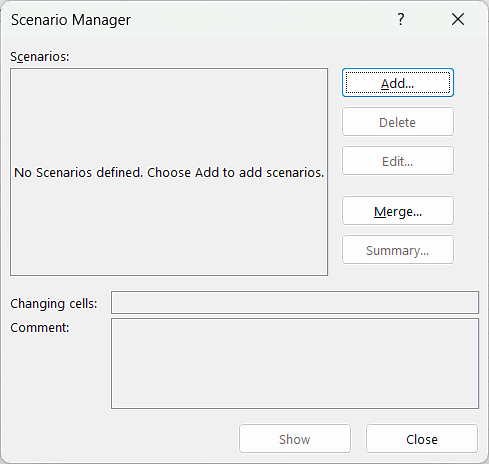
- Go to Data tab in the ribbon and click on Scenario Manager button under What-If Analysis.
- Click on “Add…” in the Scenario Manager window.
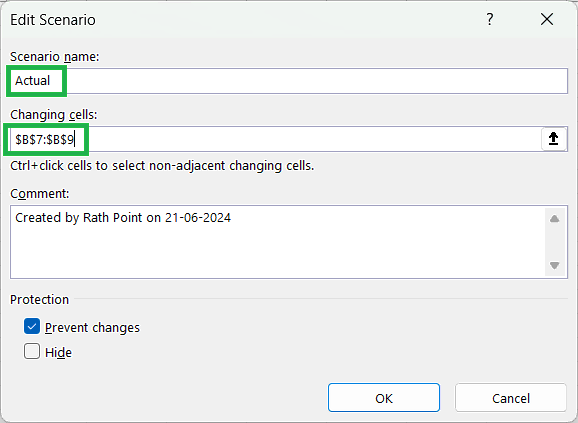
- Type scenario name in the Edit Scenario dialog box. In this example, the scenario name is “Actual”.
- In the “Changing cells”, you must specify the cell references you want to modify. Let’s define the expenses as a reference i.e. cell B7 to B9.
- In the “Comments” section, it will automatically take the name and date based on the Excel and system settings. You can modify the comment based on your requirement.
- Under the Protection section, tick the “Prevent Changes” button and leave the “Hide” button unticked. Then click Ok.
- At least one of the changing cells you specified contains a data type or a formula. Formulas will be replaced by constant values when you show a scenario, and data types will be detected.
- Click OK.

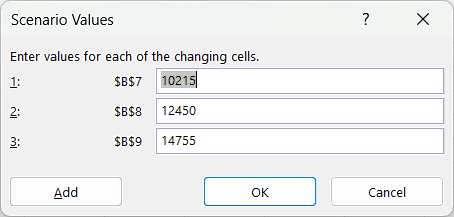
- In the Scenario Values dialog box, do not change any values. In this example, we want to keep it as Actual as specified in the scenario name.
- Click “Add” to add another scenario.
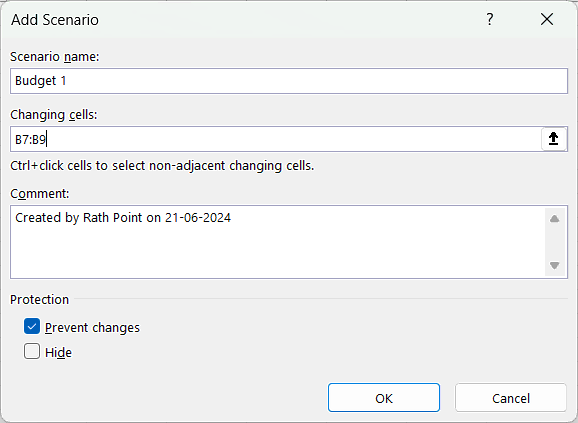
- In the Add Scenario dialog box, let’s keep the scenario name as “Budget 1” and in the Changing cells, specify the same cell references of the expenses as cell B7 to B9.
- Under the Protection section, tick the Prevent Changes button only. Then click Ok.
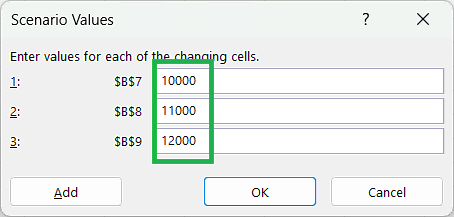
- In the Scenario Values dialog box, enter values for each of the changing cells. In this example, we updated as 10,000 for professional expenses in cell B7, 11,000 for management expenses in cell B8, and 12,000 for other expenses in cell B9.
- Click OK. You can click the “Add” button if you want to add more scenarios.
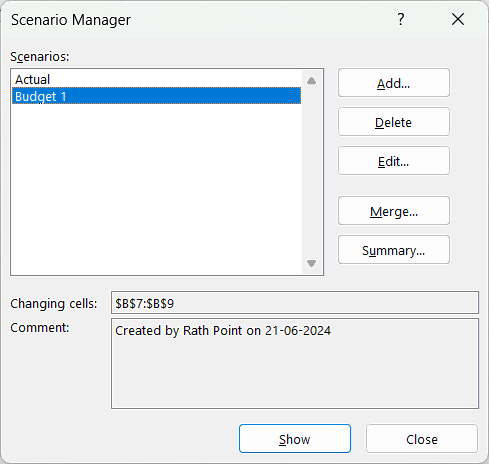
- We have created 2 scenarios as “Actual” and “Budget 1”, which are visible under Scenarios list of the Scenario Manger window.
- You can add, delete, edit or merge scenarios in this window by click on the buttons available right side of this window.
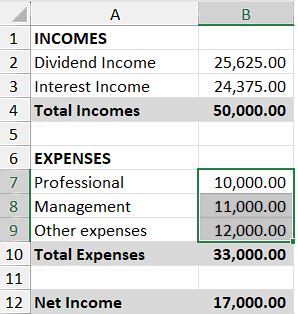
- Select the “Budget 1” scenario and click the “Show” button.
- It will change the professional, management and other expenses in cell B7 to B9 as per the values we have specified.
- Similarly, if you select the “Actual” scenario and click the “Show” button, then it will show the actual values for the expenses. If you have added more scenarios, then you can show the values based on the selected scenario.
How to use What-If Analysis in Excel using Shortcut?
Below is the keyboard shortcut key to navigate to the What-If Analysis, Goal Seek, Data Table and Scenario Manager button through ribbon in Excel:
Conclusion
The What-If Analysis in Excel gives users a strong tool for making smart decisions and solving problems. Using tools like Scenario Manager, Goal Seek, and Data Tables, you can easily look at different situations and see how they affect your data. This helps with predicting, budgeting, and planning by letting you test ideas and see results under various conditions. In the end, What-If Analysis in Excel boosts your ability to analyse and make informed choices, making you more ready for future changes and opportunities.
Learn More
» How to Consolidate Data in Excel from Multiple Worksheets?
» How to create a Relationship between Tables in Excel?
» How to create Relationship in Power Pivot?
» How to use Conditional Formatting in Excel?
» How to use Data Validation in Excel?
» How to Remove Duplicates in Excel?
» How to use Advanced Filter in Excel?
2 Comments
Submit a Comment

Excel Tutorial Part 1 (Basic)
» Excel Home
» Excel Basics
» Excel Workbook
» Excel Template
» Excel Cell
» Excel Password
Excel Tutorial Part 2 (Format)
» Excel Clipboard
» Excel Format Font
» Excel Format Alignment
» Excel Format Number
» Excel Border
» Excel Conditional Formatting
Excel Tutorial Part 3 (Data)
» Excel Sort Data
» Excel Filter Data
» Excel Text to Columns
» Excel Data Validation
» Excel Flash Fill
» Excel Remove Duplicates
» Excel Relationships
» Excel Consolidate
» Excel What-If-Analysis
» Excel Group
» Excel Charts
» Excel Table
» Excel PivotTable
Excel Tutorial Part 4 (Find)
» Excel Find and Replace
» Excel Go To
» Excel Select Objects
» Excel Selection Pane
Excel Tutorial Part 5 (Review)
» Excel Spell Check
» Excel Smart Lookup
» Excel Translate
» Excel Comments & Notes
» Excel Protect
» Excel Hide Ink
Excel Tutorial Part 6 (View)
» Excel Workbook Views
» Excel Formula Bar
» Excel Zoom
» Excel Window
» Excel Macros
Excel Tutorial Part 7 (Fx)
» Excel Formulas (Category)
» Excel Formulas (Alphabetical)
» Excel Errors
» Excel Name Manager
» Excel Formula Auditing
» Excel Watch Window
» Excel Calculation Options
Excel Tutorial Part 8 (Other)
» Excel Add-ins
» Excel Shortcuts

ITS BEEN VERY GREAT GOING THROUGH THE GUIDELINES. I MUST SAY THANK YOU FOR HOW SIMPLE YOU HAVE MADE THIS EXCEL LEARNING SO EASY.
I AM PICKING UP AND I BELIEVE THAT, WITH THIS GUIDELINES, I WILL BE A MASTER OF EXCEL. I AM ALREADY EXCELLING IN EXCEL.
You are welcome.