How to Increase or Decrease Indent in Excel
You can increase or decrease indent in Excel to add or remove space automatically. This tutorial will show you how to increase or decrease indent in Excel, by which you can move text slightly to the right or left within a cell, making it easier to read and understand.
How to Increase or Decrease Indent in Excel using Ribbon?
In Excel, when you type words in a cell, they line up on the left side. But when you put numbers, they go to the right. If you want to give your content some breathing room away from the cell edges, you can use indentation. You can push text a bit to the left or right inside a cell. Let’s learn how to increase or decrease indent in Excel by using the Ribbon.
How to Increase Indent in Excel using Ribbon?
Steps to increase indent in Excel using Ribbon:
- Select Cells: Begin by choosing the cells or range of cells where you wish to increase the indent.
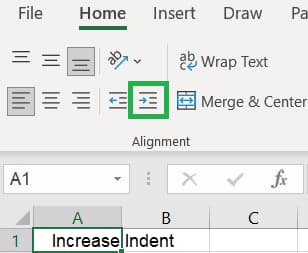
- Increase Indent Button: Within the ‘Alignment’ group on the ‘Home’ tab, locate the ‘Increase Indent’ button. The ‘Increase Indent’ button usually displays a right-facing arrow with lines beneath it. Click on the ‘Increase Indent’ button to increase the indentation of the selected cells.
- Increase Multiple Levels: You can increase the indent further by clicking the ‘Increase Indent’ button multiple times. Each click will add another level of indentation to the selected cells.

How to Decrease Indent in Excel using Ribbon?
Steps to decrease indent in Excel using Ribbon:
- Select Cells: Select the cells or range of cells where you wish to decrease the indent.
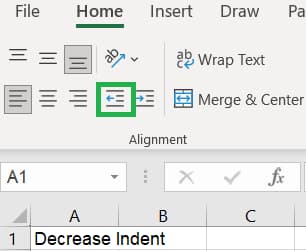
- Decrease Indent Button: Within the ‘Alignment’ group on the ‘Home’ tab, locate the ‘Decrease Indent’ button. The ‘Decrease Indent’ button usually displays a left-facing arrow with lines beneath it. Click on the ‘Decrease Indent’ button to decrease the indentation of the selected cells.
- Decrease Multiple Levels: You can decrease the indent further by clicking the ‘Decrease Indent’ button multiple times. Each click will remove extra level of indentation to the selected cells.

How to Increase or Decrease Indent in Excel using Format Cells?
Steps to increase or decrease indent in Excel using Format Cells:
- Select Cells: Select the cells where you wish to increase the indent.
- Alignment Group: Within the ‘Alignment’ group on the ‘Home’ tab, click on the Alignment laucher. Alternatively, use the keyboard shortcut Ctrl + 1 (or right click on Cell and select “Format Cell”) to get the Format Cell dialog box and then go to ‘Alignment’ group.
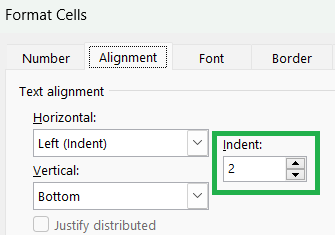
- Indent: Under ‘Alignment’ group, go to ‘Text alignment’ section and then ‘Indent’.
- Increase or Decrease Indent: Under ‘Indent’ section, you can increase or decrease the indent between 0 to 250. By default it will be zero (0) and you can increase indent by typing manually or clicking the up arrow button near to it. Similarly, once the indent is increased then you can reduce by clicking the down arrow button near to it or type manually.

How to Increase or Decrease Indent in Excel using Shortcuts?
The keyboard shortcut keys to increase or decrease indent in Excel are:
Conclusion
In Excel, think of indenting as adjusting the starting space within a cell. It’s like pushing text a bit to the right or left to make it neater and easier to follow. It’s super handy because it helps to make your information easier to read and keeps things neat and organized in your spreadsheets.
Learn More
» How to Rotate Text in Excel (Text Orientation)?
» How to Merge and Unmerge Cells in Excel?
» How to use Shrink to Fit in Excel?
» How to use Wrap Text in Excel?
» How to Format Alignment in Excel?

Excel Tutorial Part 1 (Basic)
» Excel Home
» Excel Basics
» Excel Workbook
» Excel Template
» Excel Cell
» Excel Password
Excel Tutorial Part 2 (Format)
» Excel Clipboard
» Excel Format Font
» Excel Format Alignment
» Excel Format Number
» Excel Border
» Excel Conditional Formatting
Excel Tutorial Part 3 (Data)
» Excel Sort Data
» Excel Filter Data
» Excel Text to Columns
» Excel Data Validation
» Excel Flash Fill
» Excel Remove Duplicates
» Excel Relationships
» Excel Consolidate
» Excel What-If Analysis
» Excel Group
» Excel Charts
» Excel Table
» Excel PivotTable
Excel Tutorial Part 4 (Find)
» Excel Find and Replace
» Excel Go To
» Excel Select Objects
» Excel Selection Pane
Excel Tutorial Part 5 (Review)
» Excel Spell Check
» Excel Smart Lookup
» Excel Translate
» Excel Comments & Notes
» Excel Protect
» Excel Hide Ink
Excel Tutorial Part 6 (View)
» Excel Workbook Views
» Excel Formula Bar
» Excel Zoom
» Excel Window
» Excel Macros
Excel Tutorial Part 7 (Fx)
» Excel Formulas (Category)
» Excel Formulas (Alphabetical)
» Excel Errors
» Excel Name Manager
» Excel Formula Auditing
» Excel Watch Window
» Excel Calculation Options
Excel Tutorial Part 8 (Other)
» Excel Add-ins
» Excel Shortcuts

0 Comments