How to Rotate Text in Excel (Text Orientation)
You can rotate text in Excel or change text orientation to improve the clarity and visual appeal of the spreadsheets. Whether you’re designing tables, charts, or reports, text rotation provides flexibility for showcasing information, resulting in improved organization and understanding. This feature allows users to tilt text at different angles, catering to diverse layout choices and maximizing space efficiency. Let’s explore the realm of text rotation in Excel and uncover how it can enhance the display of your data.
How to Rotate Text in Excel using Ribbon?
There are multiple angles to rotate the text diagonally or vertically in Microsoft Excel. Follow the below steps to rotate text in Excel using Ribbon:
- Select Cells: Click on the cell or range of cells containing the text which you want to rotate.
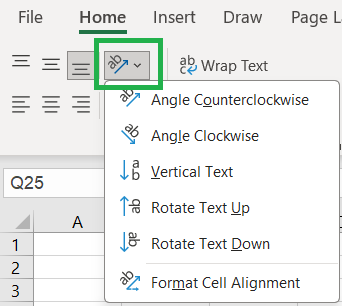
- Navigate to Orientation: Within the ‘Alignment’ group on the ‘Home’ tab, locate the ‘Orientation’ button. There 5 different types of rotation options available under the ‘Orientation’ button and those are:
- Angle Counterclockwise
- Angle Clockwise
- Vertical Text
- Rotate Text Up
- Rotate Text Down
- Apply Rotation: Select the rotation option or angle that you prefer by clicking on it. Then, the text in the selected cell(s) will be rotated accordingly.

How to Rotate Text in Excel using Format Cells?
Follow the below steps to rotate text in Excel using Format Cells:
- Select Cells: Click on the cell(s) containing the text that you want to rotate. You can select multiple cells by holding down the “Ctrl” key while clicking on each cell.
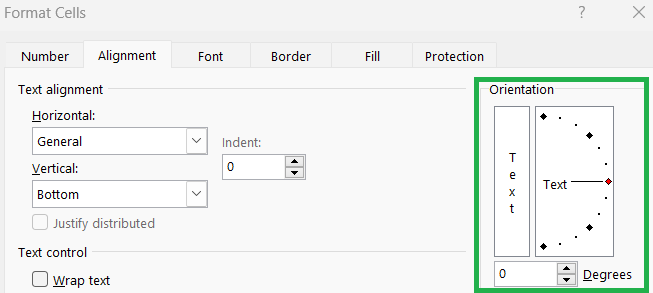
- Access Format Cells: Right-click on the selected cell(s) and select “Format Cells”, which will open the Format Cells dialog box.
- Navigate to Alignment Tab: In the Format Cells dialog box, navigate to the “Alignment” tab at the top. This tab controls the alignment and orientation of the text in Excel.

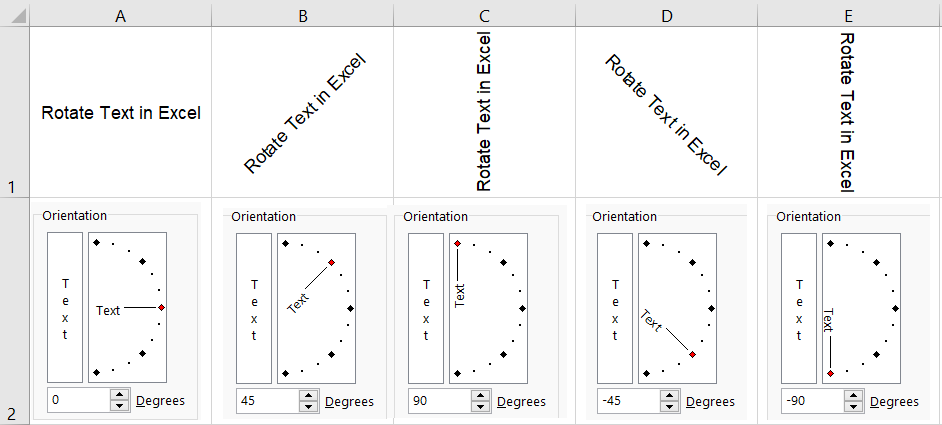
- Set Orientation: Under the “Orientation” section, you’ll see a box with a degree measurement. This box allows you to set the orientation of the text. You can drag the text direction line to change the degree. On the bottom of it, you can manually type the degree between -90 to +90 or click the up and down arrow button to increase and decrease the degree one by one.
- Apply Rotation: Once you’re satisfied with the orientation, click “OK” to apply the changes and close the Format Cells dialog box.

How to Rotate Text in Excel using Shortcuts?
The keyboard shortcut keys to rotate text in Excel are:
Conclusion
Whether you’re highlighting headings, structuring data, or injecting creativity into your documents, familiarity with Excel’s rotation features expands the potential for impactful data visualization. Through techniques like adjusting text orientation, customizing angles, and aligning text, users can customize their Excel sheets to suit their unique requirements and style preferences. With practice and exploration, individuals can leverage text rotation to communicate information more effectively, enhancing both their Excel proficiency and productivity.
Learn More
» How to Format Alignment in Excel?
» How to use Wrap Text in Excel?
» How to use Shrink to Fit in Excel?
» How to Merge and Unmerge Cells in Excel?
» How to Increase or Decrease Indent in Excel?

Excel Tutorial Part 1 (Basic)
» Excel Home
» Excel Basics
» Excel Workbook
» Excel Template
» Excel Cell
» Excel Password
Excel Tutorial Part 2 (Format)
» Excel Clipboard
» Excel Format Font
» Excel Format Alignment
» Excel Format Number
» Excel Border
» Excel Conditional Formatting
Excel Tutorial Part 3 (Data)
» Excel Sort Data
» Excel Filter Data
» Excel Text to Columns
» Excel Data Validation
» Excel Flash Fill
» Excel Remove Duplicates
» Excel Relationships
» Excel Consolidate
» Excel What-If Analysis
» Excel Group
» Excel Charts
» Excel Table
» Excel PivotTable
Excel Tutorial Part 4 (Find)
» Excel Find and Replace
» Excel Go To
» Excel Select Objects
» Excel Selection Pane
Excel Tutorial Part 5 (Review)
» Excel Spell Check
» Excel Smart Lookup
» Excel Translate
» Excel Comments & Notes
» Excel Protect
» Excel Hide Ink
Excel Tutorial Part 6 (View)
» Excel Workbook Views
» Excel Formula Bar
» Excel Zoom
» Excel Window
» Excel Macros
Excel Tutorial Part 7 (Fx)
» Excel Formulas (Category)
» Excel Formulas (Alphabetical)
» Excel Errors
» Excel Name Manager
» Excel Formula Auditing
» Excel Watch Window
» Excel Calculation Options
Excel Tutorial Part 8 (Other)
» Excel Add-ins
» Excel Shortcuts

0 Comments