How to use Shrink to Fit in Excel
The Shrink to Fit in Excel is a formatting feature that allows users to adjust the size of their spreadsheet’s content to fit within a cell. The Shrink to Fit in Excel is a handy tool that automatically resizes the text within a cell to ensure that it fits without overflowing into adjacent cells or getting cut off. Whether dealing with lengthy labels, expansive datasets, or simply striving for a more polished presentation, the Excel Shrink to Fit offers a convenient solution for optimizing readability without sacrificing content. By dynamically adjusting text size, Excel users can maintain clarity and coherence in their spreadsheets, enhancing overall usability and effectiveness.

Why to use Shrink to Fit in Excel?
The Shrink to Fit in Excell allows the user to keep all the text inside the cell without changing the cell size. It will not change the cell height or width but will make the data fit in the cell. The benefits of Excel shrink to fit feature are:
- Avoiding Tedious Font Size Trials: Simplify your Excel experience by steering clear of the hassle of experimenting with various font sizes to fit text into cells.
- Shrink Text for Perfect Fit: When altering the font size or style across your sheet or selected cells, employ the “shrink” feature. This ensures that text remains scaled down to snugly fit within cells, saving you time and effort.
- Maintain Appearance While Saving Space: Retain the desired size for your cells and columns without compromising on appearance. Even if text is shrunk, you can keep cells and columns at the preferred size, maintaining a neat and organized layout.
- Dynamic Text Adjustment: After shrinking text, freely adjust cell sizes as needed. The shrunken text will dynamically resize itself to perfectly fit within the modified cell dimensions, maintaining readability and presentation.
How to Shrink Text to Fit in Excel?
Follow the below steps to shrink text to fit a cell in Excel or to enable Shrink to Fit in Excel:
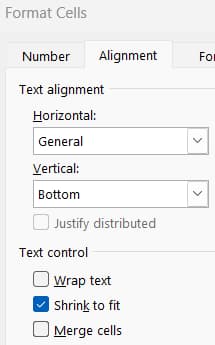
- Select the cell(s), pess Ctrl + 1 or right click on Cell and select Format Cell.
- Go to the Alignment tab and Text Control section. Tick the Shrink to fit option to apply the format.

What is the Shortcut for Shrink to Fit in Excel?
For Shrink to Fit in Excel, you can use the keyboard shortcut key Alt + H + FA and then Alt+ K in Windows. There is no direct shortcut key to enable Shrink to Fit in Excel in Windows or macOS.
What is the difference between Wrap Text and Shrink to Fit in Excel?
While both Wrap Text and Shrink to Fit features offer to format alignment in Excel, users may sometimes find it challenging to determine which feature to utilize for optimal results. Therefore, understanding the difference between Wrap Text and Shrink to Fit is essential for effective formatting.

Let’s find out Wrap Text vs Shrink to Fit:
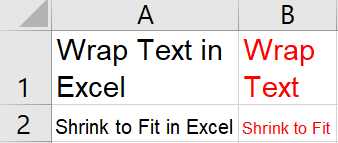
- Cell Height and Width: The Wrap Text adjusts the height of a cell to accommodate all the text within it, whereas the Shrink to Fit decreases the size of text within a cell to ensure that all content fits within the width of the cell.
- Font Size: The Wrap text maintains the original font size and layout of the text, whereas the Shrink to Fit adjusts the font size to fit the text within the cell.
- Appearance: The Wrap text allows the text to flow automatically onto multiple lines within the cell without changing the apperance, whereas the Shrink to Fit alters the appearance of the text to accommodate the available space.
- Uses: The Wrap text is useful when dealing with lengthy content that needs to be fully visible within a cell. Whereas the Shrink to Fit is handy when working with data sets or tables where maintaining a consistent cell size is essential.
How to Remove Shrink to Fit in Excel?
To remove or turn off Shrink to Fit in Excel,
- Right click on Cell in which you want to remove Shrink to Fit and select Format Cell.
- Go to the Alignment tab and Text Control section. Untick the Shrink to fit option to remove the format.
Conclusion
In short, using the Shrink to Fit feature in Excel is like having a magic tool for making sure your text looks good in cells. It automatically adjusts the size of the text so that everything fits neatly, even if the cell space is tight. This makes your data easier to read and ensures that important stuff doesn’t get cut off. Whether you’re making financial reports, schedules, or tables, Shrink to Fit is a handy for making your Excel sheets look clean and professional without any hassle. It’s a simple yet powerful way to make your spreadsheets more visually appealing and user-friendly for all sorts of tasks.
Learn More
» How to Merge and Unmerge Cells in Excel?
» How to Increase or Decrease Indent in Excel?
» How to Rotate Text in Excel (Text Orientation)?
» How to use Wrap Text in Excel?
» How to Format Alignment in Excel?

Excel Tutorial Part 1 (Basic)
» Excel Home
» Excel Basics
» Excel Workbook
» Excel Template
» Excel Cell
» Excel Password
Excel Tutorial Part 2 (Format)
» Excel Clipboard
» Excel Format Font
» Excel Format Alignment
» Excel Format Number
» Excel Border
» Excel Conditional Formatting
Excel Tutorial Part 3 (Data)
» Excel Sort Data
» Excel Filter Data
» Excel Text to Columns
» Excel Data Validation
» Excel Flash Fill
» Excel Remove Duplicates
» Excel Relationships
» Excel Consolidate
» Excel What-If Analysis
» Excel Group
» Excel Charts
» Excel Table
» Excel PivotTable
Excel Tutorial Part 4 (Find)
» Excel Find and Replace
» Excel Go To
» Excel Select Objects
» Excel Selection Pane
Excel Tutorial Part 5 (Review)
» Excel Spell Check
» Excel Smart Lookup
» Excel Translate
» Excel Comments & Notes
» Excel Protect
» Excel Hide Ink
Excel Tutorial Part 6 (View)
» Excel Workbook Views
» Excel Formula Bar
» Excel Zoom
» Excel Window
» Excel Macros
Excel Tutorial Part 7 (Fx)
» Excel Formulas (Category)
» Excel Formulas (Alphabetical)
» Excel Errors
» Excel Name Manager
» Excel Formula Auditing
» Excel Watch Window
» Excel Calculation Options
Excel Tutorial Part 8 (Other)
» Excel Add-ins
» Excel Shortcuts

0 Comments