How to use Wrap Text in Excel
The wrap text in Excel is a formatting feature that allows you to display cell contents on multiple lines within a single cell, instead of overflowing to other cells. This is helpful to improve readability, to ensure consistent column width across the entire worksheet, and to adjust the layout for better printing.
Let’s learn about wrap text in Excel in detail step by step, the most common reasons for Excel wrap text not working and how to fix it.
Why to Wrap Text in Excel?
Before we use the wrap text in Excel, there are mainly 2 major issues which makes the wrap text feature so useful. Let’s understand these 2 issues with examples:
1. When you put too much data into a single cell and the cells to the right are empty, then the extra text overflows to next cells as shown in the below image.

2. When there is data in the next cell, the text gets cut off at the cell’s edge as shown in the below image.

Wrapping text in Excel makes your spreadsheet easier to read and look better. Here’s why its important to know why to use the wrap text in Excel:
- Improves Readability: Long text in Excel cells can often get cut off and make it difficult to read the entire contents. By using the wrap text, it is visible within the cell easily.
- Maintains Cell Size: Expanding column widths in Excel to fit long text can mess up your whole spreadsheet’s layout. Text wrapping helps you keep the column width slim while showing all the text neatly inside the cell.
- Clarity in Presentation: When you’re showing data to others, like in reports or presentations, it’s important to make sure your information is crystal clear. Wrapped text in Excel stops important information getting cut off or hidden, making your documents look more professional and clean.
- Preserves Data Integrity: Text wrapping ensures that none of your data is lost or disturbed. Cutting off text can lead to misinterpretation or misunderstanding of the information presented in the spreadsheet. So, the Wrap text in Excel helps the user to maintain the integrity of the data.
- Flexibility in Formatting: In Excel, wrapping text lets you format your text in different styles like bold, italic, or colored, without the risk of text spilling over. This feature helps you make your spreadsheet look just the way you want while making sure all your text is easy to see.
- Consistency Across Devices: When you send Excel files to others or use them on different devices, text wrapping makes sure that all the text fits neatly in the cells, no matter the screen size or resolution. This helps keep everything looking the same, so everyone sees the data in the same way without any formatting issues.
How to Wrap Text in Excel?
There are two methods to wrap text in Excel and those are:
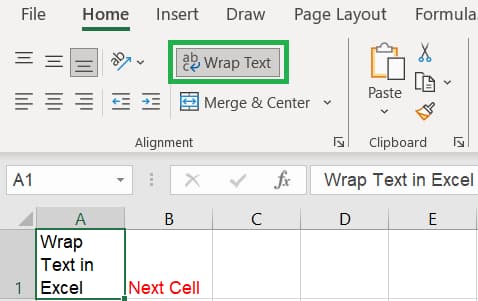
Method 1 (Ribbon): Select the cell, go to the Home tab > Alignment group, and click the Wrap Text button.

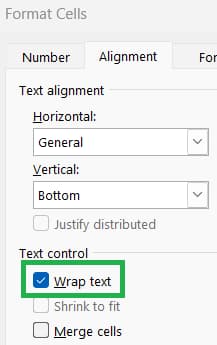
Method 2 (Format Cell): Select the cell, press Ctrl + 1 (or right click on Cell and select Format Cell), and click on Wrap Text under Text Control.

Method 3 (Shortcut): The keyborad shortcut key to wrap text in Excel is Alt + H + W in Windows.
Why Wrap Text in Excel is Not Working?
In Excel, the Warp Text feature helps text fit nicely into cells without overflowing. It’s designed to be user-friendly, but if you encounter any issues with Excel wrap text not working, below are some tips to fix it:
AutoFit Row Height and Column Width
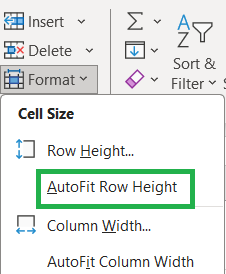
If the wrap text in Excel is not showing all text in a cell, it’s probably because the row isn’t tall enough or column width isn’t sufficient. To solve this, just click on the cell with the issue, go to Home tab, then under Cells group, click on Format, followed by AutoFit Row Height to fix the row height automatically and click on AutoFit Column Width to fix the column width automatically. That should do the trick!

Manually Adjust Height and Width
You can also adjust the row height and column width manually by increasing or decreasing it. You can manually drag the row and column or right click on the cell and click on column width amd row height to adjust with values.
Conclusion
When you wrap text, it means that even if your text is too long for one cell, Excel will make sure it’s shown properly without you having to adjust cell sizes. This is really handy when you’re working with financial reports, making schedules, or creating presentations because it helps you organize information neatly. Using text wrapping doesn’t just make your spreadsheets look better; it also makes it easier for others to understand what you’re trying to show them.
Learn More
» How to use Shrink to Fit in Excel?
» How to Merge and Unmerge Cells in Excel?
» How to Increase or Decrease Indent in Excel?
» How to Rotate Text in Excel (Text Orientation)?
» How to Format Alignment in Excel?

Excel Tutorial Part 1 (Basic)
» Excel Home
» Excel Basics
» Excel Workbook
» Excel Template
» Excel Cell
» Excel Password
Excel Tutorial Part 2 (Format)
» Excel Clipboard
» Excel Format Font
» Excel Format Alignment
» Excel Format Number
» Excel Border
» Excel Conditional Formatting
Excel Tutorial Part 3 (Data)
» Excel Sort Data
» Excel Filter Data
» Excel Text to Columns
» Excel Data Validation
» Excel Flash Fill
» Excel Remove Duplicates
» Excel Relationships
» Excel Consolidate
» Excel What-If Analysis
» Excel Group
» Excel Charts
» Excel Table
» Excel PivotTable
Excel Tutorial Part 4 (Find)
» Excel Find and Replace
» Excel Go To
» Excel Select Objects
» Excel Selection Pane
Excel Tutorial Part 5 (Review)
» Excel Spell Check
» Excel Smart Lookup
» Excel Translate
» Excel Comments & Notes
» Excel Protect
» Excel Hide Ink
Excel Tutorial Part 6 (View)
» Excel Workbook Views
» Excel Formula Bar
» Excel Zoom
» Excel Window
» Excel Macros
Excel Tutorial Part 7 (Fx)
» Excel Formulas (Category)
» Excel Formulas (Alphabetical)
» Excel Errors
» Excel Name Manager
» Excel Formula Auditing
» Excel Watch Window
» Excel Calculation Options
Excel Tutorial Part 8 (Other)
» Excel Add-ins
» Excel Shortcuts

0 Comments